Create quick diagrams and Wireframes using Excalidraw + VSCode

There are probably tons of both diagramming tools as well as wireframing tools out there. And I have been using most of those throughout my profession.

I want to talk about my recent favorite “excalidraw” that I made it a quick-note style using its Visual Studio Code extension and some bash + Alfred automation on mac (that can be easily replicated in other OSes).

Let’s start with what Excalidraw is…

Excalidraw is an open-source, react-based, web-based drawing tool. It comes with a limited set of functions in a minimal control panel but the batteries-included for all you need – for what it does in my opinion.

It’s a diagramming app after all. But not just that.

It’s Open source

https://github.com/excalidraw/excalidraw

It’s portable – No app is required

Available at https://excalidraw.com/

It stores and auto-saves your open file in the local storage.

It also has some collaborative online real-time editing mode which is awesome.

Saves editable copy inside share-ready PNG or SVG files

A very smart thing excalidraw does is save its editable meta in PNG or SVG exported/saved file. It definitely makes the file size larger, if you are using a lot of bitmap icons, screenshots, and all. If not, the png file you save and slap in slack, emails are actually going to be excalidraw openable and editable.

The easiest way to do this without any option is to name your file with .excalidraw.png or .excalidraw.svg extension. When opening this file with excalidraw online or VSCode, it will automatically open the editable version in less than a second. You make edits and just save…

Embeddable

If you are developing a react-based application, you can actually embed excalidraw as part of your app and provide diagramming support.

import { useState, useEffect } from "react";
export default function IndexPage() {
  const [Comp, setComp] = useState(null);
  useEffect(() => {
    import("@excalidraw/excalidraw").then((comp) => setComp(comp.default));
  }, []);
  return <>{Comp && <Comp />}</>;
}

https://www.npmjs.com/package/@excalidraw/excalidraw

Have a component library with everything you’ll need

https://libraries.excalidraw.com/

VSCode Extension

Even though I love it runs on the browser and auto-saves. I prefer to have this ready under my toolkit offline or faster open/edit/save files.

If you are a developer, good chance that you are using vscode daily – Or if you don’t, vscode is a very lightweight editor that is worth to use it only for excalidraw. For the ones who uses vscode actively, this means no extra tool is needed. Both vscode and excalidraw renders very fast and don’t use much system resources.

Another magic feature I like using excalidraw in its VSCode extension is that you just open .excalidraw.png (or svg) files by dragging and dropping them in vscode, making edits, and save. No export/re-export is needed. You can just use the saved PNG which includes both the final rendered PNG and the source content in the same file.

This also makes a lot of sense for teams who use their codebase to document their stuff in markdown files. Excalidraw diagrams are the perfect companion for CVS-stored documentation.

Quick Create Digram

A final trick I do that makes my day-to-day very convenient is, having a shortcut to create an empty excalidraw.png file on my desktop and open it in VSCode, so I can start diagramming or wireframing in seconds without needing to open the wireframe app, create a new empty project or file…

The way I do this is by having a bash alias that is registered in my dotfiles/my-aliases: ned abbreviation of “New Excalidraw file on Desktop”.

function ned(){
  OLD_IFS="$IFS"
  IFS='-'
  NED_FILE="$HOME/Desktop/$*.excalidraw.png"
  IFS=$OLD_IFS
  echo "Created $NED_FILE"
  touch $NED_FILE
  code $NED_FILE
}

Then calling this alias either from the command line (if I’m already there) or by using an Alfred custom workflow that calls the same bash alias.

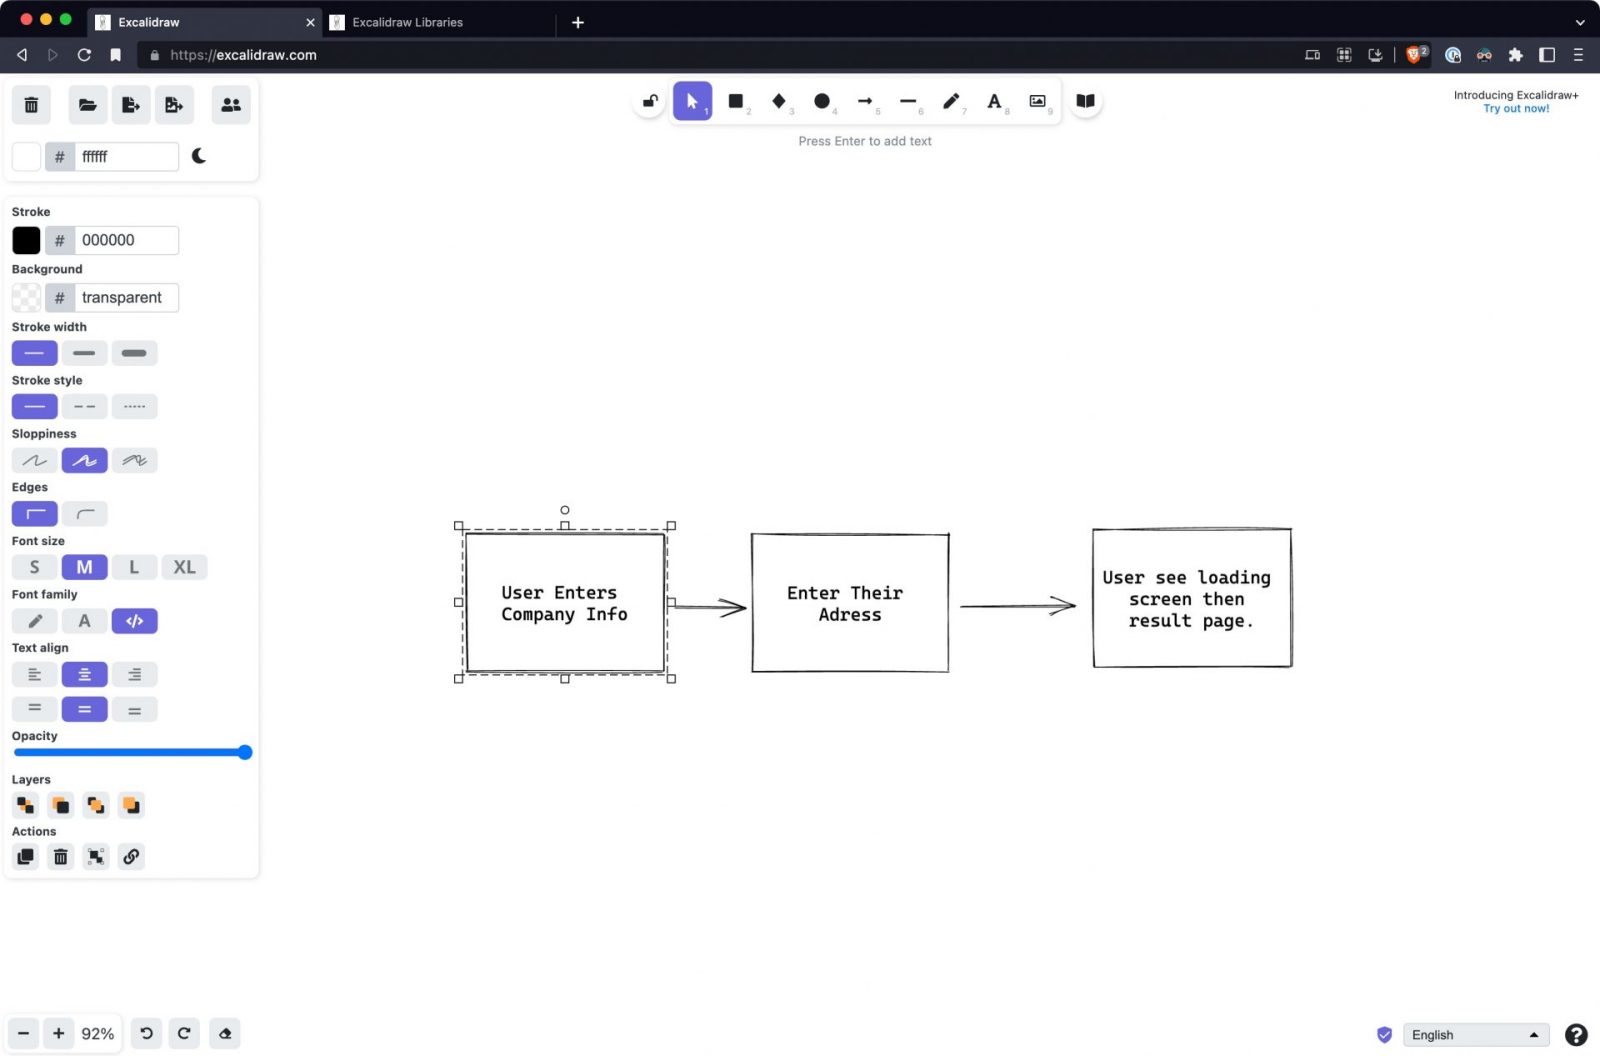
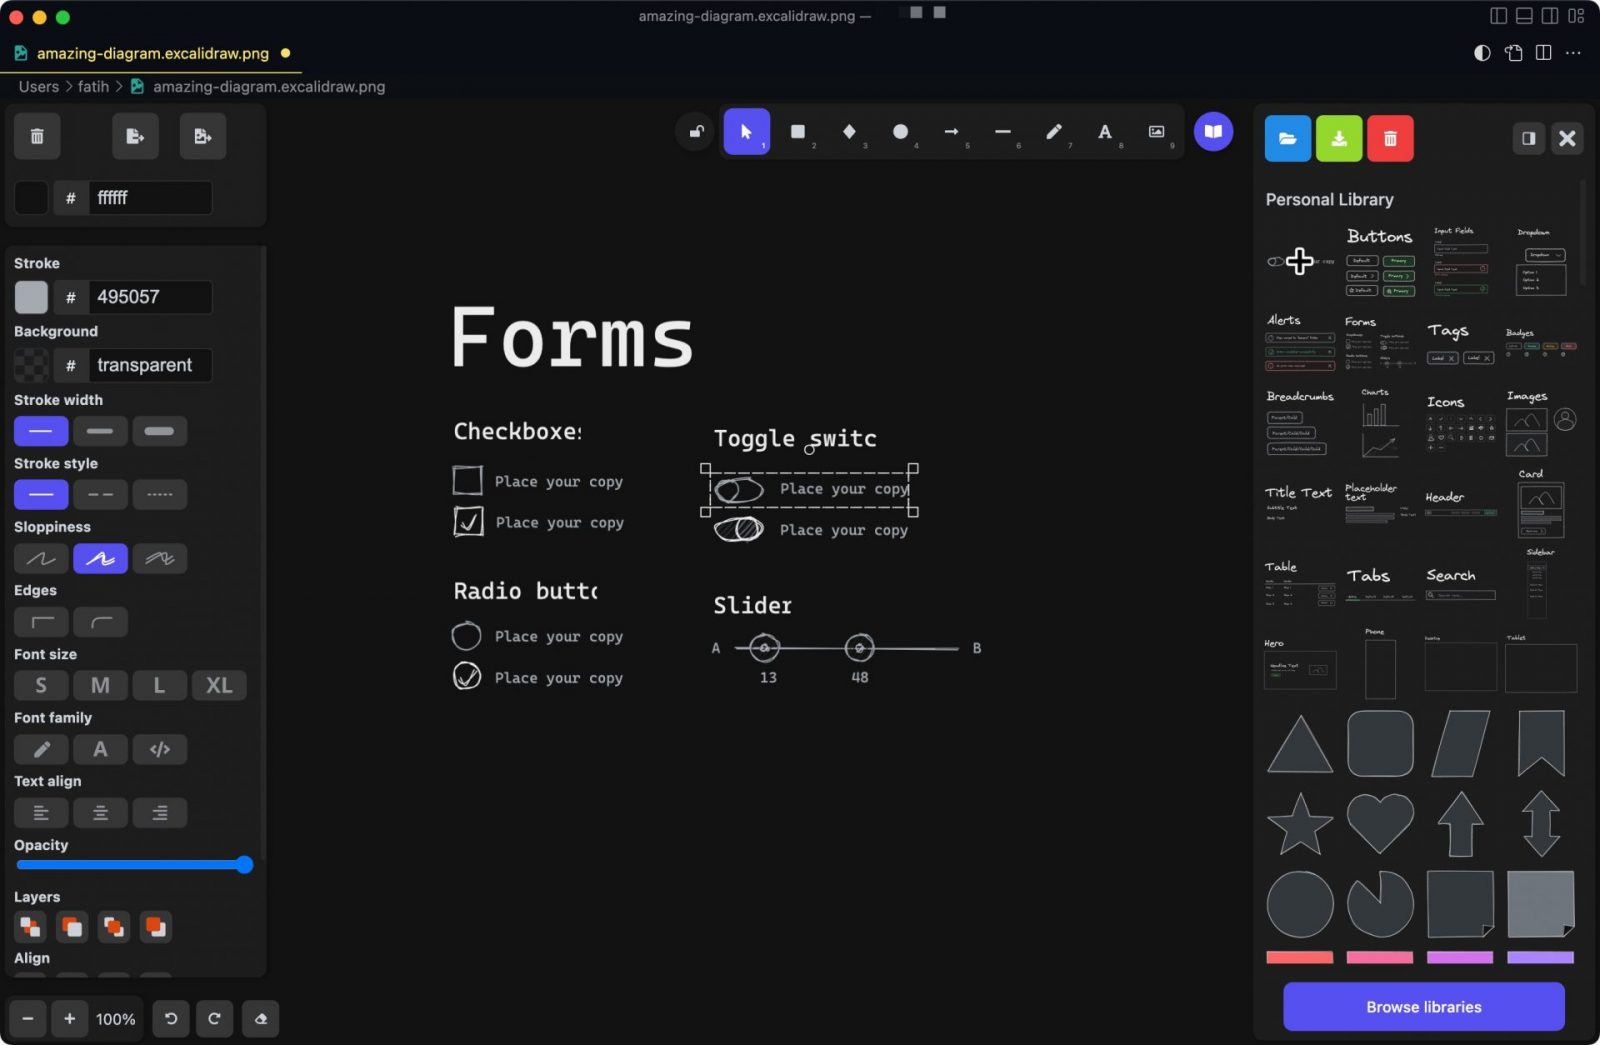
Then viola, start dropping things from my library and quickly wireframing an idea I’m thinking:

And finally, just save and share the png file in your favorite way…

Happy diagramming, wireframing ✍️

Better CMD+R – Improved command line history using Atuin

Atuin is a command line utility that replaces your existing shell history with a SQLite database.

Atuin also integrates with your shell history keyboard shortcuts to quickly navigate in your command line history.

Atuin supports multiple different types of search, from prefixes to fuzzyFast.

It also provides optional and fully encrypted synchronization of your history between devices.

Check it out here: https://atuin.sh

Github page is the most important place as a developer and here is why it is so important

Github is an amazing community and became how we host, share, and showcase our work as developers. It became a unanimous home to the open source community. Github does not stop amazing me every day.

A developer’s Github profile has now become THE source of how hiring decisions are informed. Many recruiters also do their research based on your github profiles. Certainly for developers but also for non-developer roles, especially on the technical roles like data scientists, technical product managers also should be paying a lot of attention to their github profiles.

At a glance, your profile tells things like, how many repositories you have, what is your public (open source) contributions are, and how much reaction you received for your projects (stars). But a bit deeper, here are a few bullet points I compiled from what I read on this topic/discussions, that what Engineering (Hiring) Manager or a Technical Recruiter will be looking for:

  • Are the projects well organized…by looking at the directory structure naming, can I get a sense of the architecture/design – it is easy to figure out where to go in the project to locate the various functional areas and layers.
  • Do projects have clear README and contribution guidelines written out clearly? Do you have good communication and documentation skills?
  • Does the first thing I see (the README) clearly describe the project e.g. what it does, how to run and build it etc?
  • Is the code clean, easy to read, and commented appropriately?
  • Is there an organized branching/tag process being followed, e.g. gitflow
  • Is there some sense that the person understands basic design patterns?
  • Does the project leverage existing open source libraries and frameworks (good) or does the code re-solve common problems/routines (bad)
  • Forks of other repos on which you have made pull requests (don’t worry about whether they’ve been accepted or not).
  • Do I see replicated code i.e. do I see obvious ‘cut and paste’ and ‘repeating myself’ code (bad)
  • ARE THERE TESTS!!!! There should be a test harness and if I run it (because the README told me how to run them), the tests should pass. This is a big one for me. If I don’t see tests, the very first question I will ask will be ‘how do/did you test this code’ and your answer will be ‘manually’ which of course means you don’t test!! IMO, professional quality code includes some level of unit/integration testing delivered along with it.
  • I am less concerned with what the project does, more concerned that it was developed professionally. I look for commercial quality code… will others be able to take the project and easily enhance/maintain it.

You should be pinning some of the projects that you think it reflects your best professional work. Aside of pinning these example projects, let’s talk about pimping up your profile view. This does not mean throwing every github markdown feature you find online in your profile view. You need to be really mindful of what you are showing on your profile. It has to be meaningful. Don’t put HTML/CSS or Word/Excel badges. Your goal is to get a recruiter interested in reading more of your profile and projects. So the purpose of this practice is to make your profile more skimmable.

Generally, I like the profiles that cut to the chase that kind of quickly show me which tech stack you know and like. Programming Languages, database engines, operating systems, cloud providers, or services that you can work with.

But we are human, and we also want to talk about who we are. A recruiter will not only be looking at our skills but also try to understand our culture fit.

To make it more human:

### Hi there 👋
* 👂 My name is ...
* 👩 Pronouns: ...
* 🔭 I’m currently working on ...
* 🌱 I’m currently learning ...
* 🤝 I’m looking to collaborate on ...
* 🤔 I’m looking for help with ...
* 💬 Ask me about ...
* 📫 How to reach me: ...
* ❤️ I love ...
* ⚡ Fun fact: ...

Here are a few other tricks that may help you to convey what I talked about.

Make it collapsible

<details>
    <summary><b>✨About Me</b></summary><br/>
    Laboris id veniam velit sint exercitation ut amet aliquip sit.
    Enim eu velit aliquip enim ex dolore culpa eu ut esse veniam
    aliquip pariatur sint.
</details>

Add badges to make it more colorful using shileds.io

https://shields.io/ is a great project to embed image badges to your github profile. You can add dynamic badges like Twitter followers, github repos, and more. Or you can create custom labels for pretty much anything.

Here is a page that compiles ready-made badges using shields.io that is copy/paste ready: https://github.com/Ileriayo/markdown-badges

Embed Github Stats

A beautiful project to visually communicate your github activity like your stats, the languages your repositories contain https://github.com/anuraghazra/github-readme-stats

<img src="https://github-readme-stats.vercel.app/api?username=mfyz&show_icons=true" />

Most Used Languages

<img src="https://github-readme-stats.vercel.app/api/top-langs?username=zluvsand&layout=compact"/>

Get Inspiration

There are a thousand ways to customize your github profile using many fun and creative tools people created for this purpose. The best way to learn and see it is to explore example github profiles. Spend some time to browse a dozen or two here: https://github.com/coderjojo/creative-profile-readme

How Google had almost 10 years’ head start on voice assistants and lost its competition to Amazon

This is one of the areas that I get angry at Google where it used to be leading this category and clearly fell behind in the competition.

Voice assistants are not new. Google introduced dictation and voice assistants in the Android ecosystem many years ago. I remember using dictation very well on Android keyboards to write some of my blog posts. Similarly, we were seeing Google Assistant years before Siri or Alexa existed. Yes, maybe it had much simpler capabilities but Google was the first mover in the category – like many other verticals.

It is saddening why Google didn’t or couldn’t push it forward. Instead, it stayed relatively stagnant technology for Google.

Looking at the competition; Apple is definitely not taking Siri into priority as usual. Siri is still, much of a closed ecosystem on the Apple side.

On the other hand, we’re seeing Alexa, despite its focus on shopping features, is advertised well. Every other month, Amazon is launching more experimental hardware to support Alexa in any possible physical space. It is clear that Amazon has a clearer vision of its Alexa product.

Separate from the marketing efforts, there is a more open path for developers to integrate and interact with Alexa. In my experiments as a developer playing with both Alexa and Google Home devices in their early days, I can say it was easier to build stuff around Alexa devices. Although Google APIs and integrations were pretty close.

One thing Google should be taking is its voice assistants much more seriously because it can be a big vulnerability for Google than it looks.

One can argue that voice assistants are the next big thing that will (and already did in some parts), replace how we interact with our devices.

Consider tomorrow Apple decides to launch Siri web results and makes it the default search engine in Safari – probably with a few more impressive voice-initiated search (you can kinda do something similar today, with tapping the search box and using dictation on the keyboard – or actually directly asking Siri). We had seen a similar “oh it won’t happen, people will stick with Google” when Apple Maps launched. We saw people didn’t change the OS defaults. I can’t tell a percentage but if I had to guess, Google took a hit when that happened. And certainly, it can happen – maybe even bigger – on the search side.

The same can apply to Alexa as well. Maybe with less impact, since Amazon is not too present on our mobile screens. But Apple is.

Google Home is still my favorite screen-less voice assistant device in my home. And I really enjoy hearing about new improvements Google launches about its voice assistant in general. I’m hoping we’ll hear more interesting stuff from Google on this front in the future.

Static Site hosting with Cloudflare Pages

Cloudflare Pages

I wrote about my fascination and falling in love more with other Cloudflare services recently. Cloudflare started as a DNS proxy service with caching and security features but then expanded into more capabilities like workers, domains and static website hosting with the Cloudflare Pages service.

There are thousands of hosting solutions out there, some free as well. But I really liked playing with Cloudflare Pages because of a few key features. Non of these features are unique or exclusive to Cloudflare but combination of them makes perfect candidate if you are already using other cloudflare services or if you currently don’t have a go-to solution when you want to bootstrap something and put it out there quickly.

It makes perfect candidate for developers to use it as experimenting tool. Don’t get me wrong, this service is production-ready and probably one of the best ones out there. But ease of making deployments makes it great for using it as playground.

Probably fastest (network) load times you can get

Cloudflare Network

Cloudflare edge network and CDN may be the widest distributed network of servers get your content and app closest possible to your users throughout the globe. When it comes down to the speed, they are great at doing what they do. And we’re speaking static hosting which goes well with the high quality CDN that your users will get the lowest latency and highest download speeds to your website’s resources. And you get snappy website.

Git integrated deployments

Cloudflare Pages are exclusively deployed by git/github integration. You have to put your assets (or pre-build app) in a repo and connect to cloudflare pages when you create a new project.

Cloudflare listens pushes to certain branches where you can directly push changes or restrict your git workflow to work with merge/pull-requests. Eventually commits trigger the deployment builds.

These builds are not required. If you have index.html in your repo, it gets deployed served right away. But if you are using a build process, cloudflare pages will work with that easily.

Perfect for JAMStack apps

The build process makes cloudflare pages perfect for JAMStack apps. My go to stack is next.js to create plain/simple react.js based apps. Cloudflare pages plays well with next.js among with many other popular frameworks. 

Keep in mind that your JAMStack app, build process has to export static html/js/css assets that can’t be served by running a web server process. So your static output runs on CDN network and loads instantaneously.

Custom Domains

Cloudflare provides free subdomains with SSL by default when you set up a project and deploy a site. But you can configure your custom domains without much work for free with Cloudflare Pages. It also comes with managed flexible SSL out of the box.

Pricing

Cloudflare Pages is free to start. And their free tier ie pretty generous until you need to scale a lot. And even with the paid version is dirt cheap compared to the effort you have to put to scale and/or alternative services.

Conclusion

All-in-all, I loved playing with Cloudflare Pages. Again, it never cease to amaze me how much you can do for free with Cloudflare services including Pages. I highly recommend every developer to at least play with it and do a static site deployment to see how easy is to do it.

https://pages.cloudflare.com

Intro to Cloudflare Workers

maxresdefault.jpg

Cloudflare is never missing to amaze me. It’s a beautiful service with a lot of free versions of almost all of their services makes cloudflare a great experiment hub. 

Cloudflare started as a DNS proxy with adding security and “routing” features on to their service offerings in recent years. I almost 100% of the time use and suggest cloudflare if we are setting up a new website or taking over an existing web property. Cloudflare works like magic most of the time with very minimal setup.

I recently started playing and experimenting more with their relatively new service offering “workers”. Workers is basically distributed, serverless service that allows us to build lightweight back-end components. With it, you can serve static and dynamic web pages, create APIs for your front-end application without even thinking about hosting part of your site.

You simply set up your domain, set up workers and configure your “routes” for your workers. For instance, you can redirect all traffic going to “mfyz.com/about” url to be handled by workerA. And workerA can create dynamic or static responses to this request. You can do almost anything with the worker responding this request.

Check out the workers service page: https://workers.cloudflare.com/

As I mentioned above, Cloudflare Workers has a free tier with generous $100k requests a day. And their first tier is $5/mo pricing which makes it extremely affordable even in larger traffic. The free tier allows you to start playing with it right now.

I only wanted to introduce and talk about my opinion of the service on this article. So I’m not going to give examples or a tutorial. 

Here is a very good article with some examples (seems like it’s sponsored article that was probably supported/created by cloudflare team as of their service launch):
https://www.smashingmagazine.com/2019/04/cloudflare-workers-serverless/

Flareact

For react and nextjs lovers, there are ways to configure your nextjs app to run on cloudflare workers. But there is an open source project: Flareact, makes things much easier for the nextjs lovers. It’s not directly built on top of nextjs, so you wouldn’t use nextjs apis or components but they have almost all of the apis and components mirrored on this project that makes adaptation of your current nextjs app breeze.

Check out their documentation and tutorial here: https://flareact.com/

Cloudflare also likes to talk about this framework, worth to try: https://blog.cloudflare.com/rendering-react-on-the-edge-with-flareact-and-cloudflare-workers/

Google Sheets + Zapier is a perfect gateway for quick integrations when bootstrapping a new tool/service

When bootstrapping a new product, regardless of platform and solution is used in back-end and front-end, the time comes very quickly that you will need to integrate with 3rd party platforms to create continuity of the product’s user experience between different solutions.

As a good example of this, let’s say you bootstrapped a small SaaS product that helps users calculate their taxes. Your product is not going to be only the software solution you created but the whole experience from customer support to documentation or educational materials, perhaps some marketing experience when acquiring and onboarding your new users. So right off the bat, we will need a customer support solution, marketing tool. Perhaps a CRM-ish tool to use as our “customer master” database. And will want to channel everything there as much as we can.

But when someone signs up, your back-end only creates their user account, and their customer support record, CRM record, or marketing track is not connected. Most likely, these will be separate services like Intercom, Zendesk, Mailchimp, etc. And obviously, your own backend/database where your user’s initial records are created and their engagement with your core product happen.

I have planned and done these integrations many times over in different products and worked with many 3rd party services to integrate. Some niche solutions that I had to integrate don’t have proper APIs or capabilities. Setting some of these exceptions aside, most tools have integrations with well-known platforms like Salesforce, Facebook Ads, IFTTT, Slack. And as a common and growing theme, most tools also have integration with Zapier which is the main event I want to come to.

Eventually, I find myself evaluating Zapier Integrations between these platforms to cover most of the use cases we often spend days doing single integration. If the triggers and actions cover what we are trying to do, I started to suggest my clients and the rest of my team create Zapier focused integrations.

There is an easier way. A big majority of people working in the process/product/team management space use spreadsheets daily. Either Excel or Google Sheet covers that big majority of the use cases. I evangelize Google Sheets just because of its real-time collaboration and ease-of-access capabilities. It’s a free and large majority of people having google accounts making it very universal.

I have done direct google sheet integrations in the past many times. But recently I like the concept of using google sheet as a source that can be commonly used by other services for integration purposes. Since it’s a living document, it’s very easy to make changes on a document or listen to changes happening on documents (by human or APIs). This makes it an amazing candidate for using it with Zapier to use it as a “source” of data. It makes Zapier the magic glue here to serve as a universal adapter to anything else we want to connect to. Having thousands of services available in Zapier makes it a meeting ground for moving the data we provide through google sheet to anywhere else.

I need to say this will be limited based on each service’s capability and the available actions/triggers in the Zapier platform. But most SaaS solutions invest enough effort and time to make their Zapier integrations rich enough to serve the most common use cases. It won’t cover 100% of needs but it will certainly eliminate a lot of basic integrations like slack, email notifications, marketing tools triggers (i.e: follow-up campaigns).

This is not a code-less solution

When going down this route, the biggest work and challenge will be integrating Google Sheet APIs to connect your account (through the oAuth process), and store your credentials in your server and create the server → gsheet integration to send your back-end changes to a google sheet document. It’s not the easiest API to integrate with, but it’s well documented, mature, and has endless examples in the community (Github). And best of all, this one integration opens up so many without needing to do further integration. Even in the most basic products, we find ourselves doing slack, email deliveries in MVP versions. Investing the same effort in google sheet will easily justify itself later.

Trade offs

One big trade-off is to have your user’s PII data to be transported, stored in a google sheet (which will be private), and then sent to Zapier. If you are super paranoid or have to comply with certain privacy regulations, managing this traffic may need to be done more sensitively or completely unfeasible for your product. But the majority of products I built do not need that rigorous audit and compliance. So this solution has worked for me many times.

Example

I want to show a sample integration to set up a google sheet as a trigger and put a Slack notification as an action. Hopefully, this showcases some imagination and helps you understand where this can go.

Set up Google Sheet changes as “trigger”

Create a new zap or edit the existing one to change the “trigger” service. Select Google Sheets.
In the first step, you will be asked to select the google account linked to your zapier account. If you haven’t done it yet, or want to connect to another account than you currently have, you can do it in this step.

Group 1.jpg

 After selecting the account, Zapier will ask you to select what event you want to set this zap to listen to. Generally, we will inject a new row into a sheet in one of the documents. So we select “New Spreadsheet Row” as the event to listen to, but as you can see, you can select other events like updating a spreadsheet row or new worksheet creation in a document.

Screen Shot 2021-04-28 at 6.11.jpg

 Now you will need to select which document and which worksheet to listen to. Zapier will show document and sheet selection dropdowns here.

Screen Shot 2021-04-28 at 6.11-1.jpg

 As the final step, you will be able (and kinda have to) to test your trigger that will pull a sample row from your sheet. Make sure you enter values into your columns to use this sample data to set up your further actions in zapier. Zapier will show these sample values when you create actions using these values.

Group 3.jpg

Set up Slack as “action” to send a message to a channel

Now, we’ll use this trigger in any service we want. We can also create multiple actions where you can send an email and slack notification and create a new Intercom customer record at the same time in one zap.

For this example, in the “action” section we will select Slack service when asked.

First, we will select the type of “action” we want to perform. We will select “Send Channel Message”. You can select other actions like send a direct message or others.

Screen Shot 2021-04-28 at 6.09.jpg

Then, similar to Google sheet initial steps, we will first select the slack account we want to use.

Group 5.jpg

And finally, with seeing a lot of options, we will set up the sender name, avatar and other details, but most importantly, the channel we want the message to be sent to and the message content itself:

Group 4.jpg

 Zapier is pretty intuitive and simple to construct the smart content areas like this one. You will be able to both type a static message as well as insert the actual data (variables) from your source. In this example, our source is the google sheet document. So you will see a dropdown with search capabilities to search and find the actual column value you want to insert when you want to construct a message with dynamic parts.

Once everything is done, you will be able to finish this step and be forced to test the action you just set up. And all done! Don’t forget to turn the zap “on”.

This is just the most simple example I can use. There are many use cases you can allow this integration to push changes/data into thousands of services available in Zapier.

Happy Zaps!

Mobile internet on budget – Using tripmode or little snitch on mac to control your bandwidth usage when doing mobile internet hotspot

Editing with a View by Avi Richards

I talked about in certain years and months I travel extensively and have the issue of Having reliable internet while travelling every corner of the world.

My solution was to use a mobile modem (wifi) or my phone’s hotspot. But first and the biggest issue I face with that option is to hit package limits pretty quickly, or seeing dropbox eating 8gb in 10 minutes without me knowing it (yes, I realized I had a pretty good connectivity and noticed our designer has uploaded huge set of project assets and photoshop/illustrator files that ate up 8 GB when dropbox synchronized the files super quickly – damn fast mobile internet). Live and learn right?

After having few accidents to see my mobile internet package getting destroyed with few apps, updates and stuff that is transferred without me knowing them and doing the detective work to learn that I really didn’t need these apps to do those trasnfers while I’m on a “budget internet”. 

Then I started to look for solutions. At the end of the day, you want to stop an app (or a process) to access internet and continue doing their transfers. This is actually a “firewall”s job. 

Little Snitch

decide-immediately.png

In macOS, I’ve been using “little snitch” which is a fantastic firewall software that shows every single process that wants to connect to internet and I can investigate the process’ path, it’s software signature source (signed by ABC software studio for example) and the target domain, ip it wants to connect, then I can allow and disallow these. Little snitch also allows me to set separate rule sets for each wifi network that can be automatically switched based on the network name. I tried this but it was too much prompts and setting up stuff from scratch. Because I already spent a lot of time in the past (progressively) to have my current configuration that is designed for my home connection (that is configured for security in mind instead of bandwidth).

So I continued on my research to find something simpler that allows me to turn apps on and off for internet connectivity – almost same approach in mobile OSes that you can toggle permissions for certain things like location access, or mobile internet in cellular mode…

https://www.obdev.at/products/littlesnitch/

Trip Mode

ucarecdn.png

And I found Trip Mode. It’s a paid (but cheap) app that does this exactly the way I needed it. It appears as a menubar icon at top right and flashes when there is an app has connectivity. Then you see a simple list of apps/processes that you can toggle them. All apps are disabled to access internet by default, they you enable apps one by one as you needed it.

Trip Mode also shows the total bandwidth use per session as well breakdown of each app’s individual bandwidth use which is super helpful. It’s nice to see how much my 1 hour hangouts session ate after hang up.

https://tripmode.ch/

iPad Pro + Raspberry Pi = Portable development environment on mobile

When the first iPad pro 12“ came out, I was one of the first to buy (not in the line though). I owned pretty much all the previous generations of iPads and a big fan of the iPad to be a perfect replacement for the everyday stuff you do on a computer – quick google, watch stuff, check mail, listen, read…

I actually attempted to get my mom to learn computers back in the 2000s and had struggles for her to adapt. But the iPad I got for her was a perfect device for her to learn stuff with super intuitive OS and apps – also touch is such a natural behavior even though the idea of us keep touching and dragging out finders on glass is weird.

Back to my iPad pro experience. I really loved the device and within a month or two, I started to do my work primarily on iPad pro and ran an experiment of exclusive use of iPad pro as my “only” device – it lasted 7 months. I can say it was pretty successful as far as the stuff that I was doing in that period. I was mostly managing our projects, process, team. So my work was heavily on emails, Slack, Trello, quip, google docs, excel/word… Almost all of them had pretty damn good writing, editing experience on iPad (on iOS apps). So I was flapping my iPad pro cover keyboard in weird places with perfect mobility. To this day, I still seek that portability (with occasionally peeking surface pros 🙂 ).

But there were few deal-breakers. On top of the list was (and still is) to not have a low-level runtime environment for nodejs/npm, PHP, python. I also had some challenges on my product management tasks like being able to do low-level wireframes/mockups, sometimes touch the designs (it was mostly sketch back then). But for the sake of this article, let’s stay on the “development” part. It’s not all bad. There are isolated packaged environments for PHP and python and do their job to a certain level.

PHP

“Draftcode” (app) is emulating most PHP capabilities, so you can do some scripting work but not a fully-fledged development environment. But it can run a SQLite version of WordPress and other PHP apps with either remote database and API connections or simpler, file-based database systems like SQLite. Most popular frameworks use an ORM or database layer that can work with these databases along with My/PgSql.

Python

“Pythonista” is actually pretty well done. It’s almost full python runtime that you can run a lot of things, including package manager pip and well-known frameworks like Django (SQLite only though). But it’s still an isolated environment under the app’s own container. So no talking to other apps – yet iOS won’t let apps run daemons for long. You can run basic HTTP server like stuff but when it’s decided to kill or freeze the app, your deamon is gone too. So you have to rely on multitasking (split-screen keeping your server’s app running).

Nodejs 🙁

I code a lot of my stuff on nodejs. Writing JS (for any interface) is one of the most versatile ways to learn a method/library and re-use the same approach in almost all sides of digital programming (maybe not super low, hardware and OS level stuff). In my computer, when I set up my stuff for the first time, it’s one of the first things to make sure nodejs/npm/nvm is set up aside from the OS’ own package manager (or homebrew for OS). So I have a skeleton of what I use every day (on command line and UI) from these package managers.

But there is also a very thin line between being able to run a nodejs script with having nodejs ecosystem available. So we are not just talking about being able to run a nodejs application on its runtime. There are some initiatives on alternative javascript engines that can run on iOS. But again we will not have all the other goodies nodejs platform brings. Kinda similar to Pythonista and being able to run Python apps. But I don’t know the underlying differences why getting Python runtime with its other components was easier compared to Nodejs environment.

Long story short

From my go-to/favorite 3 development ecosystems, I failed to create a comfortable place within iOS (still same today). And there is the (no) filesystem. Today, there are files app and some convenience covered to access, read/write files in a commonplace within the OS. But not as convenient as a computer. So you can’t just open your favorite coding editor and start typing then switch to another app (let’s say git client) and push a button. It’s close, but not there yet.

A weird solution to the weird problem

When I first did the 7 months iPad Pro-only lifestyle. I had 2 remote machines I set up for myself. One of them was generic ubuntu from digitalocean ($5/mo) I had all of my real development happening here. I was using Coda for its great SSH client (recently moved to Blink). And I set up all the remote ssh tools and replicated my desktop command-line tools zsh, tmux, vim – first time created my dotfiles repo and still I use that with few helper scripts that basically syncs my command line configurations within multiple machines.

I also set up a mac instance from macstadium for Mac-only weird work like opening sketch files and trying to export stuff. This was pricy and not sustainable – I was paying $60/mo for that instance. I wouldn’t mind paying but the way to work on remote VNC/RDP is not fun. It requires a lot of bandwidth and trying to work with a mouse cursor on a touch screen is definitely bad. And iOS didn’t have cursor support back then. Maybe it can be different today with the cursor and I’m “guessing”, some RDP/VNC clients to support hardware mouse to be emulated on the remote machine. But long story short, I have already adapted the “iOS” and “touch” behaviors. Adding mouse interactions only for one app or task was inconsistent. I prefer to adapt, calibrate, and stick with whatever physical tools I use on computers.

One (big) caveat: You have to always-connected (and may require good connectivity)

I love working in flights, in completely disconnected places like mountains (I’m currently writing this article, fully unplugged in 1000m altitude in the mountains in a mini-treehouse 🙂 ). So you basically can’t work if you are not connected.

Solution

What if you have portable hardware that’s job is to host the development environment – like raspberry pi

On another track, I also played with Raspberry PI’s from its first version in a variety of hobby and nerdy projects. Raspberry PIs were not powerful when it first came out. Now the most powerful Raspberry PI maybe a nice portable computer you can carry and connect to TVs, monitors, etc. There are also tons of nerdy projects to create portable devices with mini-screens and mini controllers that caters to gamers or other use cases. Regardless, what you want from raspberry pi is its capabilities with hardware, OS. Not it’s visual form. As long as it’s somewhat networked with another device – like an iPad that has a comfortable screen size and keyboard or controls, you can do all Unix stuff you want on raspberry.

That’s what I did recently with “raspberry pi zero w“ which is the cheapest ($5 – ridiculous right?) and the smallest raspberry pi. It is powered with micro usb, has mini HDMI and most importantly wifi and bluetooth. So if you want to connect peripherals, you can use wireless devices like bluetooth keyboard. But that’s not even what we’re after. What we’re after is connecting raspberry pi zero w to our iPad pro over its usb-c port and have a way to have an internal network to be established between the two and find a way to access to our raspberry pi. Fortunately, there is a way and people have done it.

There are few other more detailed ways of doing this, but here is the shortest way to do it (at least it worked for me pretty easily):

Add modules-load=dwc2,g_ether to cmdline.txt after rootwait
append dtoverlay=dwc2 to config.txt, or run following that does it for you (on a mac after connecting the SD card):

sed -i '' 's/rootwait/rootwait modules-load=dwc2,g_ether/' /Volumes/boot/cmdline.txt<br>echo 'dtoverlay=dwc2' >> /Volumes/boot/config.txt

It’s not the fastest but it’s the most comfortable solution that fills the gap that iOS can’t. With having your development environment on raspberry pi and run your applications, servers, use your favorite command-line tools on raspbian which is a debian based OS that pretty much opens its doors to ridiculous sizes packages of pretty much everything you need.

The physical form factor can be improved like a usb stick (maybe some nerdy group of people will do this) but for now, I found my raspberry pi zero w a plain black case and a short micro-usb cable that is connected to a minimal usb-a to usb-c adapter that I connect it to my iPad. Raspberry pi zero w is using low enough power that powers itself from iPad pro as well as creates its network with iPad pro over the same usb cable – perfect.

Here is a minimal setup with iPad and Raspberry Pi looks like:


This is not my set-up but mine is also very similar. I use raspberry pi zero w with a single cable to the usb-c directly to the iPad.

For further reading, this medium article covers pretty much everything aside from my experience and more on this topic.

I used Windows10 temporarily for my work setup for 10 days after 10+ years of being apple ecosystem user – It was better than I expected…

I used windows from it’s 3.1 version to pre-vista years – early 2000s. Then switched fully to be linux person for years in between before switching to mac around 2007. Since then have been apple fanboy, owning, using and geeking about apple hardware and software. But coming from other OSes, I’m not like people started their computer journey with easy-to-use apple devices. So I know there is more out therefor having more “control” and “customization” on your digital everyday space. I also worked as custom computer/hardware builder for years in my early years of converting my hobby to my profession. I also wasn’t too distant to “what in computer” question.

iPad Pro experiments

Years after living comfortably in apple ecosystem, after starting to experiment with extreme portability of a powerful device like ipad pro (see https://mfyz.com/digital-nomads). Seeing its limitations, there was always a geeky desire to own/create a super-portable work environment with me at all times. I achieved this to a degree in my experiments with various devices in last decade. Closest I got was with ipad pro with some outside help.

At the end of the day, it’s still not fully fledged operating system that responds to what I need. I talked about this in my recent articles and me trying to find alternative solutions that will work with iPad.

Microsoft doing things right lately

I also mentioned this in my previous writings that I occassionally finding myself browsing and configuring microsoft’s Surface Pro. I really believe microsoft started to do a lot of things right in it’s recent years management as far as company strategy, it’s investments on -especially- on open source community. Now I see they are doing some good things on the hardware front. I still find the quality is not match with apple hardware but I definitely see the lack of craftsmanship on all brands producing hardware that is designed to run windows operating systems. Among them, microsoft’s own hardware definitely stands out. Of course with price. But if you are using your computer exclusively for work and if your work requires exclusively a capable computer, then money is not a problem. It’s an investment. Powerful, better, comfortable, better…

1570471615_1510035.jpg

I really like Surface family devices. Both surface book and surface pros are nicely designed, well built and some configurations are really powerful machines that has the best portability/mobility factor.

An alternative path for me: Give Windows10 a try for 10 days

I found myself occasionally bid on pre-owned surface pro devices on ebay. But I never went too high to pay also because I still hesitated how comfortable I would be living on Windows10. I was wondering that question more than paying for pricy experiment to get a surface pro and see it myself. Instead, I bought an external SSD that I really like and got windows 10 pro license for dirt cheap and hit the road to install the windows 10 on the external SSD. Because the SSD is crazy fast through thunderbolt port I use on my macbook pro, I didn’t feel a thing in performance as if I installed windows 10 on macbook pro’s internal hdd. This gave me great comfort that I can restart on mac, unplug ssd and live my macOS life if I decided that windows 10 is not for me. So how did the experiment go?

Migrating my work life from macOS to Windows 10 was very easy

I thought I would have to re-adapt almost all apps I use every day. Result was different, I was already spending most of my time on team coordination, meaning communication tools we use were the primary tools I had to see if I get same precision on macOS. Almost all the apps are browser or electron based apps like Slack, Trello, Jira… So almost zero difference happened on this side. Only thing was bummer is that there is no great email client as you have many on macOS. Outlook is probably “the best” email client on windows. And even with outlook, there were so many holes you have to fill. I’ve been using spark on macOS for many years now and I was super excited to see they are working on windows version. Although nothing in the horizon yet. So it may be years until that happens.

Development Environment

Development environment was much better and faster than I expected. I really loved the idea of subsystem. Windows Subsystem for Linux (WSL) that had almost all distributions to be installed and run within a virtual machine that is managed by windows OS itself. Brilliant. 

0_MzyrfKl3evUM6NZP.png

So you have pretty much ubuntu subsystem running on windows almost without any issue. It went great to set up my zsh scripts, aliases, nodejs, python and other packages super fast. Until I realized, when running some apps like visual studio code, started from command line that runs separate nodejs threads inside WSL that may not be 100% optimized to run with the local filesystem. Windows is continuously working on to improve this as well as vscode team (Microsoft again) also has some remedies in vscode to overcome the integration painpoints. But I hit a weird high cpu usage issue that was discussed online, and looks like closed/solved in github issues but still receiving comments from people like me reporting the issue still exists. All in all, great development set up with little shortcomings that can be addressed or adapted easily.

I also found most of the tools I use that were already open source tools that were pretty much cross platform OR tools that commercial but had cross platform client apps (like TablePlus for database client).

Design Tools

The last and the one of the most important one was design tools topic. We exclusively use “figma” in Nomad Interactive in last few years now. It was Sketch before and that was a dealbreaker macOS only app. Figma being browser based and has so many extendability through a plain and nice “javascript” api makes the tool completely compatible on almost any OS that can run a capable browser engine like webkit. Other than that, I had few photoshop files that I rarely need to open. I can subscribe adobe to get photoshop installed on the windows machines in few hours – we worked on windows machines on our design tasks 10 years ago. Assuming Adobe still investing good deal of effort to have it’s suite running on windows platform, that shouldn’t be a problem when needed.

Continuity is a lacking big on windows platform when you use other devices – not just iOS but also Android too. There is almost no connectivity between your mobile device (phone/table) and your desktop OS. Apple started this and after last few OS versions, they kinda perfected it to a level that we don’t see it until we lose it. For example, I got used to receiving my SMSes (not iMessage, the actual SMS I get from the bank) and only need to use my computer to check the SMS and copy paste the OTP I received from paypal when I’m trying to login on my mac. It’s a very subtle but became very important micro feature between my mac and iPhone to be communicating between each other smartly. There is also other things similar to this.

But I went back to macOS after 10 days

Why? Because I had to rewrite a lot of other things under the hood – like my keymaps, like a lot of shortcuts I learned, optimized and perfected over the years. I also don’t want to invest any time to research and re-learn new apps and new ways to do the same thing I’ve been doing in last 10+ years. Like sending email in few keyboard clicks. 

I’m feeling less adventurous and more comformist on my wok setup. I don’t want to spend my precious time to learn the basics or re-adapt. But I’m ok to spend hours on improving my efficiency for doing X. Doesn’t matter what it is.

I can survive – I can buy a surface pro now

My primary work/life station will remain apple eco-system. But I know it’s not as difficult as I assumed to have same/very-similar tools to live life happy in windows even after spending a decade exclusively living on apple ecosystem. I know surface devices are the best portable devices designed until apple gives up the resistance of not having hybrid working OS that runs desktop-class apps on their ipads or have macbookpros to be more like 2-in-1 style devices.

Smart(er) documents – Quip, Notion, Airtable, Coda or good old GDocs&GSheets

I’ve talked about the importance of written communication before. I highly believe that written communication is the best and purest way to accumulate and share knowledge. Most importantly, it allows all of us to communicate on our own terms/time/speed, enabled asynchronous communication.

This is a key concept to eliminate unnecessary meetings, or making everybody’s time is utilized well. Also a key requirement for scalability for whatever the knowledge transfer needed between peers at work.

I also mentioned multiple times that I use Quip personally and for my team communication and management. There are a lot of great tools came before or after Quip, namely a new up and the coming tool is Notion. Regardless of the tool itself, we grew our need to “document” beyond just writing.

Writing is the storytelling part of the documentation and it’s necessary. Any tool helping us writing better, faster and with fewer errors (i.e: Grammarly) is good. But I have a hunger for more, as an engineer. I have been thinking a lot of displaying information in different ways, making it interactive due to my education background (Statistics). I also operate highly in data filled environments where there is always a need to “simplify” information to readable, easier to digest formats. So I always look out for making data, or a plain timeline of events in a more creative and fun way.

I see 2 very common way of documenting things.

1) A story, or instructions on some topic. How-tos, technical documentation, etc… These documents are generally static. What I mean by that is, we generally just read these documents. There is not much interactivity or dynamic outcomes we expect from them. Although, even if a document is displaying a few numbers, we may want to treat it to be reports that we may want them to update with more recent versions. So the story outline stays the same but the mentioned numbers or dates, or some other info can be changing over time.

2) Complex information like technical data shown in tables, charts. These are the information we generally come up with ways to look at the same information from multiple angles. Like an expense table showing the category of the expense, it’s date, amount and more. Sometimes we want to only see certain dates or categories, or sometimes we ask a question of “what is the totals of the expenses per category”… Similar approach is applicable for charts and some other smarter elements. But essentially they all come from static information that is displayed in a static way. For this type of information, we choose to use tools like Excel, Google Sheets, where they already have a lot of formulas, chart creation tools included in them to help us come to the conclusions we want.

These tools are subtle differences between them but with enough optimizations, it can make a big difference in how we work day to day. In a lot of cases, if we do these document creation, editing frequently enough, we want to automate the process.

Now, after talking about the reasoning of it, what are the sample scenarios we may want more from the traditional tools we use.

Traditionally, we use word, google docs, quip like tools to create story-heavy documents with text formatting, images, and other elements. And we use excel, google sheets, airtable like tools for spreadsheets, showing table or data that we can analyze easily.

What about other type of either repetitive data, or ways to create a better understanding of things like calendar-based information (like marketing calendar), or the same simple bullet point list but with more context as a todo list in a more visual way also showing it’s progression? Eventually, we are all talking about tabular-like data with multiple attributes but displayed differently when it comes to read/consume them.

Here are a few tools I really like worth checking out in this matter:

Quip

Quip is a very plain and clean tool that does not have super smart features but has enough that is one of the easiest to learn and most portable that has been around long enough that is very reliable and slowly becoming more powerful. The features I like and use often in quip is:

  • Spreadsheets embedded in regular docs
  • Project tracker
  • Calendar
  • Kanban board

All of these components are very plain and bare-bones in quip. It’s ideal for quick drafting when documenting project plans, or other things but they are not advanced that you can export and utilize with other platforms. So it falls short when I feel I need more capabilities from these in my documents – or at least linking with existing systems so we can display information in our documents (like monthly planning).

https://quip.com/

Notion

Notion is the new kid in the block and it is filled with a lot of advanced views and custom “data” modeling (they call it “database”). You can create a database of anything and display them in a lot of different views. Calendar view, board view, gallery view, list/table view…

With good design, you can plan and manage a lot of things in Notion. In some respects, it can easily become a company/team knowledge base as well as a task/project management tool.

I loved Notion except 1 hard blocker for me is the mobile experience on iPad with keyboard. I had to change a lot of common sense navigation and editing gestures I use in pretty much everywhere in order to work on Notion properly when I edit the content.

Other, minor issue is the pricing is way steeper than the tools we currently use for a small team. The free quota gets filled very very quickly for a team producing a lot of written documentation like ours.

https://www.notion.so/

Airtable

If you think in spreadsheets mindset, you’ll love airtable. Airtable actually is a database engine for me. I find it extremely API friendly that if you want to code stuff that feeds data to tables with views and stuff, Airtable is perfect. I’ll write about using Airtable as a light db via their API in a separate article later.

Airtable has smarter table management that can also display the same table data in different views like calendar, board views.

https://airtable.com/

Coda

I kinda liked certain aspects of Coda, but I didn’t like the UX that much. I found it’s mobile experience is a big deal-breaker, but it’s unique approach, it’s promising if the makers catch the wave against other tools out there.

https://coda.io/

Traditional Tools Can Do That Too

Some of these stuff have been in traditional tools for long time, but not utilized well, or they are more advanced topics for their own environment, requiring technical knowledge or have steep learning curve (like Excel Macros). The only exception I still use and encourage teams to utilize is Google Docs’ App Scripting. We use google sheets for exported data, importing data to our micro services. We also use for plain documents for planning projects, content and other stuff.

One of the common things we did actually came out as a team product. Check it out: https://sheet2cal.com/

How I use Slack as my Dashboard

Slack has become how many teams communicate internally. In essence, select is an old-school instant messaging platform that has existed from IRC days. What makes slack so powerful is its integrations with other services. Almost all popular services integrate with Slack with a click of a button.

I wanted to talk about a few different angles I utilize slack in my personal and team accounts.

Talk to humans

Slack is the centerpiece on our remote/distributed team on multiple timezones and multiple cities/countries/continents because communication is the centerpiece on remote teams and slack is doing a great job to give a plain tool to communicate. Of course, it’s not the only tool we use to communicate but it’s the most frequent one.

Speaking of communication, communication is not exclusive to humans in our scenario. We also communicate with bots, servers, services, tools, etc… Fortunately, big names (Google, Trello etc) is already nicely integrated with Slack. So we use their apps/bots to talk or listen to them on slack. In some cases, we use slack as our source to talk to these services.

Listen to no-human activity without getting distracted from your slack routine

Slack can be a great “monitoring” platform for keeping eye on things (everything) from a single point of view. This makes slack different than a just chatting app. You can set up pretty much any “notification sending” tool/app to send these notifications on slack. Things like your website’s uptime status, order tracking, new tweets/IG photos/daily news, new blog posts from your favorite blogger… Anything that can be received as email can be set up be redirected to a slack notification in your own categorization skills.

Even “Track Who Goes To Space With IFTTT“ which I talked about it before. The way I was tracking on a slack channel too.

There is also a great article written in Smashing Magazine about using using slack to monitor your app that exhibits this use case well.

Make non-humans to listen you through slack – run your stuff / take actions

We do this all the time without slack. Thing like opening your calendar app and creating new event/reminder/meeting and invite others. Or open amazon app and buy stuff. Go to Trello and create a task to yourself or your team member. Or share a dropbox file. We do these things on our devices with manual steps, using each service’s apps/tools or tools that are designed for that purposes.

But slack brings standardization to these things. A single interface to make these happen with making bots listen to you and do these stuff for you. Some of these “actions” are given in plain English (or your language) or in most cases, though slack’s rich message features like buttons or slash commands. Few things we did and doing regularly on our team: like creating meetings with meekan (scheduling bot) or create Trello cards from slack while we discuss something with the team without getting distracted to open Trello and create cards.

There are many other cases we use slack to “take actions” within slack. The beauty of this is you can make slack very smart with bots that trigger things to services you use through bots. Also extendable that we can write bots to do things that are not provided with existing bots and services or custom stuff. Or even write bots for new things we create.

Why I don’t like wearables? (that are attached to your body)

Men wearing wearable wristband (apple watch)

Prepare yourself for a cynical opinion 🙂

I find wearables (mostly wristbands and watches) too annoying and mostly useless. There is a stereotype I’ll follow in this article which, when someone says wearables, I think (and mostly criticize) wristbands. Let me put it out there that there are many versions of wearables that you can wear and carry. I’m happy and ok with most wearables that don’t need to be physically attached to the body and don’t need to be charged every day or every other day. In general, good tech is the ones that you don’t feel any different or do any different than how you live right now. Let’s get the stereotype wristband and likes on the table.

Activities? Meh!

I know I lot of people use to track their activities, like walking, running but I’m sure the majority of the people are not professionals or taking the activity tracking seriously. In my case, everybody I know wearing apple watches are not using them for that. Kind a novelty to have your walking tracked. You either walk or don’t. It’s like a wearable will make me go to swimming more often or not, of course, it will not.

Notifications – God no!

Wearables are like demons in my head. Well, my phone is actually already like that. Wearables are mostly configured to notify you by default when you open them in the box. I know they are changeable, which I tried to make a silent apple watch. But then why am I wearing it, what’s the purpose of it now? I found only 2 passive notifications helped me when I was trying out different wearables:

  • Inactivity alert, where if you sit and don’t move for an hour, you get a nudge that will remind you to move your a** from the chair – which is great and impactful for sure. Instead, I use screen timeout tools that do the same thing (mostly).
  • Good old timer (wrist version of the kitchen timer). This is used for anything but in most cases my pomodoros (or focus blocks, way to GTD). I set the timer with Siri (in apple watch case) and get to work until I get the nudge. This was the only “real” use case I had – but for having a timer at $350+ cost is just dumb.

Health – Yes!

For seniors, wearables that do consistent hearth monitoring throughout the day is probably the most impactful way to use wearables in my opinion.

Sleep? Hell yes but no 😞!

What I loved on body-attached-wearables from the beginning was sleep tracking. But unfortunately “in theory”. Nobody got this right. Jawbone Up was my first and beloved sleep tracker worked “the best” but had a lot of room to improve. Then Jawbone stopped improving this feature (maybe nothing left to improve). Even though the hardware was fragile and gets broken after few months, I was happy to keep buying same hardware many times (I swear I had 10+ of same and different versions of Jawbone Up – I actually still have unopened box ones). But then Jawbone discontinues to sell them (well, I have 3 unopened ones, so I thought I was good for couple years), then they shut down the servers which made the mobile app to not work at all (because it’s a cloud/API based app) which basically made all Jawbone wearables garbage.

Then every single wearable copied but copied the shittiest version of sleep tracking including Apple. Even if Apple was nailed it, it’s just moronic that you have to charge your apple watch pretty much every day – and any real opportunity you have is when you sleep which you are (in practice) forced to not wear it. Please, someone, get this right…

If you really have to…

put something on your wrist to be cool or maybe really tracking your activities, please don’t make it rain! It’s just a waste. Now there is a sea of wearables does the exactly same stuff every other one does as low as $20 on Amazon. I recently tried Xiaomi’s 4th gen wearable which is pretty good – does my timer and alarm functions well (that’s enough for me but if you are interested, it does all the other things too), and I only need to charge almost once a month (well, I only wear it when I sleep).

Work in a distraction free mode on your computer

I always tune my work style and seek for ways to increase my focus and productivity. From my previous posts (screen-less saturdays), you can see I am also sensitive to the screen time the distractions comes with the screens. There are endless ways to waste time as well as get distracted on screens as things pop-up. Namely notifications. God, I started to hate notifications. So much noise!

I’ve been using an app called focus.app for last few years here and ther. I’ve have been incorporating it to me pomodoro-like sessions. Focus is a paid app but cheap that helps tremendously to keep my focus together while I set a session for myself to be distraction-free and get stuff done.

The app is very minimal, sits on your menubar and you simply toggle in focus and unfocus modes. When in focus mode, app blocks predefined and extendable list of websites and apps. If these pages are open, they show an inspirational quote. If a blocked app is open when getting into focus mode, focus.app closes the app.

I set up my pomodoro length sessions with blocking all communication apps. Also turning my mac’s do not disturb mode on and with a custom script. With this scripts, I set my slack status to do not disturb so my team mates can see that I’m in focus mode and will not get response from me right away.

The last two things I explained is unfortunately done with a bash script. This script runs from focus app when getting in and out of focus modes. I also use some additional scripts that re-opens all apps and restore my “connected” work session after a focus session is completed.

I highly suggest focus to anyone can get easily distracted with an email they received, or a thing they wanted to check in twitter.

https://heyfocus.com/


Best GTD method for geeks – Todo.txt

For most of the GTD (Get(ting) Things Done) mastery student, there is a constant research of better “todo” app or tool. I’ve been in this for a very long time and used many apps. Desktop, mobile, command line, cloud, API… You name it, I’ve probably used it for some time.

At the end, I found myself staying very plainly managing my todos without needing a lot of features. In fact, I needed not to worry about the features of the apps I used. This especially become an issue as I’m OCD (obsessed about “order” and tidy) and a little bit ADD (regularly distracted). When you have a todo app that looks ugly and you need to use their features in order to clean things up, it eats up your time aside of actually focusing on your todos.

Methods and apps

There are also a million apps (I wrote 4 of them for myself) does a combination of “todo” management and a specific type of method. Like pomodoro, or kanban or whatever is out there. This gets more dangerous because the method is actually completely independent from what the todo is, where it lives and how it lives. It can be written on a paper list. For instance, if you do pomodoro, the best way to do it actually use a kitchen timer. Literally, use that old school timer to perform your pomodoros. Otherwise, I almost always find it time consuming to think that things will be more connected and automated when you have a todo app that does the pomodoro. So you can click to a todo and a button to do pomodoro of that item. It sounds good but it’s opposite in practice.

Plain formats works best

For long time, I used cloud based (to sync between my devices) tools. I used evernote, then quip, then trello at some point, then few more. But I found it, the simplest when I can simply copy paste stuff to move around. Because you’ll be consistently re-prioritizing your todo list, editing, adding, removing, marking things done. It’s just how the process of GTD works. That’s why you need a method that is the most convenient and requires less adaptation and portability between platforms and environment. There are few fancy stuff you may want to have like:

  • A programmable interface (API/CLI) – for instance to have your top 3 todos for the day appears on a screen somewhere. Or query the last completed tasks.
  • Color coding or highlighting at least to distinct what’s done and what’s not done. Ideally, when you’re done with stuff, it should disappear from your screen but in some cases, you want to see them at least until the end of your day to be able to review.

Todo.txt

After many years trying different things, I came across with the todo.txt format. It’s a very low level and with few simple rules to give you the freedom to use whatever tool you want, wherever you want with having additional capabilities with community implementations on CLI, cloud, mobile etc…

https://github.com/todotxt/todo.txt

todo.txt format is so simple that is explained in one annotation below:

To be honest, I don’t use almost any of these things except the “done” marker. So for me, it’s as simple as todos are either not done or done. That’s it. What I want to do manually is always re-ordered them and have separators (which I simply use 3-5 dash characters “——” as an extra line).

I love this format is because I use it in a few different tools on my platforms. Wasn’t super happy with the desktop solutions, so I forked and enhanced a simple code editor written on electron/nodejs. Added a few capabilities and adjusted the color schema to my liking and open sourced published it (You can find, download and contribute to it here: https://github.com/mfyz/todox).

On mobile, it’s not that easy to have a custom code editor without getting my hands dirty with a lot of native coding which I felt lazy. Also, another point that I had to figure out was the sync between my devices. I live on apple ecosystem so I simply used iCloud drive of the text editor app I use on my iOS devices (Textastic).

Texastic supports textmate and sublime bundles (including custom syntax support and themes). I installed a sublime text implementation of todo.txt format and had color coding which all I needed on my mobile devices. Most of the time my activity on my mobile devices are simply adding new stuff to the list or mark them done.

Taking long (scrolling content) screenshots on Mac

Sometimes we need to take a screenshot of a long content mostly from scrolling applications. Most common example of this is full-length web page screenshot. There are chrome extensions we can use for taking full-length website screenshot. But there is not an easy way to take screenshot from other apps like native desktop apps or email content from mail clients.

XNip Screen Capture Tool

We can use Xnip Screen Capture tool that has all of the common screen capture software features and a feature We can use for taking long content screenshots called “Scrolling screenshot”

It’s is a freeware with upgrade ($2/yr subscription) but works perfectly for this purpose without the upgrade (it leaves watermark that can be cropped easily if needed).

http://xnipapp.com/

http://xnipapp.com/scrolling-capture/

https://itunes.apple.com/us/app/xnip/id1221250572?mt=12

Track who goes to space with IFTTT

I have a fun way to track people goes to space and I want to share that with you on this post 🙂

I love using “If This Then That” (IFTTT) and have been using it for years. It’s a brilliant service. For first-timers, I can summarize it as “Internet Robot”. What it does is, connects two internet services (or smart devices) in scenario basis consists of two parts: “event → action”. So it takes an “action” when an “event” happens.

Some generic samples of how to use IFTTT;

  • When I post a photo to facebook → Save to dropbox
  • When there is a new entry in RSS → Send me an email
  • When weather is rainy → Tweet “take umbrella”

Almost all popular services are available in IFTTT.Each service has their own set of events and actions.

Some fund IFTTT Recipes

Tracking Space Activities

I use IFTTT for many different ways, mostly work related scenarios but I have some fun use cases. One of the most fun thing I do with IFTTT is to use NASA’s events about space activity (when there is a new launch with astronauts going into space), I send a message to my slack channel named “space”. This way I see astronauts went to space and often I check their wikipedia page, their achievements etc…

Slack Channel with Space Activities

How we use Quip and how to leverage collaborative writing tool in team communication

I want to talk about a tool we use and how to leverage it for better collaboration on pretty much anything involves multiple people. But first, I encourage to read my thoughts on writing and reading at //mfyz.com/written-communication-king if you haven’t done so.

I started using Quip pretty early on when they came out and loved it from start. Love the simplicity and giving real-time collaboration features and mostly mobile-friendliness of it. Compared to Google Docs, it feels much more lightweight.

For personal use cases, I used to use Evernote for note taking purposes and keep my notes on cloud and keep them synced between my devices and computer. Quickly after starting using Quip, I moved all my notes from Evernote and iCloud Notes to Quip. I document my personal information, my plans, new ideas, my book notes, to-do lists and mfyz.com stuff from todos, bug tracking to articles to write. I even write these blog posts on Quip first, then finalize before I move them to my blog. After publishing, I move them to a folder like “Published” or “Archive”.

At our team, we use quip daily basis and I use quip maybe as much as I use my email client or maybe even web browser. I often edit 10-15 docs in quip a day as mix of personal and business docs.

We use Quip at our team for following reasons primarily;

  • Transparency – we believe in creating a culture of transparency, where our team has full visibility into all aspects of our work.
  • Quip allows us to see (in real-time) what people are working on.
  • Quip’s history allows us to see the conversations and evolution of our thinking, not just the finished product.

Here are few tips that we collected as the team and try to implement on our Quip settings.

  • Turn notifications off apart from @mentions to reduce the noise – most of us don’t need to know everything that is happening in quip in real-time.
  • Fine tune your notifications for documents and folders that you are an active contributor or reviewer of.

We use Quip with it’s “team” version which we pay very minimal cost monthly but there is almost zero reason you need to pay as the team. Their team functionality is free and it’s not very different than sharing a folder to a group of contacts.

Other than my team, I have smaller teams for my other initiatives and a family folder with my wife that are not designed as “team” they are just well organized single folders that are shared with team members.

Create Baby Dashboard with cheap Tablet

When becoming parent, first thing you get into is the feeding and changing cycle of the baby(ies). It’s tiring but optimizable cycle since the whole thing is pretty standard in the beginning.


And keeping track of feeding and pooping activities becomes very important especially in early days. You need to feel comfortable that your baby is growing. Best way to know how they are doing well is to track how much they eat around the clock and how many times they pee and poop. It’s a weird thing to track when you think about it but it’s actually very natural and best way to think the only sensors you have about your baby in early days.

You’ll most likely to have multiple people looking after your babies and it’s inevitable to do shifts on feeding and changing duty and it gets really easy to lose track of how much they are consistently eating or pooping. Most parents take notes on paper, or keep track of it in some ways. The tech parents 🙂 will obviously use some form of digital tracking and there are many many apps does this. I’m looking this in an experimental mind and thinking, how this becomes a seamless process.

Last year, when I was trying to hack amazon “dash” buttons, I found this engineer dad, hacked dash buttons for exactly this purpose. Basically, he had 2 buttons for his baby that when the baby poops, tapping to one when the baby pees, he taps to the other one which is pinged to an IFTTT hook to log the timestamp of the activity in a google spreadsheet. Connecting the dots between these services literally takes 5 minutes if you guys are familiar with them.

My challenge was having 2 babies and my early “monitoring” task that I was assigned from the pediatrician was to track of how much babies ate in every 3hr cycle. So I had to log how many milliliters babies ate. I also needed to see last 3-4 times to make sure I balance out if one baby ate less last time, so she gets more attention this time. Having 2 babies at home definitely, requires 3 people’s attention. We also share the day to take some of the feeding hours to be done by one person. I usually take nights and when it’s my turn, I don’t have anybody up to ask what they ate last time. Same thing for my wife and my mother in law when they wake up and I go to bed and it’s time to feed the babies.

I created a solution to stick one of the old tablets to the wall and create a mini-app to log and see the last 4-5 feed logs. So everytime someone feeds the babies, they simply click 2-3 times to log exact amount for each baby.

I wanted to write a react js app to practice react a native little bit more and also have native animations but I found myself losing in “perfect” routing and modulation of the UI which I dropped and wrote a web app in half an hour. I pretty much created a front-end only app that triggers webhooks and implements some proxy APIs to public services to pull some more helpful information for our home life (like clock, weather, brief forecast, a background slideshow of black/white photos from Flickr). Here is how the tablet screens look like. Of course, I’m using a full-screen web view wrapper app to display these in a more kiosk-like way.

Then I let bitbucket to host it without worrying about deployment, hosting etc…

Who has a spare tablet?

Well, we’re trashing more tech gadgets than ever. You may have an old android tablet or iPad or you may not. There are 2 super cheap ways to do this.

Amazon kindle fire tablets are getting bought-from-china level of low costs and Amazon keeps having sales to boost to uses of kindle fire tablets. Having Kindle fire tablet 7 is often as low as $35 to own one. To be honest, it can’t get cheaper than this.

Another way is to look on eBay to get a used one for a low cost but I can’t imagine if it will be cheaper than getting brand new kindle fire tablet. Maybe the last option can be looking at cheap android tablets that go cheaper (on aliexpress).

Tablet on the wall, Ough?

Sticking a tablet on the wall is not my way of doing this. So I hacked an IKEA frame to embed tablet screen with a black canvas cardboard and hide the tablet.

Now it is much more appealing… 🙂