Simple Gitlab CI/CD Deployment via SSH+RSYNC

Setting up a project that runs in a web server (consider a traditional server like an AWS EC2 instance) requires you to deploy your code and configure the application. Doing this once may not be a big task but doing it continuously is not. Not to mention it will get impractical. Especially if it’s a project that you work on and maintain actively.

Setting up a good way to deploy your application is one of the key characteristics of a successful development setup. Ideally, your project should have an automated way to deploy, and roll back changes.

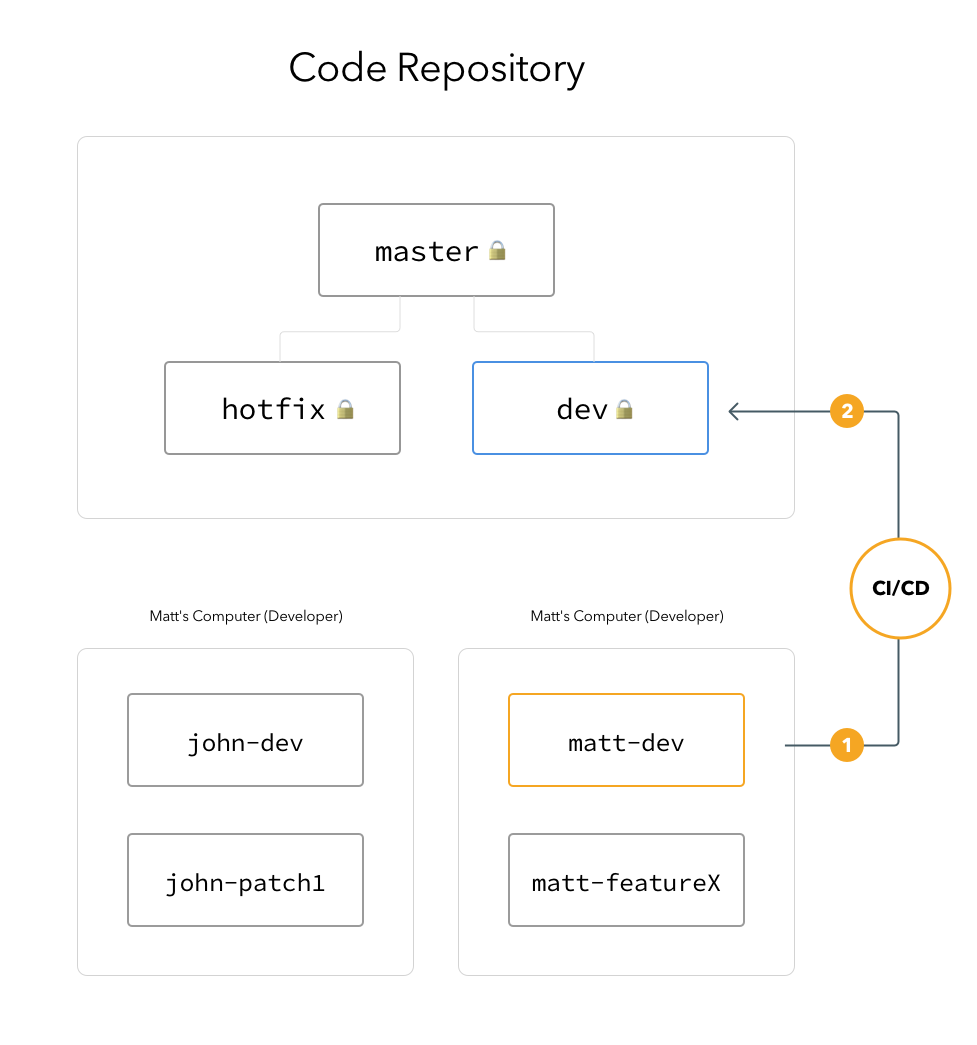
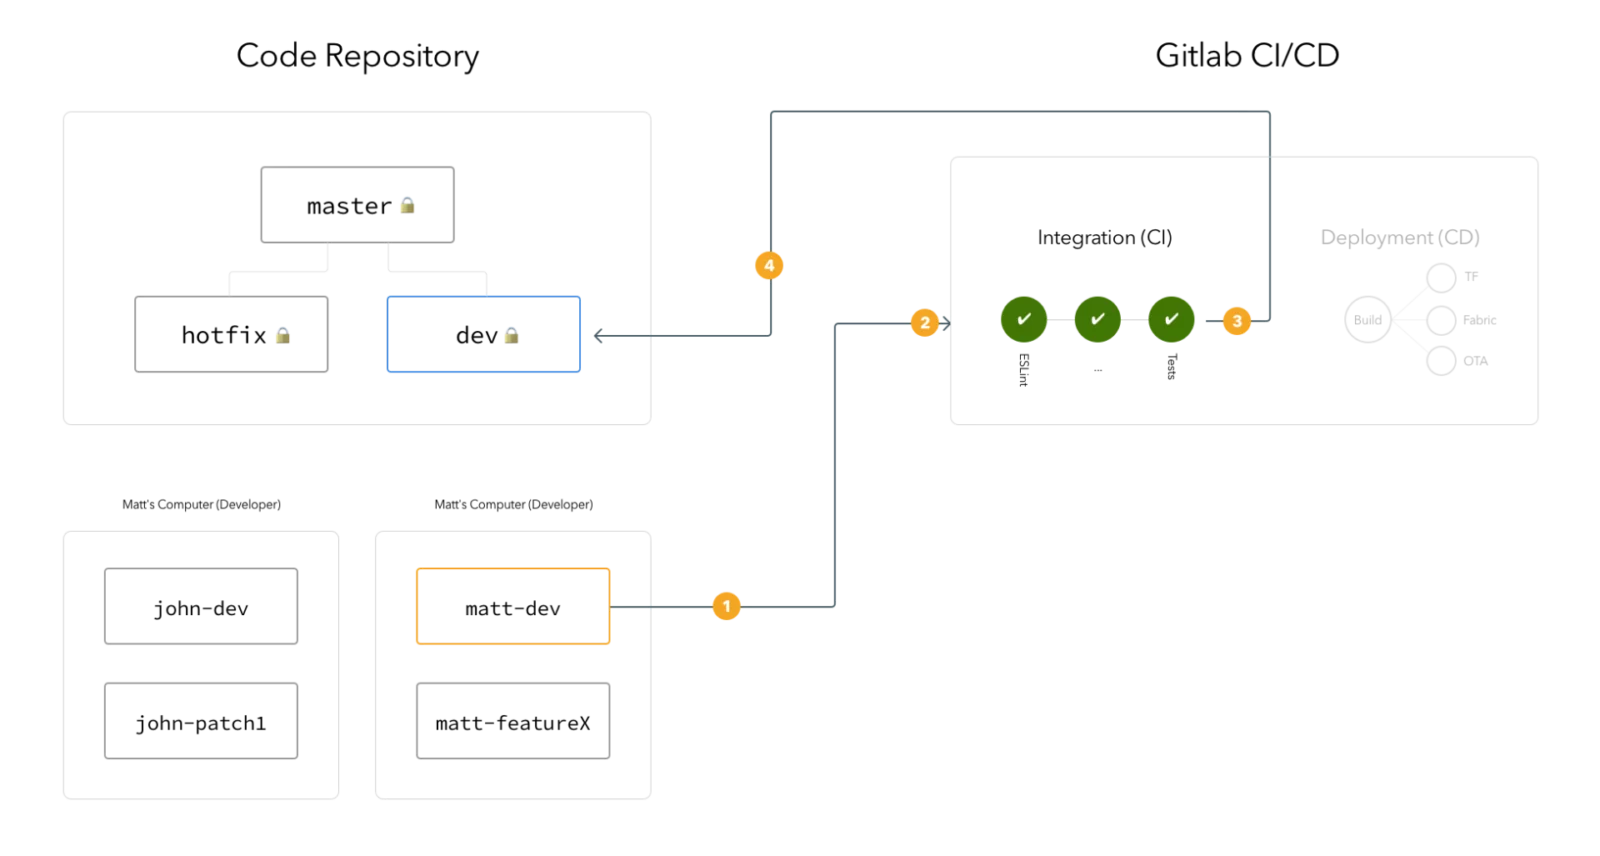
It makes a lot of sense of to use version control systems as the base of deployments. VCS systems are about how code changes are tracked by individual developers, comes together and merges back to the main branches. It perfectly fits well to have the capabilities to track deployments to these changes too.

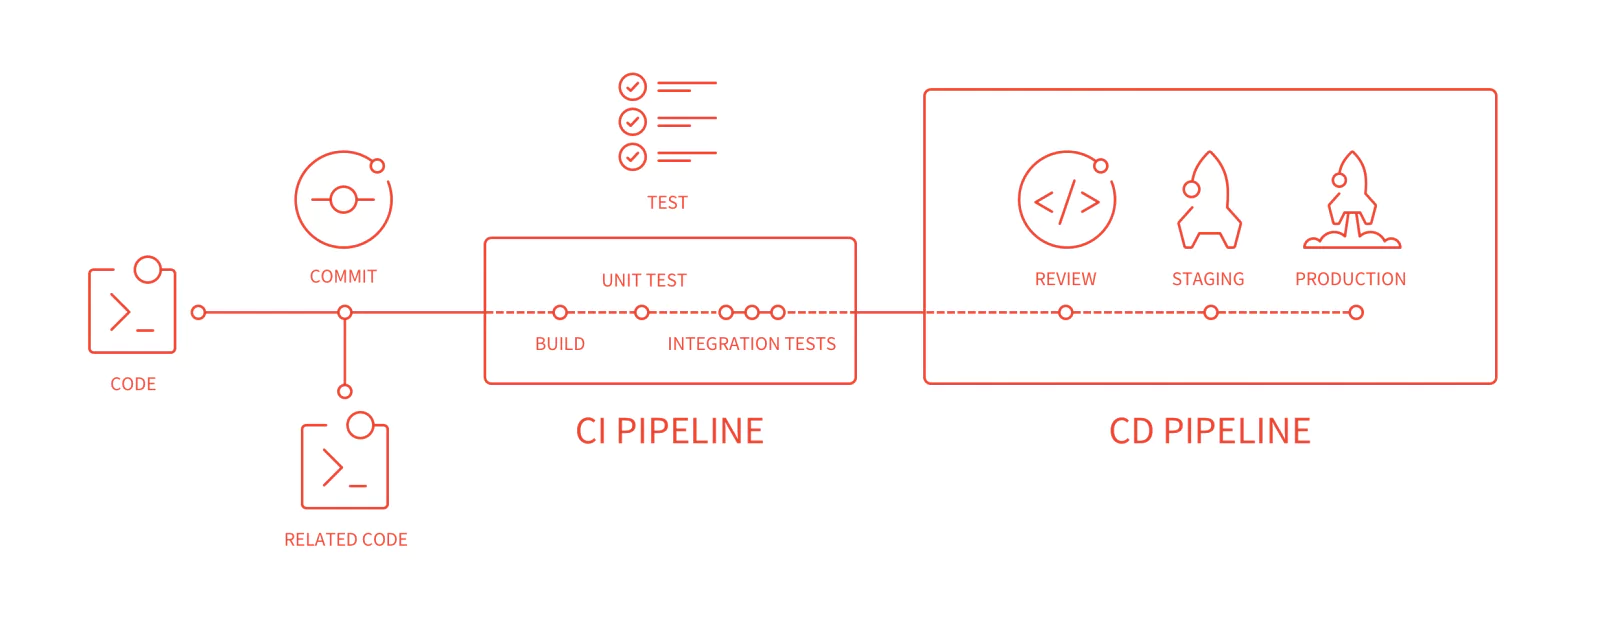
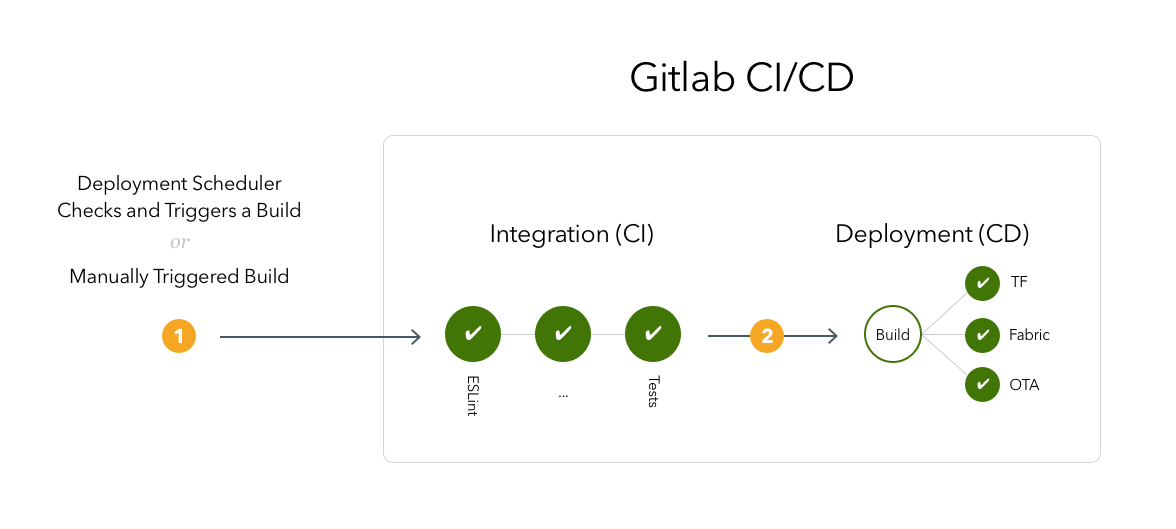
The VCS services like Github and Gitlab now come with powerful CI/CD pipelines supports these use cases almost out of the box.

There are also many ways to achieve what I’m going to describe in this post. But I take this as my bare minimum, plain and simple way to deploy code and perform simple tasks to restart my application automatically as part of my code workflow.

We will be using SSH and RSYNC to update your code remotely, then update the changed/added/deleted files in your target folder then restart your application if needed.

In a PHP-based project, updating files would be enough because apache will be running the scripts in every single request unless you are using a caching module – which even comes with an automatic cache refresh if the file is changed.

If you are deploying a NodeJS (or similar) app that needs to be re-started, then we’ll use remote SSH command to perform a restart operation from your CI/CD pipeline.

Let’s jump right in the .gitlab-ci.yml example and I will point out the key areas in this template.

image: node

stages:
  - deploy

variables:
  npm_config_cache: "$CI_PROJECT_DIR/.npm"

cache:
  key: ${CI_COMMIT_REF_SLUG}
  paths:
    - .npm

production_deployment:
  stage: deploy
  image: alpine
  only:
    - master
  before_script:
    - apk update
    - apk add openssh git curl rsync
    - git checkout -B "$CI_BUILD_REF_NAME" "$CI_BUILD_REF"
  variables:
    DOCKER_DRIVER: overlay
    SERVER_NAME: "my-server-name"
    CONNECTION_STR: "[email protected]"
    ENVIRONMENT: "production"
    PROJECT_NAME: "myproject"
    SLACK_CI_CHANNEL: "#ci-myproject"
    RSYNC_EXCLUDES: "--exclude 'storage' --exclude '.env' --exclude 'node_modules' --exclude 'keys' --exclude '.git' --exclude '.yarn-cache'"
    RSYNC_BEFORE_HOOK: "mkdir -p $DEPLOY_PATH && rsync"
    DEPLOY_PATH: "/srv/data/deploy/${PROJECT_NAME}/production"
    SERVE_PATH: "/srv/data/www/${PROJECT_NAME}/production"
    PRIVATE_KEY: $SSH_PRIVATE_KEY_DEPLOYER
  script:
    - mkdir -p ~/.ssh
    - 'which ssh-agent || ( apk add --update openssh )'
    - eval "$(ssh-agent -s)"
    - echo "${PRIVATE_KEY}" | tr -d ' ' | base64 -d | ssh-add -
    - '[[ -f /.dockerenv ]] && echo -e "Host *\\n\\tStrictHostKeyChecking no\\n\\n" > ~/.ssh/config'
    - ssh "$CONNECTION_STR" "mkdir -p $SERVE_PATH $DEPLOY_PATH;";
    - rsync -avzqR --rsync-path="$RSYNC_BEFORE_HOOK" $RSYNC_EXCLUDES --delete -e 'ssh' ./ "$CONNECTION_STR:$DEPLOY_PATH";
    - ssh "$CONNECTION_STR" "cd $DEPLOY_PATH; rsync -avqR --delete ${RSYNC_EXCLUDES} ./ ${SERVE_PATH}";
    - ssh "$CONNECTION_STR" "cd ${SERVE_PATH}; npm install --production";
    - ssh "$CONNECTION_STR" "if forever list | grep 'production/server_run.js'; then forever stop ${SERVE_PATH}/server_run.js; fi; forever start --workingDir ${SERVE_PATH} ${SERVE_PATH}/server_run.js"
    - 'cd $CI_PROJECT_DIR && sh ./scripts/notify_slack.sh "${SLACK_CI_CHANNEL}" ":rocket: Build on \\`$ENVIRONMENT\\` \\`$CI_BUILD_REF_NAME\\` deployed to $SERVER_NAME! :white_check_mark: Commit \\`$(git log -1 --oneline)\\` See <https://gitlab.com/myproject/$(basename $PWD)/commit/$CI_BUILD_REF>"'
  environment:
    name: production
    url: <http://myproject.com>

Essentially we need to do:

  1. Upload (or update) the files in the server
  2. Restart the application (if needed)

You get a deployment log like this:

Running with gitlab-runner 15.4.0~beta.5.gdefc7017 (defc7017)
  on green-4.shared.runners-manager.gitlab.com/default ntHFEtyX
section_start:1664673660:prepare_executor
Preparing the "docker+machine" executor
Using Docker executor with image alpine ...
Pulling docker image alpine ...
Using docker image sha256:9c6f0724472873bb50a2ae67a9e7adcb57673a183cea8b06eb778dca859181b5 for alpine with digest alpine@sha256:bc41182d7ef5ffc53a40b044e725193bc10142a1243f395ee852a8d9730fc2ad ...
section_end:1664673666:prepare_executor
section_start:1664673666:prepare_script
Preparing environment
Running on runner-nthfetyx-project-17714851-concurrent-0 via runner-nthfetyx-shared-1664673617-f4952085...
section_end:1664673667:prepare_script
section_start:1664673667:get_sources
Getting source from Git repository
$ eval "$CI_PRE_CLONE_SCRIPT"
Fetching changes with git depth set to 50...
Initialized empty Git repository in /builds/amazingproject/website/.git/
Created fresh repository.
Checking out 7ab562d5 as staging...

Skipping Git submodules setup
section_end:1664673681:get_sources
section_start:1664673681:step_script
Executing "step_script" stage of the job script
Using docker image sha256:9c6f0724472873bb50a2ae67a9e7adcb57673a183cea8b06eb778dca859181b5 for alpine with digest alpine@sha256:bc41182d7ef5ffc53a40b044e725193bc10142a1243f395ee852a8d9730fc2ad ...
$ apk update && apk add git curl rsync openssh openssh-client python3
fetch https://dl-cdn.alpinelinux.org/alpine/v3.16/main/x86_64/APKINDEX.tar.gz
fetch https://dl-cdn.alpinelinux.org/alpine/v3.16/community/x86_64/APKINDEX.tar.gz
v3.16.2-221-ge7097e0782 [https://dl-cdn.alpinelinux.org/alpine/v3.16/main]
v3.16.2-229-g1f881aca9b [https://dl-cdn.alpinelinux.org/alpine/v3.16/community]
OK: 17033 distinct packages available
(1/33) Installing ca-certificates (20220614-r0)
.
.
.
(33/33) Installing rsync (3.2.5-r0)
Executing busybox-1.35.0-r17.trigger
Executing ca-certificates-20220614-r0.trigger
OK: 78 MiB in 47 packages
$ git clone https://github.com/MestreLion/git-tools.git && git-tools/git-restore-mtime
Cloning into 'git-tools'...
12,931 files to be processed in work dir
Statistics:
         0.57 seconds
       13,151 log lines processed
           59 commits evaluated
        2,204 directories updated
       12,931 files updated
$ which ssh-agent || ( apk add --update openssh )
/usr/bin/ssh-agent
$ eval "$(ssh-agent -s)"
Agent pid 54
$ echo "${PRIVATE_KEY}" | tr -d ' ' | base64 -d | ssh-add -
Identity added: (stdin) ((stdin))
$ mkdir -p ~/.ssh
$ [[ -f /.dockerenv ]] && echo -e "Host *\n\tStrictHostKeyChecking no\n\n" > ~/.ssh/config
$ ssh "$CONNECTION_STR" "mkdir -p $DEPLOY_PATH;";
Warning: Permanently added '199.192.23.254' (ED25519) to the list of known hosts.
$ echo "--------> Copy latest codebase to remote"
--------> Copy latest codebase to remote
$ eval "rsync -avzqR --rsync-path='$RSYNC_BEFORE_HOOK' $RSYNC_EXCLUDES --delete -e 'ssh' ./ '$CONNECTION_STR:$DEPLOY_PATH'"
$ ssh "$CONNECTION_STR" "find $DEPLOY_PATH -type d \( -path $DEPLOY_PATH/assets/uploads -o -path $DEPLOY_PATH/application/logs \) -prune -o -exec chmod og-w {} \;"

$ cd $CI_PROJECT_DIR && sh ./scripts/notify_slack.sh "${SLACK_CI_CHANNEL}" ":rocket: Build on \`$ENVIRONMENT\` \`$CI_BUILD_REF_NAME\` deployed to $SERVER_NAME! :white_check_mark: Commit \`$(git log -1 --oneline)\` See <https://gitlab.com/amazingproject/website/commit/$CI_BUILD_REF>"
  % Total    % Received % Xferd  Average Speed   Time    Time     Time  Current
                                 Dload  Upload   Total   Spent    Left  Speed

  0     0    0     0    0     0      0      0 --:--:-- --:--:-- --:--:--     0
100   427    0     2  100   425     15   3218 --:--:-- --:--:-- --:--:--  3259
oksection_end:1664673757:step_script
section_start:1664673757:cleanup_file_variables
Cleaning up project directory and file based variables
section_end:1664673758:cleanup_file_variables
Job succeeded

It runs fast, is almost universal and applicable to any type of codebase, and is extendable. If you need to restart your application by either using process managers or full daemon restart, you can add a new command and use the ssh lines that we remote-execute a command on the server.

Create and use a limited-permission deployer user for better security

A good rule of thumb is to set up a “deployer” user on the server, have the smallest possible permissions to the user, and have the target folder write access so these commands run properly. There is even a way to give sudo rights for specific commands if you really need to execute something with root permissions, without having a full sudo-enabled user account.

Even simpler deployment

Maybe RSYNC is even more complex for your needs. Maybe all you need is to pull the repo on your server initially, and in each deployment run “git pull”. You can simplify this script to get rid of all rsync parts and only have a remote SSH command runs that.

Portable WordPress with SQLite instead of MySQL

When working with WordPress, there are many occasions you may need a quick spin WordPress environment without dealing with database setup and a web server.

Making WordPress use a SQLite database and run on a native PHP server is surprisingly easy and simple.

I’ve been using this setup for testing plugins, and themes and trash the setup without worrying about it much.

The magic here is mostly automating the installation and configuration of the WordPress instance using wp-cli. It’s very easy to install and run wp-cli from a phar package.

# Install wp-cli
curl -O https://raw.githubusercontent.com/wp-cli/builds/gh-pages/phar/wp-cli.phar

# Set up wordpress site
php wp-cli.phar core install
		--url=http://localhost:8011
		--title='Test Site'
		--admin_user=admin
		--admin_password=admin
		[email protected]
		--skip-email

# Tweaking wordpress settings
php wp-cli.phar rewrite structure '/%postname%/' --hard
php wp-cli.phar option update page_for_posts 10

# Installing and activating plugins
php wp-cli.phar plugin install kirki --activate

# Installing and activating theme
php wp-cli.phar theme activate mytheme

# Creating sample content
php wp-cli.phar post create --post_type=post --post_title='A sample post'

You can get the full installer and configuration script here: https://github.com/mfyz/wp-sqlite-installer

Remove unused CSS with PurgeCSS

When building a web app, we often use our go-to CSS framework (bootstrap, tailwindcss…) that comes with a lot of useful stuff that normalizes and speeds up our UI building process. Frameworks also come with a lot of baggage, a lot of it. Most of our UIs are not super complex and we don’t use the majority of the CSS frameworks we use. Even when we build and implement your own Design System from scratch, you always will have unused CSS in any given project or application.

PurgeCSS is a great way to optimize your final output to only contain the CSS you need and used. In my simple apps, I’ve implemented PurgeCSS, and I’ve seen between 70-90% final CSS size decrease and a significant render time decrease.

PurgeCSS works with most javascript bundlers and web build tools. It also comes with its own CLI tool. My go-to use case is their seamless integration with TailwindCSS in NextJS builds. Here is a nice guide and the example github repo I put when I was playing with this.

Check out PrugeCSS

Optimize your bundle size by eliminating dead code / tree-shaking in Webpack

When building modern javascript apps (regardless of browser or server-side use), it’s important to know what your dependencies are and what you utilize from those dependencies. If no care is given to this, your bundle size may end up being very large and result in a non-performant user experience. Especially if this is a browser-based application that every byte matters.

Today, I want to talk about a very effective method to optimize your bundle size called Tree Shaking.

Traditionally, we install a module and import the methods we use from a module. In many modules, the methods in them are not separately exported and are part of a single default export that we object deconstruct from the default import. The most common example of this is:

import { Box } from "@material-ui/core"

This results webpack to bundle all module methods. Even if we don’t use any of them.

There are a couple of ways to avoid this. Some libraries like lodash allow you to install only what you need. Instead of installing the entire lodash library, you can install only the module you need like lodash.get or lodash.trottle.

Another method is the tree shaking where we still install the full library but when we package our bundle, we tell webpack that we are only importing a portion of the larger library.

https://material-ui.com/guides/minimizing-bundle-size/#option-1

Instead of:

import { Box } from "@material-ui/core"

Do this:

import Box from "@material-ui/core/Box";

Similarly, a lodash example: instead of:

import { groupBy } from "lodash";

Do this:

import groupBy from "lodash/groupBy";

Alternative method

There is also a babel plugin that can do this for you: babel-plugin-tree-shaking-import

Consistent import convention

Another key point to pay attention to about tree shaking is the consistency throughout your code. Make sure every instance of a module’s imports should be done consistently to point module paths. A single instance of a traditional way of importing the module and then deconstructing the parts needed will result in bundling the whole module in your bundle again.

Another reason to look into using the babel plugin is to achieve this automatically.

Better webpack build outputs with webpack-dashboard

When working on a javascript application (i.e: a react app), you probably work with webpack. Your local development setup will most likely be watching changes on your files and doing repeat builds throughout the development process.

It’s important to get used to webpack output. Being able to pick up important details from it. Webpack output is not particularly difficult but there is a cleaner, more organized way, using webpack-dashboard.

Webpack-dashboard is an interactive command line output that gives you the summary and important stuff you need to see about your build quickly.

https://github.com/FormidableLabs/webpack-dashboard/

No-jQuery Movement

Why jQuery?

jQuery is one of the most useful javascript frameworks makes things a lot easier for a lot of developers.

jQuery also standardizes ways of doing things between different browsers, otherwise, certain implementations would require per-browser treatment.

But as much as jQuery makes things easier for developers, the end result may not be the best. Especially in this day and age, every byte counts towards many different aspects of your website/app’s performance. Page load times, SEO, crawling performance…

A big mistake most web developers do when they start learning web technologies is to learn jQuery very quickly (because the content is abundant about jQuery tutorials and libraries) without knowing underlying technologies and what/how jQuery is helping them to do things quicker.

Why NOT jQuery?

Essentially jQuery is a layer on top of standard Javascript and Web APIs that each browser may or may not support certain aspects or requires separate implementations. So what you are doing at the end of the day is to use Web APIs to interact with DOM on your HTML document and create magic. As much as most of the magic can be created with libraries. Their dependencies and bundled asset size can add up. In some cases – like a WordPress blog and plugins, these assets can add up to a megabyte or more total download size for your web page. 

It’s better to be extra paranoid and conservative about what you need and what you can do with vanilla javascript and existing web APIs. Unless you are working with brand new web technology, the majority of what you will need is already very mature and standardized between browsers. 

With enough knowledge of the underlying technologies, you can actually see how much you can do without needing jQuery when writing a javascript for a web page you are building.

Here are two great resources compiles the non-jQuery ways of doing things:

No jQuery Movement

Recently, the no jQuery approach became a bigger trend within the web developers communities because everybody is doing an amazing job to optimize their rich web pages and applications to score better on performance, speed. 

Looking from a generalist’s eyes, jQuery probably comes very quickly in various types of web frameworks, CMSes, themes to these CMSes. So when it comes to optimizing the speed, one of the biggest questions comes down to cleaning up unused code that is loaded on the web page. In most cases, when using jQuery, you are not utilizing a good chunk of what you create on your web page. It’s not very easy to unbundle and make sure your final page only contains what you make use of on your jQuery-based javascript code.

There is a great article: https://catchjs.com/Blog/PerformanceInTheWild that analyzes a large sample set of web pages and finds jQuery being the most common dependency at half of all websites they analyzed. 

img_0494.png

With enough engineering effort and care, almost all of these pages can do what they do without jQuery and supporting libraries.

That’s why we are seeing more and more libraries that are written in vanilla JS and have no dependencies on other libraries. Most javascript framework/library developers are also proud to advertise their library is X kb in production. And it’s definitely one of the most important factors of a developer making the smart choice of these solutions when creating a web page.

Our git workflow at Nomad Interactive (branching, tagging)

Here is an adjusted version of our internal documentation at Nomad Interactive about our git workflow explained. We almost exclusively write javascript on all platforms (node.js back-end, react.js web front-end, and desktop, react native for mobile with minimal swift and android java for mobile apps). There are a lot of biased opinions and structures in this article that may be too javascript focused but it can be applied to other languages with equivalent solutions. 

We want to have a code base and development process with best practices that reflect ideal workflow and produce clean, understandable, testable. This article outlines few key goals we want to achieve with this ideal workflow. 

Continuous Integration Requirements (Pipelines)

Clean Code, Unified Developer Language

Development shouldn’t be built around a lot of rules or “musts”. Allowing developers to define their own style is important, but understandable code is one of the most important elements of an effective development team. It’s famously known that big teams (Google, Facebook, Airbnb…) utilizes a large set of rules under a good practice definition that allows every developer to speak the same language and be able to adapt to each other’s code and process very easily.

In order to do that, we will follow similar practices to have our javascript code to be unified in a single style. Few tools we will start utilizing to achieve this.

REQUIREMENT #1: WRITE JS in ES6

We will have a good practice of writing modern ES6 and in this case, we have to, use transpilers (babel, webpack) to compile our code to VanillaJS for plain javascript rendering.

REQUIREMENT #2: Clean code enforced using ESLINT

We inherit Airbnb’s javascript guidelines and write javascript/JSX in the same style. We have built our own eslintrc and maintain that in a separate repository. Our eslint configuration is packaged in an npm package and our project eslint configurations are generally just a few lines and inherit all rules from this package: https://www.npmjs.com/package/@nomadinteractive/eslint-config

We will set up our continuous integration server to only accept error/warning-less code commits.

REQUIREMENT #3: 100% Test passing

We don’t want to worry about breaking stuff, spend time on unnecessary human energy to make sure we cover all regression tests within our development iterations. For this, we need to embrace some form of test-driven development. For each environment and often per-project specific test approach. But we generally do unit testing via jest on our express back-end apps (mostly APIs), some unit testing on web apps but mostly e2e test with puppeteer, and some unit + e2e using detox on iOS and Android apps.

We don’t have any code coverage requirements yet.

Branching and Tagging Practices

  • We always lock the master branch for all users except the CI server, locked for pushes and merge requests as well.
  • Dev branch is also locked for direct commit/pushes. Only pull request and merge requests are going to be allowed.
  • Development code is pulled or merged to the “dev” branch when the CI pipeline succeeds.
  • Every developer works on their own local development branches per feature, fix, or other categorized with uniform branch naming strategy.
  • We should avoid having long-living remote branches other than the protected branches that are specific to a developer – at all costs.
  • When it’s time to push your changes to a build or the latest development branch where all developers push their branch remote, then merge their code. You can create merge requests to the dev branch from your branch easily on GitLab or GitHub UI or from the command line. Then, the CI server picks up your commit, makes sure your code is clean and acceptable, then it approves and finishes merge to the dev branch. You continue working on your local branch and repeat this process.

Diagram below demonstrates the branching and development workflow.

Image.jpg

Automated deliveries

Shipment of the code has to be automated in all cases from development to production submissions. We need to utilize all code distribution methods to automate this workflow.

We currently use Test Flight for iOS apps, Firebase Beta for Android apps.
Obviously, web-based apps (both front-end and back-ends) deploy to their respective environments via CD automatically.

For mobile apps (react native), we also utilize Microsoft Code Push for over the air updates for react native apps aside from the bundled native builds to be distributed in the traditional ways mentioned above. This allows us to ship smaller builds faster.

Merge Request Approvals – Code Reviews

We conduct code reviews, every merge request to be assigned to another developer for them to review and approve the changes, then CI will proceed with deployment.

Example 

  1. Ethan makes some changes,
  2. Ethan sends merge request to the dev branch,
  3. CI server runs tests and prerequisites for the project, if succeeds,
  4. CI server assigns a random developer (from the approvers’ list) for code review (Let’s say Fatih)
  5. Fatih reviews code on GitLab UI and approve the merge request
  6. CI server finishes CI and CD pipeline (finish merge to dev and if its release, merge it to master and deploy as well).

Based on the team size, we will only enable code review for releases. Making code review part of our regular builds will be an extra step for a remote development team and may cause delays.

CI /CD Pipeline Types

A) Development Merges

Regular code check-ins when finishing sprints, screens, bugfixes, etc. The primary reason to do this as often as possible to sync clean and stable codebase between developers when working on larger/longer builds.

Regular dev merges (no build).png
  1. Matt commits and pushes all his changes to his local branch “matt-dev” and created a “merge request” from the matt-dev → dev branch.
  2. Gitlab CI picks up the requests and starts the CI pipeline to check the code.
  3. With successful CI pipeline result, merge request will be approved by the CI server and code will be merged to the dev branch.

With successful build and code change notifications on slack channels, all developers will be able to see any change on the dev branch. Everybody will pull the latest code to their local development branch.

B) Development Builds

Same as Dev CI but triggered with a final build to be pushed for distribution for testing

Image.jpg
  1. Deployments (builds) will be triggered either:
    1. Manually over GitLab UI, slack commands, or a potential mobile app, we will build for deployments.
    2. Every morning with a scheduler, if there are merges that are not built yet. This will allow our development pipeline to be always shipping the changes to testable code. This process effectively eliminates the “deployment queue” concept.
  2. Deployments will start with CI pipeline re-run including code quality checks.
    1. CD steps are actually steps in the CI pipeline that are only enabled for deployments. These steps will package and deliver the app bundles to various distribution platforms TF, Fabric/Firebase, OTA based on the platform.

C) Releases (production)

When the development builds are stable and it’s time to package the code for production. 

Releases.png
  1. One of the developers of the project takes the lead and manually triggers a release build by creating a merge request from the dev branch to the master branch. CI server picks up this merge request and fires up a CI pipeline.
  2. When the CI pipeline successfully passes, it notifies all “reviewers” defined in the project to review the code. We will have multiple developers and team leads review the code and approve the release.
  3. Once all reviewers approve the merge request and pushed the code to the master branch, the CI pipeline also tags the master branch with the version number of the release,
  4. Gitlab merges the code to master and continues on CI pipeline for the release.
  5. After packaging the app, CD pipelines distribute the app to existing internal distribution services TF + Fabric/Firebase + OTA. On top of this, CD prepares the build on App Store and Google Play for final release operation. Since the App Store uses TF builds as the way to push builds to the app store, we don’t need anything extra on that but we need to implement a way to upload the release build to Google Play as a “Timed Publishing” model.

D) Hotfix releases

This is a special branch that mimics the “dev” branch and has the same release workflow. Hotfix releases have an extra step on the “merge to master” step, it also runs pull operation to the “dev” branch after hotfix changes are merged to master. This makes hotfix changes to become available in the “dev” branch.

Using Ant Design as our primary react.js UI framework

A_zx7LTI_ECSAAAAAAAAAAAABkARQnAQ.png

I want to talk about a UI framework we have been using at Nomad Interactive for quite some time now on our react.js applications. We have been separating front-end and back-end parts of our apps for many years and for front-end solutions, we have experimented with angular, vue, and some simpler alternatives but eventually we ended up in react.js world and have been exclusively working with react.js on both web, mobile and desktop products we are creating.

And obviously, we are in need of a powerful, rich UI framework to not bog down on basic stuff like form handling, UI elements for user input, or data representations like data tables, charts… And until the frameworks like angular, react, we have used Twitter bootstrap for years and probably used many different versions of the same thing over and over again…

With React, it’s been more stable for us to pick a solution on, let’s say date, time entries on the forms that we use and support the libraries we love. And in the last year and a half, we have started using Ant Design as our primary UI framework which is built on top of bootstrap. Ant Design framework is built by Alibaba team obviously to empower Alibaba products which may not be at the ant design level when you use alibaba.com or its other network sites, but I’m sure at some point they will be at that level. Regardless, the framework has huge designer, developer talent behind it. Occasionally you see just Chinese parts in the documentation but don’t make that scare you, there is also a huge English-speaking developer community behind it as well.

https://ant.design/

Ant Design is super react.js friendly and everything is very well simplified and streamlined for developers to only worry about the data flow on the app from the back-end APIs through the presenter/controller controllers/classes. We use redux extensively for that.

Eventually, in most cases, we want the same clean and simple representations of UI widgets/elements in a consistent manner. So we find Ant Design’s default state as well as its customization features through simple SCSS or even inherited from package.json through webpack build, which makes things much more atomic designed and configured on our applications.

Ant Design has a huge library of components and well-designed and flexible scaffolding for your layouts.

Screen Shot 2020-12-27 at 8.35.48 PM.jpg

We benefited so much as far as the consistency of the application layouts we build and common language between our designer and our developer to stick with ant component’s general interactions and obviously layout and other details. Not that we are not customizing ant components, it’s just much easier for our designer to work with since it’s well designed and documented and it’s also easier for our developers to customize it for the same reasons.

Here is the official documentation starting with basics: https://ant.design/docs/react/introduce. You can also dive into the components library and start playing with some of its more complex examples in the demonstration embedded in the documentation.

Why we are moving from GitLab self-hosted to gitlab.com

gitlab ci-cd test deploy illustration

Working without a code versioning system is unthinkable. And we progressed from the days of svn to git. Despite having a big competitor like the most popular git service is github.com, gitlab.com is for me a more appealing git hosting (and much more) service compared to github.com.

Gitlab is a fantastic platform that is ahead of github.com in certain aspects. We use GitLab as our primary code management, quality control, continuous integration, and deployment platform in our team. Although Microsoft is pushing hard to catch up on the parts (i.e GitHub actions to catch up GitLab CI/CD pipelines) that they follow, and obviously, much more ahead of gitlab.com on other features.

One of the biggest separating factors for gitlab.com is its self-hosted nature of it. IT’s open source license and software that you can install and host on your own infrasture. In some projects or clients, you may want to host your own isolated code revisioning and build platform.

With this nature of it’s licensing model, we first choose to use GitLab self-hosted to run and maintain GitLab versions over years until last year that we migrated to gitlab.com cloud service.

The biggest underlying reason was to not want to maintain gitlab.com hosted versions and be responsible for the server management, updates/upgrades, and stuff. To be honest, in one of the instances, we spent too much time figuring out upgrade details and making sure we didn’t cause any downtime while we performed upgrades. We also rigorously wanted everything running on the docker swarm pool of servers we manage. And Gitlab itself is not the easiest service to get it running with our current toolset of docker/traefik…

Gitlab.com has the exact same licensing structure between the cloud and the self-hosted versions. This is why it doesn’t make any sense to self-host and maintain infrastructure if you don’t have other reasons not using the cloud version of the service. That’s exactly what we were doing and we quickly experimented on few repos to be migrated and see we could have almost no change needed on our CI/CD pipelines settings that were 100% compatible to continue running on the cloud version. It really was seamless to migrate to the cloud version from the hosted version.

Another beauty of using gitlab.com is how easy to set up hosted “runners” and set them up to be used in the cloud repos for CI/CD pipelines. We often have extra build steps that are generally just optional but just because we could run them on our own runners without worrying about build minutes.

I suggest gitlab.com and its cloud version for both basic git hosting use cases as well as more advanced use cases like ci/cd pipelines or even adding 3rd party services on your code quality process.

https://about.gitlab.com/pricing/

Using gitlab.com as your background workers using CI schedules

ci-cd-test-deploy-illustration_2x.png

 Many years ago, we used IronWorker as our worker running, management service. We were also delegating all infrastructure resources for the workers that required more and more resources as we scaled our app back then. It was great to have the workers separated from our main applications (API, website…).

Just to give you context, the workers – or background scripts – are generally independent and isolated scripts that run in their own schedules to do one and only one type of task – like sending birthday emails, or calculating an index that will be used for a function on the website that is used frequently. Each worker/script has separate schedules. Some run once a day (generally runs nightly), or some run every hour or some run even more frequently like every 5 minutes or so. There are also workers that are designed to always-run, but these tasks also can be designed and coded as scripts that can run in batches and scheduled accordingly. Workers are mostly packaged, all dependencies included scripts that only require a runtime and its external dependencies like database connection, etc…

We used different solutions in different projects over the years along with cloud services like Iron Worker. But I was never satisfied because I wanted something both convenient as well as had nice web UI to be able to have some control – like start/stop/check status of workers as well as see output and error logs. I also didn’t want to run another daemon for this along with my main application and the workers.

I passively searched for a nice solution for years until I realized when we were using gitlab.com runners to run a lot of our CI/CD pipelines and coded up many CI pipelines included multiple steps, often using 3rd party services and bots to control the flow of the pipelines. At the end of the day, a pipeline was a script (or series of scripts or steps) that runs on a runner, in a temporary container in docker/Kubernetes infrastructure. This allows us to use any tool/script language we want, add many environment preparation steps we want, and see the output of the scripts we run.

Gitlab.com CI/CD pipelines support ways to run a pipeline on a schedule without any other trigger (like code push, merge…). This allows us to design our workers as custom pipeline steps and be able to schedule these steps as we want. We can also pass any payload we want from the schedule configuration as a command-line argument to the pipeline scripts.

When I realized this, I experimented with few personal scripts that crawl, extract and aggregates stuff for myself – like a script that processes new craigslist posts through RSS feeds, cache them, and sends notifications on slack. Also, I was able to run these scripts on my own self-hosted runner that didn’t incur any CI/CD minutes. It was perfect.

pipeline_schedules_list.png

You can design, code, and schedule your background scripts/workers as gitlab.com pipeline steps. Running them on either shared cloud runners (gitlab.com gives 400 minutes per project group per month), or use your own self-hosted runner on a docker swarm (or Kubernetes).

3 ways of redirections in react-router

Drive Around The Mountain by pine  watt
by pine watt

We use “react-router” which is a general underlying routing package. And with it, we use react-router-dom which manages routing on web applications together with react-router package.

react-router-dom essentially is a layer on top of the browser’s history API. It tracks URL changes in the browser and maps to a router where it’s defined in a single place on our web apps. Generally named as router or routes.js.

The rest of the app, both programmatically (javascript) or the HTML links uses to root path addresses to request navigation in the router. The rest is handled by react-router.

3 Types of Navigation Requests in React JS Web Applications

1) Links – Replacements of <a> tags in reactjs web apps

We use a special “Link” component from the react-router-dom library that wraps simple links with javascript event handlers and maps directly to react-router where it’s handled as URL change without page refresh.

To use Link component, first import it from react-router-dom package: 

import { Link } from 'react-router-dom'

and to use the component:

<Link to="/">...text, button or other elements....</Link>

Keep in mind that <a> tags are still functional but may have complications on the react-router-dom package to capture if the link is internal. Or external so it’s captured properly by react-router-dom.

2) Redirections as Component in “render” methods

This method is not a good practice in my opinion but it’s a quick solution and in some cases where of your page component is directly resulting a redirection all together which will need to be unmounted/destructed and the application has to navigate to another page component. Like unauthorized access, login page, error page redirection…

Simply import and use the “Redirect” component from the react-router-dom package. Here is a scenario in your component render method that your page is resulting in unauthorized access:

if (!authorized) {
    return <Redirect to="/login" />
}

3) Programmatical redirect from javascript

This is probably the most common scenario where a redirect needed when certain user interaction synchronously or asynchronously results in the redirect. Like clicking a button that calls the API and results in the redirect when it successfully resolves. 

This case is unfortunately not very straightforward. In order to access history API, you need to configure it as a prop to all components from the router. For this, there has to be a shared history instance of the browser. So at the highest level when we define our router using react-router and react-router-dom package wrappers. We need to create and pass the history instance that will enable the “history” prop in the components so we can push new changes or request navigation to previous steps (going back). We will use the “history” package to create a browser history instance.

For the first time set up, after installing the history package from npm, in your app container. Import “createBrowserHistory” method from the history package. Then call it to create an instance of browser history.

import { createBrowserHistory } from 'history'
const history = createBrowserHistory()

After that, where you define redux Provider, before your root “router” definition, wrap your root router component with BrowserRouter (which you may already have for the react-router-dom package), pass the history instance to your BrowserRouter component as a prop:

<Provider store={store}>
    <BrowserRouter history={history}>
        <Route path="/:filter?" component={App} />
    </BrowserRouter>
</Provider>

You’re ready to start manipulating browser history from your components.

In your components, whenever you need to programmatically redirect, deconstruct (or directly use) “history” object from props of the component. Then, to redirect to a new address:

const { history } = this.props
history.push('/dashboard')

This will initiate react-router-dom to listen to the history instance and resolve the route and re-render the whole app container with the component assigned to the route requested.

Some of these methods feel unnatural but sometimes all we need. Good to know different approaches to initiate dom, native or redux routers in different platforms. The approach above is focused on a web-based application but the same/most approaches can be applied to react-native applications as well.

Better code history with gitlinter / commitlinter

Working with git (or a similar version control system) is not an essential part of coding. We do frequent code commits as part of our workflow. Every developer has their own way of committing their code and labeling the changes made in the commit with commit messages. We often do this without putting enough thought into our commit messages that essentially define our change log in a more readable way when we look in the history of changes.

Photo by Yancy Min on Unsplash

We need better commit messages

This brings us why having consistent, concise, and easier to follow commit messages very important. Better commit messages will make your code history, easy to follow, and navigate in the event to understand what happened when. In some cases, we want to use these changelogs more formally for internal purposes or external use like public changelogs or release notes. There are even tools that help to automate / to generate changelogs from commit messages.

Source: xkcd

Better teamwork

Working with multiple developers even as little as two developers on a project will require clear communication on the version control system. The commit messages do not only appear in the code history, but also in blame logs as well as in-IDE helper tools like git lens for Visual Studio Code when the last change was done on the particular line under the cursor, by who, and with which commit message. Features like these make the code writing experience much richer and passively collaborative between team members. So commit messages actually appear in different places in different ways.

How

Team should define clear set of commit message rules starting from their git flow. What I mean by that is how they do their branching, tagging strategy. This generally allows certain rules to be inherited to commit messages.

Regardless of the rules, people will forget. Easiest and best way to implement these rules to make sure there is a automated control mechanism that rejects/alerts if the commit message written is abiding these rules. “commitlinter” is a nicely designed npm package that is, when registered as a git pre-commit hook, checks the commit message and based on the commitlinter configuration, allows or rejects the commit if the commit message follows all the requirements or tell what’s going wrong with the commit message.

commitlinter comes with pre-defined conventions that are adapted by big companies/teams that are different in approach and have different focuses. 

https://www.conventionalcommits.org/en/v1.0.0/

I suggest you to review these different conventions and pick a convention that speaks closer to what you want to follow. And you can extend and customize its rules with your own approach.

At a high level, defining “scope” for your commit messages is the most critical categorization of the change content when commiting. An approach like the below is a good start:

  • feat: Add a new feature to the codebase (MINOR in semantic versioning).
  • fix: Fix a bug (equivalent to a PATCH in Semantic Versioning).
  • docs: Documentation changes.
  • style: Code style change (semicolon, indentation…).
  • refactor: Refactor code without changing public API.
  • perf: Update code performances.
  • test: Add a test to an existing feature.
  • chore: Update something without impacting the user (ex: bump a dependency in package.json).

We use a simplified version of this scope set. A sample commitlinter config file:

module.exports = {
	parserPreset: 'conventional-changelog-conventionalcommits',
	extends: ["@commitlint/config-conventional"],
	rules: {
		"type-enum": [
			2,
			"always",
			[
				"feat",
				"fix",
				"cont",
				"chore"
			]
		]
	}
};

See all rules in its official documentation: https://github.com/conventional-changelog/commitlint/blob/master/docs/reference-rules.md

commitlinter also can be configured with husky which is another npm package that handles git hook registration in npm install commands.

The combination of both projects in a NodeJS project will allow setting and configuring the hooks easily.

Change logs from commit messages

Conventional commit and commitlinter gets juicer when combined with an auto-generated changelog in a technical project – even for internal use cases. There are changelog generators from git-log that gives you conventional changelog which will be much more consistent throughout the team members who are making commits to a single repo as well as having well consistent updates in the commit messages.

Conventional changelog generators can translate each conventional commit spec to nicely categorized changelog in a simple configuration file like:

{
    "types": [
      {"type": "feat", "section": "Features"},
      {"type": "fix", "section": "Bug Fixes"},
      {"type": "chore", "hidden": true},
      {"type": "docs", "hidden": true},
      {"type": "style", "hidden": true},
      {"type": "refactor", "hidden": true},
      {"type": "perf", "hidden": true},
      {"type": "test", "hidden": true}
    ],
    "commitUrlFormat": "https://github.com/mokkapps/changelog-generator-demo/commits/{{hash}}",
    "compareUrlFormat": "https://github.com/mokkapps/changelog-generator-demo/compare/{{previousTag}}...{{currentTag}}"
  }

That generates a nicely organized markdown or HTML document. AngularJS is one of the known project utilized conventional commit messages and conventional changelog. See their changelog for an example of this; https://github.com/angular/angular/blob/master/CHANGELOG.md

Happy conventional commits…

Using Cloudinary for image cloud storage with image transformations in your NodeJS express app in Heroku

Here we are with another article about the development aspect of photo/image management (storage, serving, retrieval). I’ve previously (right before this article) wrote about Authenticating and Getting Instagram Photos in NodeJS/Express application. This story is about manually storing, handling upload, download and serving static photo/image using a CDN service called Cloudinary.

Content should be separate than the application

We’re (web/back-end/front-end developers) building apps, sites in many different ways (different platforms, languages, stack). One thing very common and old school is that everything on the site is organized in the same bucket. So when we code and deploy a site, it’s HTML, CSS, back-end code, images, videos, fonts, etc… all in the same place. Now we have distributed deployment systems with having multiple instances of our application on different web servers too. Which made us do a soft transition to keep common files (that can be changed) like uploads folders in block storages like s3 or azure blob… But it still doesn’t do the full justice that both static and dynamic content of an application/website should be completely separated than the application code. This is not a new practice but it’s a practice that can be missed so easily.

It’s so easy to leave an image that is used in a blog post within the codebase (which is wrong). A static content that will not be used to render your page on the back-end ideally doesn’t belong to the place where you store your application (code). Yet, it shouldn’t be served (or requested) from the same servers which are responsible (only should be responsible) for rendering and serving your pages. Tiring your web server with serving images or compiled CSS is not optimal. This will also affect your site’s performance that everything is coming from the same source. Having distributed sources will make your browser to manage parallel downloads of your site’s resources faster. No brainer!

We’ll not get into the techniques of how to separate these different things in different places in this article, but we’ll talk about images specifically.

Images need a big brother

This was a novelty in the past where we wanted to have multiple sizes of an image/photo so we can economically request the right size in different pages – example: get 100px width thumbnail in the page where we show photos in a grid, show the 500px width version on the lightbox, and link out to the original photo in the “download” button. This makes total sense right? Strategizing how to have the different versions ready on your server (or CDN) is another thing. So many self-solutions you can use or code it up. But from user experience (admin/editor) standpoint, nobody wants to do this manually or even automatically but wait for the server to resize and prepare these versions when uploading a single photo to your CMS/app/back-end. To me, that is a one-way road. I only want to upload an image and only wait the time takes the file transfer from my device to the server. Done!

What is Cloudinary and should I use it?

Cloudinary is that big brother and storage and server together. Smart CDN for images and videos. It has a pretty decent free package that will be enough for almost all personal, experimental and small projects. If you have decent size traffic, you may think to pay or optimize your solution with Cloudinary.

Cloudinary hosts and serves images for you. It’ll be your storage bucket that also has many out of box solutions for known CMSs like WordPress. I like the API/SDK route which they have SDKs and well-designed API for almost all platforms. We’ll play with NodeJS below.

The magic cloudinary has that is compelling that it can do so many varieties of transformations on your images on the fly (and caches them). Basic things like color filters, crop, resize, rotate etc… But the real thing is where they have face recognization that you can create square avatars with intelligently telling cloudinary to give you the face focused position in the center on your circle avatar with transparent png background and have 2px border around circle cropped avatar. All of it happens over URL parameters. True magic. I haven’t digg the video side of this but I read bunch of smart stuff on the streaming site which is also worth considering cloudinary as one-stop-shop for visual static assets.

Add Cloudinary service on your heroku application

Adding a service to heroku application is very easy and mostly done in command line. In order to create a new cloduinary service as add-on to your application, in your application folder run:

heroku addons:create cloudinary:starter

This command will create a new cloudinary account linked to your heroku account and add cloduinary credentials to your heroku config – environment variables. You can see and copy the variables to your local .env file with

heroku config

Using it on nodejs/express app

Install first:

npm install --save express body-parser path multer cloudinary

server.js

https://gist.github.com/mfyz/1f3628acde30375b7b7fed04ed4a904e.js

See this example on github: https://github.com/mfyz/heroku-cloudinary-uploads-example

WordPress and other sites

Cloudinary has SDKs and official plugins to well-accepted platforms like WordPress. Check out their official documentation about the ent libraries and plugins


You can also use my invitation link to give me extra free credits: https://cloudinary.com/invites/lpov9zyyucivvxsnalc5/cdlhm6z9q63gdufko1kj

Analytics Data on SQL Database – Best database and table design for billions of rows of data

This is not an article that I am writing but I’m mostly quoting a great gem on a stack overflow answer I came across when I was researching a DIY way to store and create analytics reports for a small to medium size project. The project’s type doesn’t matter because this is a generic problem and great solution.

Why not use analytics tools/services?

I am in constant search of the better alternatives or simpler versions of the solutions we use at my team. We certainly use many services and tools from open source to licensed software. But I still choose to understand, know and be able to apply these solutions by myself on a custom solution where I have full control over the data, output and user experience.

So I casually read and research how others approach the issues or queries wander in my mind.

Then I stumbled upon this stack overflow thread with a brilliant answer that contains steps to try out from scratch that I suggest any engineer to just try and play on their own time.

PostgreSQL and BRIN indexes

To create a sample table with 1.7 billion rows of a sample sensor data (temperature read from the sensor with timestamps in the logs):

EXPLAIN ANALYZE
CREATE TABLE electrothingy
AS
  SELECT
    x::int AS id,
    (x::int % 20000)::int AS locid,  -- fake location ids in the range of 1-20000
    now() AS tsin,                   -- static timestmap
    97.5::numeric(5,2) AS temp,      -- static temp
    x::int AS usage                  -- usage the same as id not sure what we want here.
  FROM generate_series(1,1728000000) -- for 1.7 billion rows
    AS gs(x);

                             QUERY PLAN                              
--------------------------------------------------------------------
 Function Scan on generate_series gs  (cost=0.00..15.00 rows=1000 width=4) (actual time=173119.796..750391.668 rows=1728000000 loops=1)
 Planning time: 0.099 ms
 Execution time: 1343954.446 ms
(3 rows)

So it took 22min to create the table. Largely, because the table is a modest 97GB. Next, we create the indexes,

CREATE INDEX ON electrothingy USING brin (tsin);
CREATE INDEX ON electrothingy USING brin (id);    
VACUUM ANALYZE electrothingy;

It took a good long while to create the indexes too. Though because they’re BRIN they’re only 2-3 MB and they store easily in ram. Reading 96 GB isn’t instantaneous, but it’s not a real problem for my laptop at your workload.

Now we query it.

EXPLAIN ANALYZE
SELECT max(temp)
FROM electrothingy
WHERE id BETWEEN 1000000 AND 1001000;

                             QUERY PLAN                                                                  
--------------------------------------------------------------------
 Aggregate  (cost=5245.22..5245.23 rows=1 width=7) (actual time=42.317..42.317 rows=1 loops=1)
   ->  Bitmap Heap Scan on electrothingy  (cost=1282.17..5242.73 rows=993 width=7) (actual time=40.619..42.158 rows=1001 loops=1)
         Recheck Cond: ((id >= 1000000) AND (id <= 1001000))
         Rows Removed by Index Recheck: 16407
         Heap Blocks: lossy=128
         ->  Bitmap Index Scan on electrothingy_id_idx  (cost=0.00..1281.93 rows=993 width=0) (actual time=39.769..39.769 rows=1280 loops=1)
               Index Cond: ((id >= 1000000) AND (id <= 1001000))
 Planning time: 0.238 ms
 Execution time: 42.373 ms
(9 rows)

Update with timestamps

Here we generate a table with different timestamps in order to satisfy the request to index and search on a timestamp column, creation takes a bit longer because to_timestamp(int) is substantially more slow than now() (which is cached for the transaction)

EXPLAIN ANALYZE
CREATE TABLE electrothingy
AS
  SELECT
    x::int AS id,
    (x::int % 20000)::int AS locid,
    -- here we use to_timestamp rather than now(), we
    -- this calculates seconds since epoch using the gs(x) as the offset
    to_timestamp(x::int) AS tsin,
    97.5::numeric(5,2) AS temp,
    x::int AS usage
  FROM generate_series(1,1728000000)
    AS gs(x);

                             QUERY PLAN                                                                
--------------------------------------------------------------------
 Function Scan on generate_series gs  (cost=0.00..17.50 rows=1000 width=4) (actual time=176163.107..5891430.759 rows=1728000000 loops=1)
 Planning time: 0.607 ms
 Execution time: 7147449.908 ms
(3 rows)

Now we can run a query on a timestamp value instead,,

EXPLAIN ANALYZE
SELECT count(*), min(temp), max(temp)
FROM electrothingy WHERE tsin BETWEEN '1974-01-01' AND '1974-01-02';
                                                                        
                              QUERY PLAN                                                                         
--------------------------------------------------------------------
 Aggregate  (cost=296073.83..296073.84 rows=1 width=7) (actual time=83.243..83.243 rows=1 loops=1)
   ->  Bitmap Heap Scan on electrothingy  (cost=2460.86..295490.76 rows=77743 width=7) (actual time=41.466..59.442 rows=86401 loops=1)
         Recheck Cond: ((tsin >= '1974-01-01 00:00:00-06'::timestamp with time zone) AND (tsin <= '1974-01-02 00:00:00-06'::timestamp with time zone))
         Rows Removed by Index Recheck: 18047
         Heap Blocks: lossy=768
         ->  Bitmap Index Scan on electrothingy_tsin_idx  (cost=0.00..2441.43 rows=77743 width=0) (actual time=40.217..40.217 rows=7680 loops=1)
               Index Cond: ((tsin >= '1974-01-01 00:00:00-06'::timestamp with time zone) AND (tsin <= '1974-01-02 00:00:00-06'::timestamp with time zone))
 Planning time: 0.140 ms
 Execution time: 83.321 ms
(9 rows)

Result:

 count |  min  |  max  
-------+-------+-------
 86401 | 97.50 | 97.50
(1 row)

So in 83.321 ms we can aggregate 86,401 records in a table with 1.7 Billion rows. That should be reasonable.

Hour ending

Calculating the hour ending is pretty easy too, truncate the timestamps down and then simply add an hour.

SELECT date_trunc('hour', tsin) + '1 hour' AS tsin,
  count(*),
  min(temp),
  max(temp)
FROM electrothingy
WHERE tsin >= '1974-01-01'
  AND tsin < '1974-01-02'
GROUP BY date_trunc('hour', tsin)
ORDER BY 1;
          tsin          | count |  min  |  max  
------------------------+-------+-------+-------
 1974-01-01 01:00:00-06 |  3600 | 97.50 | 97.50
 1974-01-01 02:00:00-06 |  3600 | 97.50 | 97.50
 1974-01-01 03:00:00-06 |  3600 | 97.50 | 97.50
 1974-01-01 04:00:00-06 |  3600 | 97.50 | 97.50
 1974-01-01 05:00:00-06 |  3600 | 97.50 | 97.50
 1974-01-01 06:00:00-06 |  3600 | 97.50 | 97.50
 1974-01-01 07:00:00-06 |  3600 | 97.50 | 97.50
 1974-01-01 08:00:00-06 |  3600 | 97.50 | 97.50
 1974-01-01 09:00:00-06 |  3600 | 97.50 | 97.50
 1974-01-01 10:00:00-06 |  3600 | 97.50 | 97.50
 1974-01-01 11:00:00-06 |  3600 | 97.50 | 97.50
 1974-01-01 12:00:00-06 |  3600 | 97.50 | 97.50
 1974-01-01 13:00:00-06 |  3600 | 97.50 | 97.50
 1974-01-01 14:00:00-06 |  3600 | 97.50 | 97.50
 1974-01-01 15:00:00-06 |  3600 | 97.50 | 97.50
 1974-01-01 16:00:00-06 |  3600 | 97.50 | 97.50
 1974-01-01 17:00:00-06 |  3600 | 97.50 | 97.50
 1974-01-01 18:00:00-06 |  3600 | 97.50 | 97.50
 1974-01-01 19:00:00-06 |  3600 | 97.50 | 97.50
 1974-01-01 20:00:00-06 |  3600 | 97.50 | 97.50
 1974-01-01 21:00:00-06 |  3600 | 97.50 | 97.50
 1974-01-01 22:00:00-06 |  3600 | 97.50 | 97.50
 1974-01-01 23:00:00-06 |  3600 | 97.50 | 97.50
 1974-01-02 00:00:00-06 |  3600 | 97.50 | 97.50
(24 rows)

Time: 116.695 ms

It’s important to note, that it’s not using an index on the aggregation, though it could. If that’s your typical query you probably want a BRIN on date_trunc('hour', tsin) therein lies a small problem in that date_trunc is not immutable so you’d have to first wrap it to make it so.

Partitioning

Another important point of information on PostgreSQL is that PG 10 bring partitioning DDL. So you can, for instance, easily create partitions for every year. Breaking down your modest database into minor ones that are tiny. In doing so, you should be able to use and maintain btree indexes rather than BRIN which would be even faster.

CREATE TABLE electrothingy_y2016 PARTITION OF electrothingy
    FOR VALUES FROM ('2016-01-01') TO ('2017-01-01');

This is a great answer to the topic around working with analytics data on SQL databases. Finally thinking about table partitioning is always a good plan-ahead strategy for any data gets over millions and have distributed data around timestamps.

Reference: Best database and table design for billions of rows of data

Using Heroku for a quick development environment

Heroku is an industry-changing service that is established in 2007. It transformed how developers create and deploy apps today. With its add-ons marketplace, Heroku became the development hub that you can easily enable 3rd party cloud services. These services can be in many different categories that a web application may require. From database services, caching, image processing to mail delivery and so on…

Heroku supports many modern development languages that are actively used with big communities like PHP, nodejs, ruby, python, go, java… The beauty of the Heroku applications is that, managed by Heroku and very very easy to understand. They are also very easy to scale, deploy apps in Heroku infrastructure… All Heroku apps are deployed to given app name’s subdomain under herokuapp.com or can be easily set to have a custom domain for free.

Essentially, Heroku runs on a command line interface and an internal git repository to manage versions of your code. When you set up a new project folder, Heroku CLI tool registers your app and assigns a git repository. Heroku CLI doesn’t initiate git repository on your folder, so if it’s a non-git folder, you need to git init on your project folder first.

$ mkdir hello-world && cd hello-world
$ echo "{}" > composer.json
$ echo "<!--? print 'hello';" --> index.php
$ git init

$ heroku create
Creating sharp-rain-871... done, stack is heroku-18
http://sharp-rain-871.herokuapp.com/ | https://git.heroku.com/sharp-rain-871.git
Git remote heroku added

$ git add . && git commit -m "first commit"
$ git push heroku master
Counting objects: 488, done.
Delta compression using up to 8 threads.
Compressing objects: 100% (367/367), done.
Writing objects: 100% (488/488), 231.85 KiB | 115.92 MiB/s, done.
Total 488 (delta 86), reused 488 (delta 86)
remote: Compressing source files... done.
remote: Building source:
remote:
remote: -----> Node.js app detected
remote:
remote: -----> Creating runtime environment
remote:
remote: NPM_CONFIG_LOGLEVEL=error
remote: NODE_VERBOSE=false
remote: NODE_ENV=production
remote: NODE_MODULES_CACHE=true
remote:
remote: -----> Installing binaries
remote: engines.node (package.json): 10.13.0
remote: engines.npm (package.json): unspecified (use default)
remote:
remote: Resolving node version 10.13.0...
remote: Downloading and installing node 10.13.0...
remote: Using default npm version: 6.4.1
....
remote: -----> Build succeeded!
remote: -----> Discovering process types
remote: Procfile declares types → web
remote:
remote: -----> Compressing...
remote: Done: 19M
remote: -----> Launching...
remote: Released v3
remote: http://sharp-rain-871.herokuapp.com (http://sharp-rain-871.herokuapp.com/) deployed to Heroku
remote:
remote: Verifying deploy... done.
To https://git.heroku.com/nameless-savannah-4829.git
* [new branch] master → master

I highly suggest all developers adapt Heroku in their workflow, at least for the sandbox & playground purposes.

I have created some boilerplate repositories in the past:

Quick and dirty set up Graylog in 5 minutes with docker

Docker made things super easy if you are curious about a new open source tool to try and even use it with isolated installations on your machine. In this article, I’ll show quick steps to install and give graylog a try with a simple nodejs application to send logical errors to graylog instance.

1) Copy the docker-compose.yml file content below to a file then run:

docker-compose -f docker-compose.yml up

2) Login to graylog with opening http://127.0.0.1:9000/ in the browser
Username: admin
Password: admin

3) Configure inputs: Go to System > Inputs
Add new “GELF UDP” configuration as global input using port 12201

4) Run the simple nodejs application below to send logs to graylog. First init npm and install graylog2 package from npm with:

npm install -s graylog2

docker-compose.yml

version: '2'
services:
  mongodb:
    image: mongo:3
  elasticsearch:
    image: docker.elastic.co/elasticsearch/elasticsearch-oss:6.6.1
    environment:
      - http.host=0.0.0.0
      - transport.host=localhost
      - network.host=0.0.0.0
      - "ES_JAVA_OPTS=-Xms512m -Xmx512m"
    ulimits:
      memlock:
        soft: -1
        hard: -1
    mem_limit: 1g
  graylog:
    image: graylog/graylog:3.0
    environment:
      - GRAYLOG_PASSWORD_SECRET=mfyz11sanane22banane
      # Password: admin
      - GRAYLOG_ROOT_PASSWORD_SHA2=8c6976e5b5410415bde908bd4dee15dfb167a9c873fc4bb8a81f6f2ab448a918
      - GRAYLOG_HTTP_EXTERNAL_URI=http://127.0.0.1:9000/
    links:
      - mongodb:mongo
      - elasticsearch
    depends_on:
      - mongodb
      - elasticsearch
    ports:
      - 9000:9000 # Graylog web interface and REST API
      - 5555:5555 # Raw/Plaintext TCP
      - 1514:1514 # Syslog TCP
      - 1514:1514/udp # Syslog UDP
      - 12201:12201 # GELF TCP
      - 12201:12201/udp # GELF UDP

app.js

var graylog2 = require("graylog2");

var logger = new graylog2.graylog({
    servers: [
        { host: "127.0.0.1", port: 12201 },
    ],
    facility: "Test.js",
});

logger.on("error", function(error) {
    console.error("Error while trying to write to graylog2:", error);
});

setTimeout(() => {
    // logger.log("What we've got here is...failure to communicate");
    logger.log("With some data coming...", {
        cool: 'beans',
        test: { 
           yoo: 123,
        }
    });
    // logger.notice("What we've got here is...failure to communicate");

    console.log('logged?');
    // process.exit();
}, 2000);

Web, UI and browser automation with headless browsers

Wanted to give you a short information about browser automation. You visualize a desktop app when a “browser” comes to minds right? All browsers use an engine to render web pages on our screen. And these engines can actually work without rendering pages in the UI. All they need is to render the elements in memory. From there, it can allow us to interact with rendered pages programmatically without displaying the rendered page on our screens. There are browsers only works in this mode and they are called “headless” browsers. Means they have no UI. This browsers are meaningless for general consumers but it comes very handy to developer and testing community. Many companies build their testing and QA process utilizing these headless browser, do execute their UI flows with browser automation scripts. For instance, headless browser can be programmed to run and simulate the following user experience flow:

  • Load http://example.com web page,
  • Wait until page is completely rendered including javascript and css,
  • Fill “Fatih” to the field called “Name”,
  • Click to the button called “Send”,
  • Wait 5 seconds,
  • Take screenshot and save as JPEG

This can be very useful when doing regression tests.

Event utilizing screenshots with headless browsers will be very useful. There are many companies doing screenshot comparison for high level understanding changes done visually based on any given iteration on the code. This process simply takes and keeps versions of each page and in every release, it takes a new one with latest version and compares the pixels (and colors) to the previous version to determine a percentage for the change it detects. Then you can set some report and process to make sure you track of big changes to detect if a tiny css change blew a page you usually don’t test manually. It becomes very meaningful when you think about a web page with 100 different pages.

Are there any headless browsers I can use?

The well known headless browsers; the one named “Phantom” (and phantomjs) that is big on nodejs community. There is also headless chrome which is based on chromium.

There is an extensive list of all headless browsers out there here: https://github.com/dhamaniasad/HeadlessBrowsers

Happy browser automations 🙂

Bitbucket static website hosting

This is a short explanation of a feature I really like about github and now it’s imitated in bitbucket. Essentially allows you to host a static site under your account.

It doesn’t support anything back-end but you can use grunt, gulp like automators to create a content management system that compiles whole site to static files then serve it up with this trick.

Very simple steps to do this. My username is “mfyz” in bitbucket and bitbucket allows 1 static website hosting per account. If you create a new repository called: “mfyz.bitbucket.io” and throw an index.html file, you can access the static website from “http://mfyz.bitbucket.io” address. Bitbucket will serve anything static including css, javascript files as well as binaries like images.

Great resource to learn programming Swift

If you are interested in getting started with mobile development and if you like to start with iOS, I bumped into a great resource to learn Swift. There are tons of sample projects and great video walkthroughs as well as source codes of the projects you can download from GitHub.

Lessons Page:
https://swifteducation.github.io/teaching_app_development_with_swift/

Available on iTunesU to follow lessons on mobile devices:
https://itunes.apple.com/us/course/app-development-teaching-swift/id1003406963

Sample projects’ source codes:
https://github.com/swifteducation