Simple Gitlab CI/CD Deployment via SSH+RSYNC

Setting up a project that runs in a web server (consider a traditional server like an AWS EC2 instance) requires you to deploy your code and configure the application. Doing this once may not be a big task but doing it continuously is not. Not to mention it will get impractical. Especially if it’s a project that you work on and maintain actively.

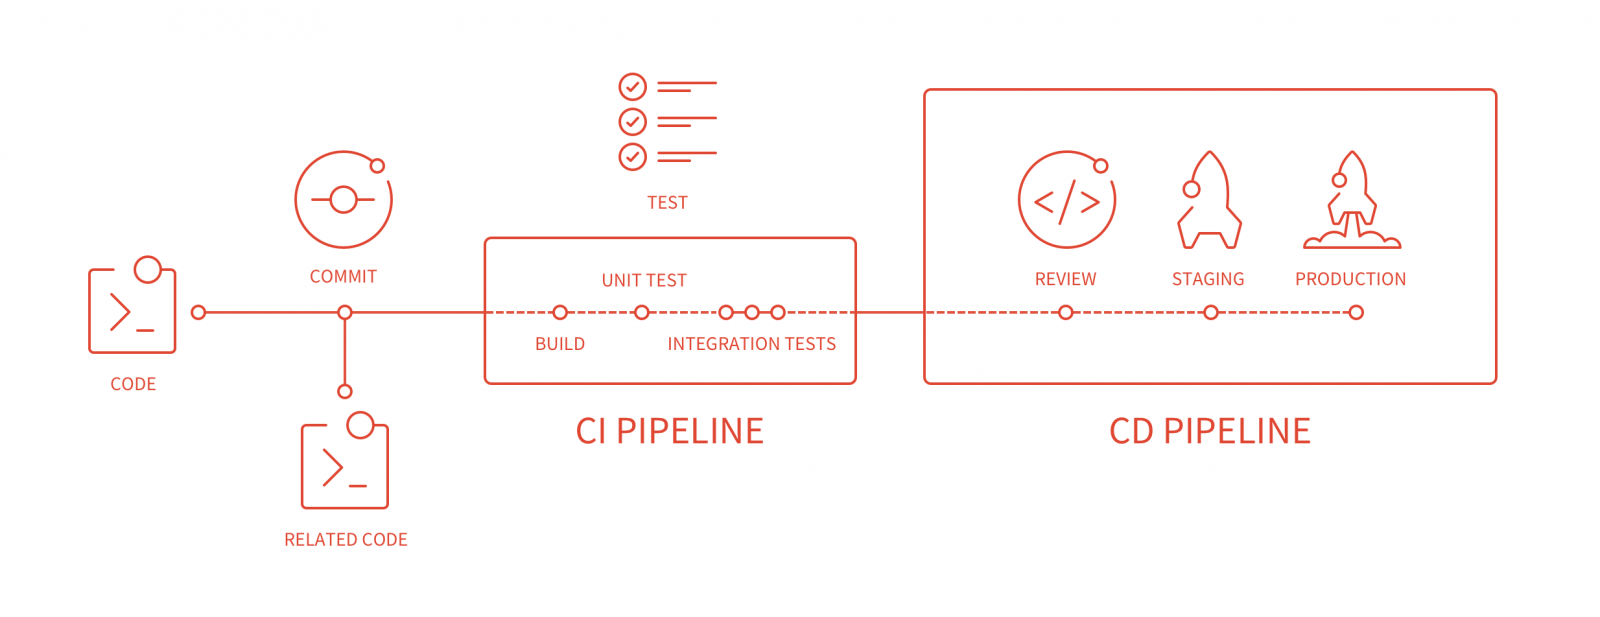
Setting up a good way to deploy your application is one of the key characteristics of a successful development setup. Ideally, your project should have an automated way to deploy, and roll back changes.

It makes a lot of sense of to use version control systems as the base of deployments. VCS systems are about how code changes are tracked by individual developers, comes together and merges back to the main branches. It perfectly fits well to have the capabilities to track deployments to these changes too.

The VCS services like Github and Gitlab now come with powerful CI/CD pipelines supports these use cases almost out of the box.

There are also many ways to achieve what I’m going to describe in this post. But I take this as my bare minimum, plain and simple way to deploy code and perform simple tasks to restart my application automatically as part of my code workflow.

We will be using SSH and RSYNC to update your code remotely, then update the changed/added/deleted files in your target folder then restart your application if needed.

In a PHP-based project, updating files would be enough because apache will be running the scripts in every single request unless you are using a caching module – which even comes with an automatic cache refresh if the file is changed.

If you are deploying a NodeJS (or similar) app that needs to be re-started, then we’ll use remote SSH command to perform a restart operation from your CI/CD pipeline.

Let’s jump right in the .gitlab-ci.yml example and I will point out the key areas in this template.

image: node

stages:
  - deploy

variables:
  npm_config_cache: "$CI_PROJECT_DIR/.npm"

cache:
  key: ${CI_COMMIT_REF_SLUG}
  paths:
    - .npm

production_deployment:
  stage: deploy
  image: alpine
  only:
    - master
  before_script:
    - apk update
    - apk add openssh git curl rsync
    - git checkout -B "$CI_BUILD_REF_NAME" "$CI_BUILD_REF"
  variables:
    DOCKER_DRIVER: overlay
    SERVER_NAME: "my-server-name"
    CONNECTION_STR: "[email protected]"
    ENVIRONMENT: "production"
    PROJECT_NAME: "myproject"
    SLACK_CI_CHANNEL: "#ci-myproject"
    RSYNC_EXCLUDES: "--exclude 'storage' --exclude '.env' --exclude 'node_modules' --exclude 'keys' --exclude '.git' --exclude '.yarn-cache'"
    RSYNC_BEFORE_HOOK: "mkdir -p $DEPLOY_PATH && rsync"
    DEPLOY_PATH: "/srv/data/deploy/${PROJECT_NAME}/production"
    SERVE_PATH: "/srv/data/www/${PROJECT_NAME}/production"
    PRIVATE_KEY: $SSH_PRIVATE_KEY_DEPLOYER
  script:
    - mkdir -p ~/.ssh
    - 'which ssh-agent || ( apk add --update openssh )'
    - eval "$(ssh-agent -s)"
    - echo "${PRIVATE_KEY}" | tr -d ' ' | base64 -d | ssh-add -
    - '[[ -f /.dockerenv ]] && echo -e "Host *\\n\\tStrictHostKeyChecking no\\n\\n" > ~/.ssh/config'
    - ssh "$CONNECTION_STR" "mkdir -p $SERVE_PATH $DEPLOY_PATH;";
    - rsync -avzqR --rsync-path="$RSYNC_BEFORE_HOOK" $RSYNC_EXCLUDES --delete -e 'ssh' ./ "$CONNECTION_STR:$DEPLOY_PATH";
    - ssh "$CONNECTION_STR" "cd $DEPLOY_PATH; rsync -avqR --delete ${RSYNC_EXCLUDES} ./ ${SERVE_PATH}";
    - ssh "$CONNECTION_STR" "cd ${SERVE_PATH}; npm install --production";
    - ssh "$CONNECTION_STR" "if forever list | grep 'production/server_run.js'; then forever stop ${SERVE_PATH}/server_run.js; fi; forever start --workingDir ${SERVE_PATH} ${SERVE_PATH}/server_run.js"
    - 'cd $CI_PROJECT_DIR && sh ./scripts/notify_slack.sh "${SLACK_CI_CHANNEL}" ":rocket: Build on \\`$ENVIRONMENT\\` \\`$CI_BUILD_REF_NAME\\` deployed to $SERVER_NAME! :white_check_mark: Commit \\`$(git log -1 --oneline)\\` See <https://gitlab.com/myproject/$(basename $PWD)/commit/$CI_BUILD_REF>"'
  environment:
    name: production
    url: <http://myproject.com>

Essentially we need to do:

  1. Upload (or update) the files in the server
  2. Restart the application (if needed)

You get a deployment log like this:

Running with gitlab-runner 15.4.0~beta.5.gdefc7017 (defc7017)
  on green-4.shared.runners-manager.gitlab.com/default ntHFEtyX
section_start:1664673660:prepare_executor
Preparing the "docker+machine" executor
Using Docker executor with image alpine ...
Pulling docker image alpine ...
Using docker image sha256:9c6f0724472873bb50a2ae67a9e7adcb57673a183cea8b06eb778dca859181b5 for alpine with digest alpine@sha256:bc41182d7ef5ffc53a40b044e725193bc10142a1243f395ee852a8d9730fc2ad ...
section_end:1664673666:prepare_executor
section_start:1664673666:prepare_script
Preparing environment
Running on runner-nthfetyx-project-17714851-concurrent-0 via runner-nthfetyx-shared-1664673617-f4952085...
section_end:1664673667:prepare_script
section_start:1664673667:get_sources
Getting source from Git repository
$ eval "$CI_PRE_CLONE_SCRIPT"
Fetching changes with git depth set to 50...
Initialized empty Git repository in /builds/amazingproject/website/.git/
Created fresh repository.
Checking out 7ab562d5 as staging...

Skipping Git submodules setup
section_end:1664673681:get_sources
section_start:1664673681:step_script
Executing "step_script" stage of the job script
Using docker image sha256:9c6f0724472873bb50a2ae67a9e7adcb57673a183cea8b06eb778dca859181b5 for alpine with digest alpine@sha256:bc41182d7ef5ffc53a40b044e725193bc10142a1243f395ee852a8d9730fc2ad ...
$ apk update && apk add git curl rsync openssh openssh-client python3
fetch https://dl-cdn.alpinelinux.org/alpine/v3.16/main/x86_64/APKINDEX.tar.gz
fetch https://dl-cdn.alpinelinux.org/alpine/v3.16/community/x86_64/APKINDEX.tar.gz
v3.16.2-221-ge7097e0782 [https://dl-cdn.alpinelinux.org/alpine/v3.16/main]
v3.16.2-229-g1f881aca9b [https://dl-cdn.alpinelinux.org/alpine/v3.16/community]
OK: 17033 distinct packages available
(1/33) Installing ca-certificates (20220614-r0)
.
.
.
(33/33) Installing rsync (3.2.5-r0)
Executing busybox-1.35.0-r17.trigger
Executing ca-certificates-20220614-r0.trigger
OK: 78 MiB in 47 packages
$ git clone https://github.com/MestreLion/git-tools.git && git-tools/git-restore-mtime
Cloning into 'git-tools'...
12,931 files to be processed in work dir
Statistics:
         0.57 seconds
       13,151 log lines processed
           59 commits evaluated
        2,204 directories updated
       12,931 files updated
$ which ssh-agent || ( apk add --update openssh )
/usr/bin/ssh-agent
$ eval "$(ssh-agent -s)"
Agent pid 54
$ echo "${PRIVATE_KEY}" | tr -d ' ' | base64 -d | ssh-add -
Identity added: (stdin) ((stdin))
$ mkdir -p ~/.ssh
$ [[ -f /.dockerenv ]] && echo -e "Host *\n\tStrictHostKeyChecking no\n\n" > ~/.ssh/config
$ ssh "$CONNECTION_STR" "mkdir -p $DEPLOY_PATH;";
Warning: Permanently added '199.192.23.254' (ED25519) to the list of known hosts.
$ echo "--------> Copy latest codebase to remote"
--------> Copy latest codebase to remote
$ eval "rsync -avzqR --rsync-path='$RSYNC_BEFORE_HOOK' $RSYNC_EXCLUDES --delete -e 'ssh' ./ '$CONNECTION_STR:$DEPLOY_PATH'"
$ ssh "$CONNECTION_STR" "find $DEPLOY_PATH -type d \( -path $DEPLOY_PATH/assets/uploads -o -path $DEPLOY_PATH/application/logs \) -prune -o -exec chmod og-w {} \;"

$ cd $CI_PROJECT_DIR && sh ./scripts/notify_slack.sh "${SLACK_CI_CHANNEL}" ":rocket: Build on \`$ENVIRONMENT\` \`$CI_BUILD_REF_NAME\` deployed to $SERVER_NAME! :white_check_mark: Commit \`$(git log -1 --oneline)\` See <https://gitlab.com/amazingproject/website/commit/$CI_BUILD_REF>"
  % Total    % Received % Xferd  Average Speed   Time    Time     Time  Current
                                 Dload  Upload   Total   Spent    Left  Speed

  0     0    0     0    0     0      0      0 --:--:-- --:--:-- --:--:--     0
100   427    0     2  100   425     15   3218 --:--:-- --:--:-- --:--:--  3259
oksection_end:1664673757:step_script
section_start:1664673757:cleanup_file_variables
Cleaning up project directory and file based variables
section_end:1664673758:cleanup_file_variables
Job succeeded

It runs fast, is almost universal and applicable to any type of codebase, and is extendable. If you need to restart your application by either using process managers or full daemon restart, you can add a new command and use the ssh lines that we remote-execute a command on the server.

Create and use a limited-permission deployer user for better security

A good rule of thumb is to set up a “deployer” user on the server, have the smallest possible permissions to the user, and have the target folder write access so these commands run properly. There is even a way to give sudo rights for specific commands if you really need to execute something with root permissions, without having a full sudo-enabled user account.

Even simpler deployment

Maybe RSYNC is even more complex for your needs. Maybe all you need is to pull the repo on your server initially, and in each deployment run “git pull”. You can simplify this script to get rid of all rsync parts and only have a remote SSH command runs that.

Better webpack build outputs with webpack-dashboard

When working on a javascript application (i.e: a react app), you probably work with webpack. Your local development setup will most likely be watching changes on your files and doing repeat builds throughout the development process.

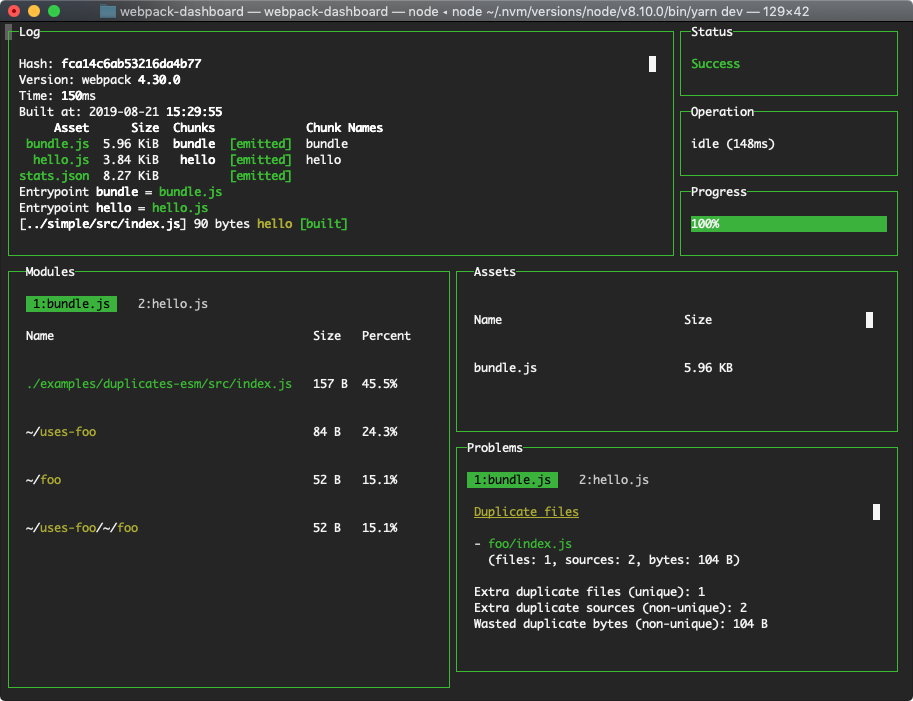
It’s important to get used to webpack output. Being able to pick up important details from it. Webpack output is not particularly difficult but there is a cleaner, more organized way, using webpack-dashboard.

Webpack-dashboard is an interactive command line output that gives you the summary and important stuff you need to see about your build quickly.

https://github.com/FormidableLabs/webpack-dashboard/

Using Cloudinary for image cloud storage with image transformations in your NodeJS express app in Heroku

Here we are with another article about the development aspect of photo/image management (storage, serving, retrieval). I’ve previously (right before this article) wrote about Authenticating and Getting Instagram Photos in NodeJS/Express application. This story is about manually storing, handling upload, download and serving static photo/image using a CDN service called Cloudinary.

Content should be separate than the application

We’re (web/back-end/front-end developers) building apps, sites in many different ways (different platforms, languages, stack). One thing very common and old school is that everything on the site is organized in the same bucket. So when we code and deploy a site, it’s HTML, CSS, back-end code, images, videos, fonts, etc… all in the same place. Now we have distributed deployment systems with having multiple instances of our application on different web servers too. Which made us do a soft transition to keep common files (that can be changed) like uploads folders in block storages like s3 or azure blob… But it still doesn’t do the full justice that both static and dynamic content of an application/website should be completely separated than the application code. This is not a new practice but it’s a practice that can be missed so easily.

It’s so easy to leave an image that is used in a blog post within the codebase (which is wrong). A static content that will not be used to render your page on the back-end ideally doesn’t belong to the place where you store your application (code). Yet, it shouldn’t be served (or requested) from the same servers which are responsible (only should be responsible) for rendering and serving your pages. Tiring your web server with serving images or compiled CSS is not optimal. This will also affect your site’s performance that everything is coming from the same source. Having distributed sources will make your browser to manage parallel downloads of your site’s resources faster. No brainer!

We’ll not get into the techniques of how to separate these different things in different places in this article, but we’ll talk about images specifically.

Images need a big brother

This was a novelty in the past where we wanted to have multiple sizes of an image/photo so we can economically request the right size in different pages – example: get 100px width thumbnail in the page where we show photos in a grid, show the 500px width version on the lightbox, and link out to the original photo in the “download” button. This makes total sense right? Strategizing how to have the different versions ready on your server (or CDN) is another thing. So many self-solutions you can use or code it up. But from user experience (admin/editor) standpoint, nobody wants to do this manually or even automatically but wait for the server to resize and prepare these versions when uploading a single photo to your CMS/app/back-end. To me, that is a one-way road. I only want to upload an image and only wait the time takes the file transfer from my device to the server. Done!

What is Cloudinary and should I use it?

Cloudinary is that big brother and storage and server together. Smart CDN for images and videos. It has a pretty decent free package that will be enough for almost all personal, experimental and small projects. If you have decent size traffic, you may think to pay or optimize your solution with Cloudinary.

Cloudinary hosts and serves images for you. It’ll be your storage bucket that also has many out of box solutions for known CMSs like WordPress. I like the API/SDK route which they have SDKs and well-designed API for almost all platforms. We’ll play with NodeJS below.

The magic cloudinary has that is compelling that it can do so many varieties of transformations on your images on the fly (and caches them). Basic things like color filters, crop, resize, rotate etc… But the real thing is where they have face recognization that you can create square avatars with intelligently telling cloudinary to give you the face focused position in the center on your circle avatar with transparent png background and have 2px border around circle cropped avatar. All of it happens over URL parameters. True magic. I haven’t digg the video side of this but I read bunch of smart stuff on the streaming site which is also worth considering cloudinary as one-stop-shop for visual static assets.

Add Cloudinary service on your heroku application

Adding a service to heroku application is very easy and mostly done in command line. In order to create a new cloduinary service as add-on to your application, in your application folder run:

heroku addons:create cloudinary:starter

This command will create a new cloudinary account linked to your heroku account and add cloduinary credentials to your heroku config – environment variables. You can see and copy the variables to your local .env file with

heroku config

Using it on nodejs/express app

Install first:

npm install --save express body-parser path multer cloudinary

server.js

https://gist.github.com/mfyz/1f3628acde30375b7b7fed04ed4a904e.js

See this example on github: https://github.com/mfyz/heroku-cloudinary-uploads-example

WordPress and other sites

Cloudinary has SDKs and official plugins to well-accepted platforms like WordPress. Check out their official documentation about the ent libraries and plugins


You can also use my invitation link to give me extra free credits: https://cloudinary.com/invites/lpov9zyyucivvxsnalc5/cdlhm6z9q63gdufko1kj

Analytics Data on SQL Database – Best database and table design for billions of rows of data

This is not an article that I am writing but I’m mostly quoting a great gem on a stack overflow answer I came across when I was researching a DIY way to store and create analytics reports for a small to medium size project. The project’s type doesn’t matter because this is a generic problem and great solution.

Why not use analytics tools/services?

I am in constant search of the better alternatives or simpler versions of the solutions we use at my team. We certainly use many services and tools from open source to licensed software. But I still choose to understand, know and be able to apply these solutions by myself on a custom solution where I have full control over the data, output and user experience.

So I casually read and research how others approach the issues or queries wander in my mind.

Then I stumbled upon this stack overflow thread with a brilliant answer that contains steps to try out from scratch that I suggest any engineer to just try and play on their own time.

PostgreSQL and BRIN indexes

To create a sample table with 1.7 billion rows of a sample sensor data (temperature read from the sensor with timestamps in the logs):

EXPLAIN ANALYZE
CREATE TABLE electrothingy
AS
  SELECT
    x::int AS id,
    (x::int % 20000)::int AS locid,  -- fake location ids in the range of 1-20000
    now() AS tsin,                   -- static timestmap
    97.5::numeric(5,2) AS temp,      -- static temp
    x::int AS usage                  -- usage the same as id not sure what we want here.
  FROM generate_series(1,1728000000) -- for 1.7 billion rows
    AS gs(x);

                             QUERY PLAN                              
--------------------------------------------------------------------
 Function Scan on generate_series gs  (cost=0.00..15.00 rows=1000 width=4) (actual time=173119.796..750391.668 rows=1728000000 loops=1)
 Planning time: 0.099 ms
 Execution time: 1343954.446 ms
(3 rows)

So it took 22min to create the table. Largely, because the table is a modest 97GB. Next, we create the indexes,

CREATE INDEX ON electrothingy USING brin (tsin);
CREATE INDEX ON electrothingy USING brin (id);    
VACUUM ANALYZE electrothingy;

It took a good long while to create the indexes too. Though because they’re BRIN they’re only 2-3 MB and they store easily in ram. Reading 96 GB isn’t instantaneous, but it’s not a real problem for my laptop at your workload.

Now we query it.

EXPLAIN ANALYZE
SELECT max(temp)
FROM electrothingy
WHERE id BETWEEN 1000000 AND 1001000;

                             QUERY PLAN                                                                  
--------------------------------------------------------------------
 Aggregate  (cost=5245.22..5245.23 rows=1 width=7) (actual time=42.317..42.317 rows=1 loops=1)
   ->  Bitmap Heap Scan on electrothingy  (cost=1282.17..5242.73 rows=993 width=7) (actual time=40.619..42.158 rows=1001 loops=1)
         Recheck Cond: ((id >= 1000000) AND (id <= 1001000))
         Rows Removed by Index Recheck: 16407
         Heap Blocks: lossy=128
         ->  Bitmap Index Scan on electrothingy_id_idx  (cost=0.00..1281.93 rows=993 width=0) (actual time=39.769..39.769 rows=1280 loops=1)
               Index Cond: ((id >= 1000000) AND (id <= 1001000))
 Planning time: 0.238 ms
 Execution time: 42.373 ms
(9 rows)

Update with timestamps

Here we generate a table with different timestamps in order to satisfy the request to index and search on a timestamp column, creation takes a bit longer because to_timestamp(int) is substantially more slow than now() (which is cached for the transaction)

EXPLAIN ANALYZE
CREATE TABLE electrothingy
AS
  SELECT
    x::int AS id,
    (x::int % 20000)::int AS locid,
    -- here we use to_timestamp rather than now(), we
    -- this calculates seconds since epoch using the gs(x) as the offset
    to_timestamp(x::int) AS tsin,
    97.5::numeric(5,2) AS temp,
    x::int AS usage
  FROM generate_series(1,1728000000)
    AS gs(x);

                             QUERY PLAN                                                                
--------------------------------------------------------------------
 Function Scan on generate_series gs  (cost=0.00..17.50 rows=1000 width=4) (actual time=176163.107..5891430.759 rows=1728000000 loops=1)
 Planning time: 0.607 ms
 Execution time: 7147449.908 ms
(3 rows)

Now we can run a query on a timestamp value instead,,

EXPLAIN ANALYZE
SELECT count(*), min(temp), max(temp)
FROM electrothingy WHERE tsin BETWEEN '1974-01-01' AND '1974-01-02';
                                                                        
                              QUERY PLAN                                                                         
--------------------------------------------------------------------
 Aggregate  (cost=296073.83..296073.84 rows=1 width=7) (actual time=83.243..83.243 rows=1 loops=1)
   ->  Bitmap Heap Scan on electrothingy  (cost=2460.86..295490.76 rows=77743 width=7) (actual time=41.466..59.442 rows=86401 loops=1)
         Recheck Cond: ((tsin >= '1974-01-01 00:00:00-06'::timestamp with time zone) AND (tsin <= '1974-01-02 00:00:00-06'::timestamp with time zone))
         Rows Removed by Index Recheck: 18047
         Heap Blocks: lossy=768
         ->  Bitmap Index Scan on electrothingy_tsin_idx  (cost=0.00..2441.43 rows=77743 width=0) (actual time=40.217..40.217 rows=7680 loops=1)
               Index Cond: ((tsin >= '1974-01-01 00:00:00-06'::timestamp with time zone) AND (tsin <= '1974-01-02 00:00:00-06'::timestamp with time zone))
 Planning time: 0.140 ms
 Execution time: 83.321 ms
(9 rows)

Result:

 count |  min  |  max  
-------+-------+-------
 86401 | 97.50 | 97.50
(1 row)

So in 83.321 ms we can aggregate 86,401 records in a table with 1.7 Billion rows. That should be reasonable.

Hour ending

Calculating the hour ending is pretty easy too, truncate the timestamps down and then simply add an hour.

SELECT date_trunc('hour', tsin) + '1 hour' AS tsin,
  count(*),
  min(temp),
  max(temp)
FROM electrothingy
WHERE tsin >= '1974-01-01'
  AND tsin < '1974-01-02'
GROUP BY date_trunc('hour', tsin)
ORDER BY 1;
          tsin          | count |  min  |  max  
------------------------+-------+-------+-------
 1974-01-01 01:00:00-06 |  3600 | 97.50 | 97.50
 1974-01-01 02:00:00-06 |  3600 | 97.50 | 97.50
 1974-01-01 03:00:00-06 |  3600 | 97.50 | 97.50
 1974-01-01 04:00:00-06 |  3600 | 97.50 | 97.50
 1974-01-01 05:00:00-06 |  3600 | 97.50 | 97.50
 1974-01-01 06:00:00-06 |  3600 | 97.50 | 97.50
 1974-01-01 07:00:00-06 |  3600 | 97.50 | 97.50
 1974-01-01 08:00:00-06 |  3600 | 97.50 | 97.50
 1974-01-01 09:00:00-06 |  3600 | 97.50 | 97.50
 1974-01-01 10:00:00-06 |  3600 | 97.50 | 97.50
 1974-01-01 11:00:00-06 |  3600 | 97.50 | 97.50
 1974-01-01 12:00:00-06 |  3600 | 97.50 | 97.50
 1974-01-01 13:00:00-06 |  3600 | 97.50 | 97.50
 1974-01-01 14:00:00-06 |  3600 | 97.50 | 97.50
 1974-01-01 15:00:00-06 |  3600 | 97.50 | 97.50
 1974-01-01 16:00:00-06 |  3600 | 97.50 | 97.50
 1974-01-01 17:00:00-06 |  3600 | 97.50 | 97.50
 1974-01-01 18:00:00-06 |  3600 | 97.50 | 97.50
 1974-01-01 19:00:00-06 |  3600 | 97.50 | 97.50
 1974-01-01 20:00:00-06 |  3600 | 97.50 | 97.50
 1974-01-01 21:00:00-06 |  3600 | 97.50 | 97.50
 1974-01-01 22:00:00-06 |  3600 | 97.50 | 97.50
 1974-01-01 23:00:00-06 |  3600 | 97.50 | 97.50
 1974-01-02 00:00:00-06 |  3600 | 97.50 | 97.50
(24 rows)

Time: 116.695 ms

It’s important to note, that it’s not using an index on the aggregation, though it could. If that’s your typical query you probably want a BRIN on date_trunc('hour', tsin) therein lies a small problem in that date_trunc is not immutable so you’d have to first wrap it to make it so.

Partitioning

Another important point of information on PostgreSQL is that PG 10 bring partitioning DDL. So you can, for instance, easily create partitions for every year. Breaking down your modest database into minor ones that are tiny. In doing so, you should be able to use and maintain btree indexes rather than BRIN which would be even faster.

CREATE TABLE electrothingy_y2016 PARTITION OF electrothingy
    FOR VALUES FROM ('2016-01-01') TO ('2017-01-01');

This is a great answer to the topic around working with analytics data on SQL databases. Finally thinking about table partitioning is always a good plan-ahead strategy for any data gets over millions and have distributed data around timestamps.

Reference: Best database and table design for billions of rows of data

Integration and verification of iOS In-App Purchases

 Economy models in iOS apps use In-App purchases become very popular. Lots of developers pick iOS environment because of the flawless payments through iTunes.

If you’re planning to have a monetization model in your app, it has to go through Apple system and you have to use in-app purchases. There is no other way to accept payments from your iOS apps. There are pros and cons of using Apple in-app purchases. I’ll try to explain some of them.

The biggest con is Apple takes 30% of your sale. And another con is, there are difficulties and grayed areas in the integration of in-app purchases to your app and back-end. But the pros make all even. Because delegating whole payments to Apple is gonna affect your sales because Apple makes it so seamless that it reduces all money related steps to only one confirmation box. So it changes the purchase experience and makes it what it supposed to be. Most of the checkout or payment experiences on web, faces lots of drops because of unnecessary and boring steps like putting your credit card info, trying to give the trust to user that you’re a legitimate company and have legitimate payment system that you will not sell their info out or you won’t let hackers to pick your customer info up. All those buying experience changed in iTunes payments. So this is why you should want to integrate in-app purchases. Continue reading “Integration and verification of iOS In-App Purchases”

Profiling and optimization on Facebook PHP SDK

If you’re developing PHP based Facebook application, you might want to use (or already using) Facebook integration little more than just authentication and identification of your user. Even if you have the simplest Facebook app and using PHP SDK, you probably have regularly done API calls.

You write your app and you start to see performance issues. You start to optimize your database interactions, PHP code optimization, after you done with your application optimization if you still have performance problems it’s possibly from Facebook calls. Since you use SDK, you might not know what’s happening with Facebook communication. So you want to do profiling between your app and Facebook API servers.

You can add a basic timing profiling to your API calls to see how many calls you do, what kind of calls they are and how long they take to run.

Let’s dive in SDK, modify it a bit and start getting profiling information. Here is the actual method you need to modify in base_facebook.php file:

public function api(/* polymorphic */) {
	$args = func_get_args();
	if (is_array($args[0])) {
		return $this->_restserver($args[0]);
	} else {
		return call_user_func_array(array($this, '_graph'), $args);
	}
}

and we’re modifying it like this:

$facebookApiCalls = array();
public function api( /* polymorphic */)
{
	$args = func_get_args();

	$time_start = microtime(true);

	if (is_array($args[0])) {
		$result = $this->_restserver($args[0]);
	} else {
		$result = call_user_func_array(array($this, '_graph'), $args);
	}

	$time_end = microtime(true);
	$time_elapsed = $time_end - $time_start;
	$time_elapsed *= 1000; //convert to millisecs

	if (isset($GLOBALS['facebookApiCalls'])) $GLOBALS['facebookApiCalls'][] = array(
		'duration' => $time_elapsed,
		'args' => $args,
	);
	return $result;
}

It simply appends a global array named “facebookApiCalls” and adds the API call details as “args” and timing as “duration”. So at the end of your page logic code, you can print this information after sorting it by duration and you can also filter to show only slow ones (for instance, the ones took over 200 milliseconds).

After this profiling you can start to identify the slow calls, also if you do same calls multiple times because of recursing, recalls etc…, you can see and optimize, combine them.

This optimization is not only a performance tweak for the user, also it will decrease the number of calls made between your server and Facebook servers.

Database Integration in PHPStorm, PyCharm or RubyMine

JetNrains released better database integration to their IDEs which applies to PhpStorm, PyCharm and RubyMine. They had database integration with some level of functionality but recently they released a video with their latest updates which is included in this post. I didn’t use database integration before in PHPStorm but i tried after seeing this video and i found it very productive and helpful.

After installing Java connectors (which you can do it with no extra effort) you’ll be good to go for connecting your database with many different database engines in your project. With database integration, you can review the structure of your database, access and manage your data and develop your SQLs with lots of cool features. These stuff are pretty standard so far, almost like a replacement of PHPMyAdmin. Nothing very new.

I found a particular connection between my code and my database very helpful, and that is, you can develop your SQL while you write your code, or you can test and run your SQL from your code without touching, copy/pasting. Also it does code IntelliSense while you write yourSQL which saves some time from mistypes and makes sql development more fun.

Check this video out for feature tour:

Source: http://blog.jetbrains.com/webide/2012/11/sql-support-and-database-tools/

PHPStorm: Most advanced PHP IDE so far

I’ve been using PHPStorm from day one of their beta release, and very happy with it.
They enhanced Java based NetBeans in the beginning, but it’s completely boosted with a lot of features.

Biggest problem developing web projects using PHP is the lack of tools and big effort requirements for creating a stable integrated development environment. There are very good simple and clean editors but none of them is not farther than a code intellisense enabled editors. What I mean is there are debuggers, advanced editors, database management tools, but all of them has their own ways, not communicating and not integrated. And it varies on different operating systems.

When I first tested phpstorm in the beta times, they had this minimal advanced editor with some half working hard to configure add-ons like svn support, debugger integration etc but wasn’t easy to get it up running. But they improved the initial configuration steps much easier, they touched lots of add-ons to get them more integrated with less configuration and they started to support modern languages for different web technologies (html5, less, sass, haml). Here is a couple of features that I like and probably you’ll find them very usefull as well.

Code Intellisense is not just for PHP, also most of the languages that you use for general PHP based web project (HTML, Javascript, CSS, XML). Also, code intelligence supports most of the PHP, Javascript frameworks and helps you to get faster coding.

Debugging PHP runtime with xdebug, you can catch, stop and debug your PHP app while it’s running. Also, makes the error handling way easier.

Version control system integration allows you to integrate your svn, git projects, access versions and manage working copy.

Database connectors support all SQL engines that Java not just allows to browse, alter your database structure also there is a database console that you can use code IntelliSense when you develop your SQL. This is a common feature for most IDEs so far but PHPStorm also uses database connections for every project when you write/browse or debug your PHP code if it’s running a SQL. You can run or use code IntelliSense when you’re writing your SQL in your code.

Also, PHPStorm has other ton of features like automatic deployment, automatic upload over FTP/SFTP protocols, zen coding, code snippets etc…

They released 6 major versions in 3 years that was basically touched version of NetBeans in the beginning but now it gives totally enhanced and different coding experience. Unfortunately, you need to pay $100, the first time and it gives free updates in minor releases. But if you want to update in major releases you need to upgrade your license in 1 year periods for $50. But it’s nothing compared to what you get.

JetBrains also develops most of the features in PHPStorm for their common product base which you can have similar or same features in their other IDEs for Ruby and Python developers. If you develop Python or Ruby, you should check PyCharm and RubyMine out.

PHPStorm’s homepage: http://www.jetbrains.com/phpstorm/