When building a web app, we often use our go-to CSS framework (bootstrap, tailwindcss…) that comes with a lot of useful stuff that normalizes and speeds up our UI building process. Frameworks also come with a lot of baggage, a lot of it. Most of our UIs are not super complex and we don’t use the majority of the CSS frameworks we use. Even when we build and implement your own Design System from scratch, you always will have unused CSS in any given project or application.
PurgeCSS is a great way to optimize your final output to only contain the CSS you need and used. In my simple apps, I’ve implemented PurgeCSS, and I’ve seen between 70-90% final CSS size decrease and a significant render time decrease.
PurgeCSS works with most javascript bundlers and web build tools. It also comes with its own CLI tool. My go-to use case is their seamless integration with TailwindCSS in NextJS builds. Here is a nice guide and the example github repo I put when I was playing with this.
When building modern javascript apps (regardless of browser or server-side use), it’s important to know what your dependencies are and what you utilize from those dependencies. If no care is given to this, your bundle size may end up being very large and result in a non-performant user experience. Especially if this is a browser-based application that every byte matters.
Today, I want to talk about a very effective method to optimize your bundle size called Tree Shaking.
Traditionally, we install a module and import the methods we use from a module. In many modules, the methods in them are not separately exported and are part of a single default export that we object deconstruct from the default import. The most common example of this is:
import { Box } from "@material-ui/core"
This results webpack to bundle all module methods. Even if we don’t use any of them.
There are a couple of ways to avoid this. Some libraries like lodash allow you to install only what you need. Instead of installing the entire lodash library, you can install only the module you need like lodash.get or lodash.trottle.
Another method is the tree shaking where we still install the full library but when we package our bundle, we tell webpack that we are only importing a portion of the larger library.
Another key point to pay attention to about tree shaking is the consistency throughout your code. Make sure every instance of a module’s imports should be done consistently to point module paths. A single instance of a traditional way of importing the module and then deconstructing the parts needed will result in bundling the whole module in your bundle again.
Another reason to look into using the babel plugin is to achieve this automatically.
When working on a javascript application (i.e: a react app), you probably work with webpack. Your local development setup will most likely be watching changes on your files and doing repeat builds throughout the development process.
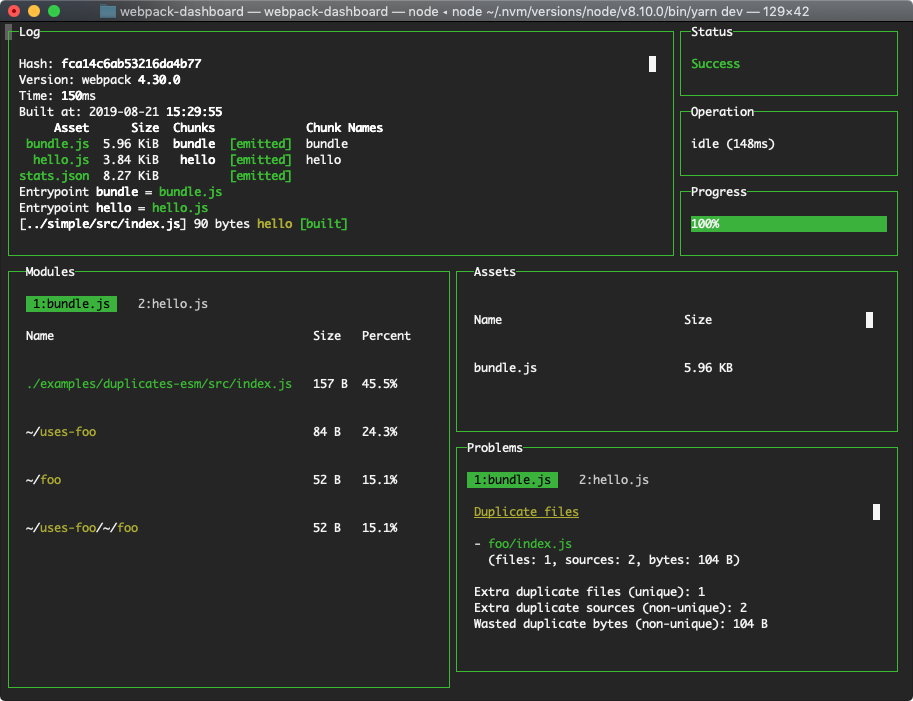
It’s important to get used to webpack output. Being able to pick up important details from it. Webpack output is not particularly difficult but there is a cleaner, more organized way, using webpack-dashboard.
Webpack-dashboard is an interactive command line output that gives you the summary and important stuff you need to see about your build quickly.
jQuery is one of the most useful javascript frameworks makes things a lot easier for a lot of developers.
jQuery also standardizes ways of doing things between different browsers, otherwise, certain implementations would require per-browser treatment.
But as much as jQuery makes things easier for developers, the end result may not be the best. Especially in this day and age, every byte counts towards many different aspects of your website/app’s performance. Page load times, SEO, crawling performance…
A big mistake most web developers do when they start learning web technologies is to learn jQuery very quickly (because the content is abundant about jQuery tutorials and libraries) without knowing underlying technologies and what/how jQuery is helping them to do things quicker.
Why NOT jQuery?
Essentially jQuery is a layer on top of standard Javascript and Web APIs that each browser may or may not support certain aspects or requires separate implementations. So what you are doing at the end of the day is to use Web APIs to interact with DOM on your HTML document and create magic. As much as most of the magic can be created with libraries. Their dependencies and bundled asset size can add up. In some cases – like a WordPress blog and plugins, these assets can add up to a megabyte or more total download size for your web page.
It’s better to be extra paranoid and conservative about what you need and what you can do with vanilla javascript and existing web APIs. Unless you are working with brand new web technology, the majority of what you will need is already very mature and standardized between browsers.
With enough knowledge of the underlying technologies, you can actually see how much you can do without needing jQuery when writing a javascript for a web page you are building.
Here are two great resources compiles the non-jQuery ways of doing things:
Recently, the no jQuery approach became a bigger trend within the web developers communities because everybody is doing an amazing job to optimize their rich web pages and applications to score better on performance, speed.
Looking from a generalist’s eyes, jQuery probably comes very quickly in various types of web frameworks, CMSes, themes to these CMSes. So when it comes to optimizing the speed, one of the biggest questions comes down to cleaning up unused code that is loaded on the web page. In most cases, when using jQuery, you are not utilizing a good chunk of what you create on your web page. It’s not very easy to unbundle and make sure your final page only contains what you make use of on your jQuery-based javascript code.
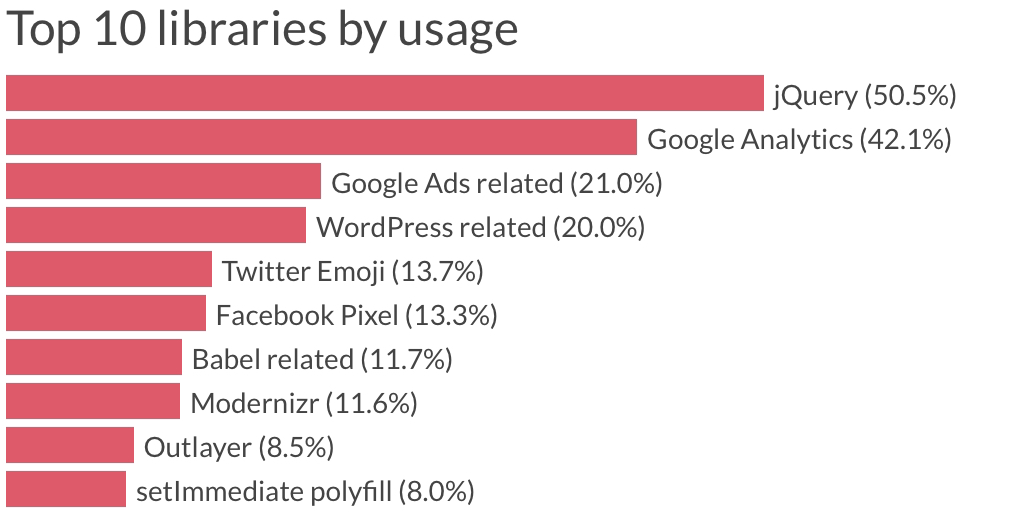
There is a great article: https://catchjs.com/Blog/PerformanceInTheWild that analyzes a large sample set of web pages and finds jQuery being the most common dependency at half of all websites they analyzed.
With enough engineering effort and care, almost all of these pages can do what they do without jQuery and supporting libraries.
That’s why we are seeing more and more libraries that are written in vanilla JS and have no dependencies on other libraries. Most javascript framework/library developers are also proud to advertise their library is X kb in production. And it’s definitely one of the most important factors of a developer making the smart choice of these solutions when creating a web page.
I want to talk about a UI framework we have been using at Nomad Interactive for quite some time now on our react.js applications. We have been separating front-end and back-end parts of our apps for many years and for front-end solutions, we have experimented with angular, vue, and some simpler alternatives but eventually we ended up in react.js world and have been exclusively working with react.js on both web, mobile and desktop products we are creating.
And obviously, we are in need of a powerful, rich UI framework to not bog down on basic stuff like form handling, UI elements for user input, or data representations like data tables, charts… And until the frameworks like angular, react, we have used Twitter bootstrap for years and probably used many different versions of the same thing over and over again…
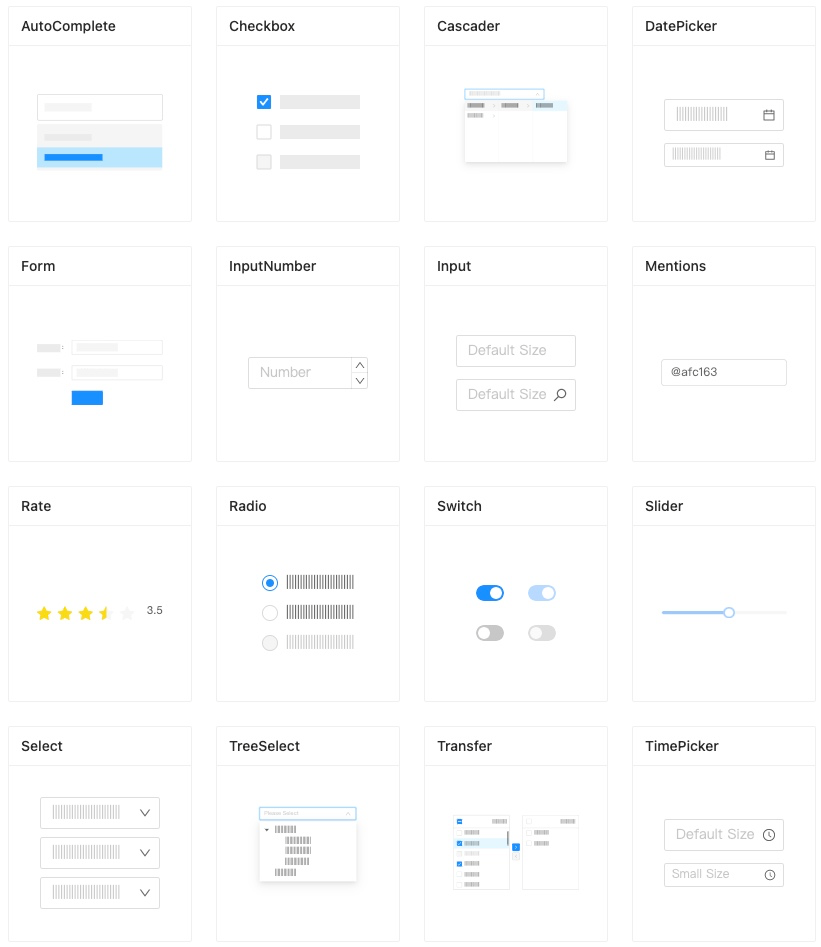
With React, it’s been more stable for us to pick a solution on, let’s say date, time entries on the forms that we use and support the libraries we love. And in the last year and a half, we have started using Ant Design as our primary UI framework which is built on top of bootstrap. Ant Design framework is built by Alibaba team obviously to empower Alibaba products which may not be at the ant design level when you use alibaba.com or its other network sites, but I’m sure at some point they will be at that level. Regardless, the framework has huge designer, developer talent behind it. Occasionally you see just Chinese parts in the documentation but don’t make that scare you, there is also a huge English-speaking developer community behind it as well.
Ant Design is super react.js friendly and everything is very well simplified and streamlined for developers to only worry about the data flow on the app from the back-end APIs through the presenter/controller controllers/classes. We use redux extensively for that.
Eventually, in most cases, we want the same clean and simple representations of UI widgets/elements in a consistent manner. So we find Ant Design’s default state as well as its customization features through simple SCSS or even inherited from package.json through webpack build, which makes things much more atomic designed and configured on our applications.
Ant Design has a huge library of components and well-designed and flexible scaffolding for your layouts.
We benefited so much as far as the consistency of the application layouts we build and common language between our designer and our developer to stick with ant component’s general interactions and obviously layout and other details. Not that we are not customizing ant components, it’s just much easier for our designer to work with since it’s well designed and documented and it’s also easier for our developers to customize it for the same reasons.
Here is the official documentation starting with basics: https://ant.design/docs/react/introduce. You can also dive into the components library and start playing with some of its more complex examples in the demonstration embedded in the documentation.
We use “react-router” which is a general underlying routing package. And with it, we use react-router-dom which manages routing on web applications together with react-router package.
react-router-dom essentially is a layer on top of the browser’s history API. It tracks URL changes in the browser and maps to a router where it’s defined in a single place on our web apps. Generally named as router or routes.js.
The rest of the app, both programmatically (javascript) or the HTML links uses to root path addresses to request navigation in the router. The rest is handled by react-router.
3 Types of Navigation Requests in React JS Web Applications
1) Links – Replacements of <a> tags in reactjs web apps
We use a special “Link” component from the react-router-dom library that wraps simple links with javascript event handlers and maps directly to react-router where it’s handled as URL change without page refresh.
To use Link component, first import it from react-router-dom package:
import { Link } from 'react-router-dom'
and to use the component:
<Link to="/">...text, button or other elements....</Link>
Keep in mind that <a> tags are still functional but may have complications on the react-router-dom package to capture if the link is internal. Or external so it’s captured properly by react-router-dom.
2) Redirections as Component in “render” methods
This method is not a good practice in my opinion but it’s a quick solution and in some cases where of your page component is directly resulting a redirection all together which will need to be unmounted/destructed and the application has to navigate to another page component. Like unauthorized access, login page, error page redirection…
Simply import and use the “Redirect” component from the react-router-dom package. Here is a scenario in your component render method that your page is resulting in unauthorized access:
if (!authorized) {
    return <Redirect to="/login" />
}
3) Programmatical redirect from javascript
This is probably the most common scenario where a redirect needed when certain user interaction synchronously or asynchronously results in the redirect. Like clicking a button that calls the API and results in the redirect when it successfully resolves.
This case is unfortunately not very straightforward. In order to access history API, you need to configure it as a prop to all components from the router. For this, there has to be a shared history instance of the browser. So at the highest level when we define our router using react-router and react-router-dom package wrappers. We need to create and pass the history instance that will enable the “history” prop in the components so we can push new changes or request navigation to previous steps (going back). We will use the “history” package to create a browser history instance.
For the first time set up, after installing the history package from npm, in your app container. Import “createBrowserHistory” method from the history package. Then call it to create an instance of browser history.
import { createBrowserHistory } from 'history'
const history = createBrowserHistory()
After that, where you define redux Provider, before your root “router” definition, wrap your root router component with BrowserRouter (which you may already have for the react-router-dom package), pass the history instance to your BrowserRouter component as a prop:
You’re ready to start manipulating browser history from your components.
In your components, whenever you need to programmatically redirect, deconstruct (or directly use) “history” object from props of the component. Then, to redirect to a new address:
const { history } = this.props
history.push('/dashboard')
This will initiate react-router-dom to listen to the history instance and resolve the route and re-render the whole app container with the component assigned to the route requested.
Some of these methods feel unnatural but sometimes all we need. Good to know different approaches to initiate dom, native or redux routers in different platforms. The approach above is focused on a web-based application but the same/most approaches can be applied to react-native applications as well.
Wanted to give you a short information about browser automation. You visualize a desktop app when a “browser” comes to minds right? All browsers use an engine to render web pages on our screen. And these engines can actually work without rendering pages in the UI. All they need is to render the elements in memory. From there, it can allow us to interact with rendered pages programmatically without displaying the rendered page on our screens. There are browsers only works in this mode and they are called “headless” browsers. Means they have no UI. This browsers are meaningless for general consumers but it comes very handy to developer and testing community. Many companies build their testing and QA process utilizing these headless browser, do execute their UI flows with browser automation scripts. For instance, headless browser can be programmed to run and simulate the following user experience flow:
Load http://example.com web page,
Wait until page is completely rendered including javascript and css,
Fill “Fatih” to the field called “Name”,
Click to the button called “Send”,
Wait 5 seconds,
Take screenshot and save as JPEG
This can be very useful when doing regression tests.
Event utilizing screenshots with headless browsers will be very useful. There are many companies doing screenshot comparison for high level understanding changes done visually based on any given iteration on the code. This process simply takes and keeps versions of each page and in every release, it takes a new one with latest version and compares the pixels (and colors) to the previous version to determine a percentage for the change it detects. Then you can set some report and process to make sure you track of big changes to detect if a tiny css change blew a page you usually don’t test manually. It becomes very meaningful when you think about a web page with 100 different pages.
Are there any headless browsers I can use?
The well known headless browsers; the one named “Phantom” (and phantomjs) that is big on nodejs community. There is also headless chrome which is based on chromium.
This is a short explanation of a feature I really like about github and now it’s imitated in bitbucket. Essentially allows you to host a static site under your account.
It doesn’t support anything back-end but you can use grunt, gulp like automators to create a content management system that compiles whole site to static files then serve it up with this trick.
Very simple steps to do this. My username is “mfyz” in bitbucket and bitbucket allows 1 static website hosting per account. If you create a new repository called: “mfyz.bitbucket.io” and throw an index.html file, you can access the static website from “http://mfyz.bitbucket.io” address. Bitbucket will serve anything static including css, javascript files as well as binaries like images.
@shayhowe sum up HTML & CSS for beginners: “A Beginner’s Guide to HTML & CSS” http://learn.shayhowe.com/html-css/
A nice presentation in 10 topics showing techniques that’s not outdated. Most of the resources you search on web about html and css, are from 90s showing very old outdated methods.


 This is a short explanation of a feature I really like about github and now it’s imitated in bitbucket. Essentially allows you to host a static site under your account.