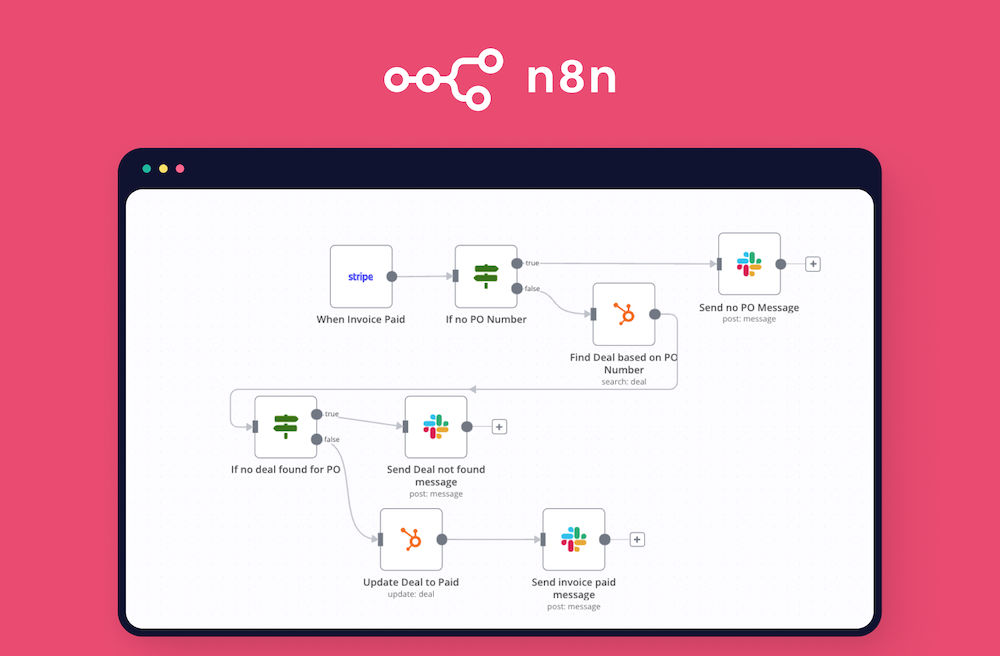
When building tools or workflows, sometimes all you need is a simple form. You want to collect some data, maybe trigger an email, or store it somewhere. Nothing too fancy.
n8n now has a Form node that solves this need in the cleanest way possible: it lets you build and host forms directly inside your workflow—no frontend code, no extra tools.
Let me walk you through what it is, why it’s useful, and how to use it with Docker.
Why Not Use Google Forms, Typeform, etc?
You can always reach for Google Forms, Typeform, or similar tools. They’re simple and easy to use. But the moment you want to automate what happens after a submission—send a Slack message, call an API, store the data in your DB—you’ll hit limitations.
You’d need extra tools or integrations to make things work.
With n8n’s Form node:
The form and logic live in the same workflow
You don’t need webhooks or third-party automation platforms
You keep your data private (self-hosted)
You get full flexibility—send emails, update spreadsheets, trigger scripts, whatever you want
If you’re already using n8n, look nowhere else. This is the simplest and most powerful way to collect data and do something with it.
New to n8n?
If you haven’t used it before, n8n is an open-source workflow automation tool. You build workflows by connecting blocks—kind of like Zapier, but with full control and self-hosting support. I also covered this short intro to n8n in my previous post.
You can connect APIs, run scripts, automate tasks, and now—host forms.
Running n8n with Docker (or Cloud)
n8n has a cloud-hosted version if you want a managed solution.
But I self-host mine. If you’re like me and want to run it locally or on your server, here’s the quickest way using Docker:
Let’s create a simple form that collects name and email, and sends a confirmation email.
Create a New Workflow Open the n8n editor and click “New Workflow.”
Add a Form Node
Search for “Form” and add it.
Set title and description.
Add fields like:
Name (text)
Email (email)
Save the node. It will give you a public form URL.
Add Next Steps After the Form node, connect whatever you want:
Email node (send confirmation)
Google Sheets node (log submission)
HTTP node (send data to an API)
Any other of the 200+ integrations
Activate the Workflow Save and activate the workflow so the form becomes live.
Now, share the form link and start collecting data. Every submission will go through your automation steps.
Use Case Ideas
Internal forms: collect input from your team (ideas, feedback, etc.)
Mini surveys: run a quick form for user research
Beta signup: collect early access signups and auto-reply
Manual triggers: trigger dev/test workflows with custom input
AI workflows (highlighted): Forms are a great entry point for AI-powered workflows. You can collect user input and feed it into large language models, prompt chains, or API calls. n8n also has built-in AI and agentic nodes, which makes it easy to build GPT-style workflows without writing glue code.
Form node is another way n8n makes things really low-effort
The Form node is a small but powerful feature. You don’t need to manage your own frontend or use a third-party tool. It’s perfect for quick workflows where you want to collect input and immediately act on it.
You can learn more at n8n.io, or just spin it up locally with Docker and try it out.
Zapier is great—until you hit its limits. Most automation tools work fine for simple things, but the moment you need more control, flexibility, or self-hosting, they fall short.
And building automations manually? It’s time-consuming, labor-intensive, and honestly, boring.
That’s where n8n comes in.
What is n8n?
It’s an open-source workflow automation tool that makes building automations not just easier—but actually fun. You can connect APIs, tools, databases, even AI blocks, and control everything visually. No complex setup. No vendor lock-in.
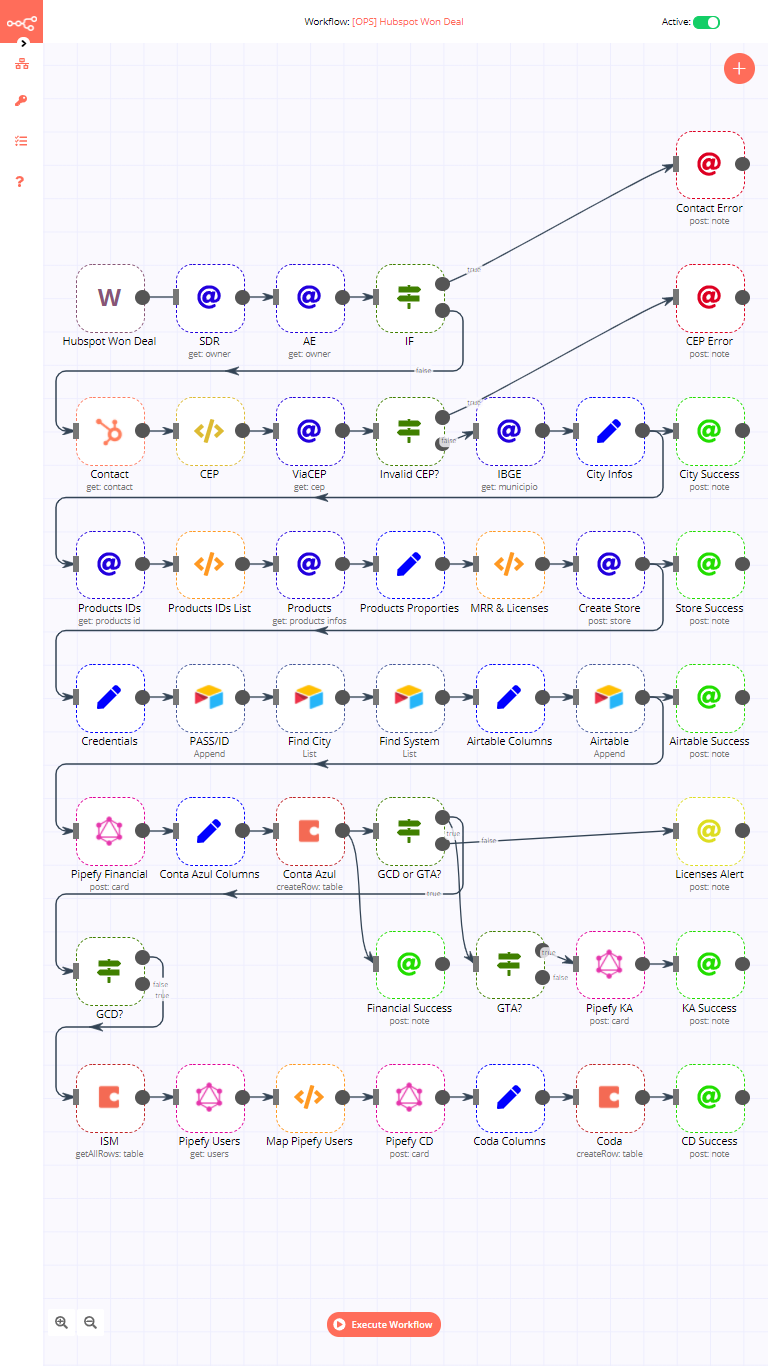
You build workflows by visually connecting nodes on a canvas. Each node is an action—like calling an API, sending an email, writing to a database, or running a script. You can start small, then build more complex automations as you go.
You can go as crazy as you want:
Why Use n8n?
There are lots of automation tools out there, but n8n stands out if you care about flexibility, ownership, or just want something that works without lock-in.
A few things that make it different:
Docker or Cloud: You can self-host it easily (I use Docker), or use n8n Cloud if you want something managed.
Open Source: You own your workflows. You can customize it. You don’t depend on someone else’s pricing tiers.
Visual Interface: Drag, drop, connect. No complex setup.
No Code (or Full Control): You can build powerful workflows without writing code. But if you need it, you can drop in JavaScript or run custom functions.
Templates: They have tons and tons of community contributed templates that you can just copy to your instance with 1 click. I often use templates to learn how new blocks that I don’t know configured with real examples.
AI-Ready: n8n has built-in AI blocks. You can call LLMs, run prompts, build agents, and connect them to other tools. AI workflows are one of the strongest use cases right now.
How I Run n8n (Docker Setup)
If you’re like me and prefer to self-host, here’s the simplest way to run n8n locally with Docker:
You can also check out n8n Cloud if you prefer a managed version.
Create Your First Workflow
Once n8n is running:
Open the editor UI in your browser
Click “New Workflow”
Add some nodes—click the + button and search for integrations (Slack, GitHub, Google Sheets, etc.)
Connect the nodes
Click “Execute Workflow” to test
You can trigger workflows manually, on schedule, or with triggers like webhooks, emails, or form submissions.
Example Workflows
1. Slack Alerts for GitHub Issues
You want to get notified in Slack when someone opens an issue on a repo.
GitHub node: trigger on new issues
Slack node: send message to a channel
2. Weekly Google Sheets Report
You update a sheet regularly, and want to email yourself a report every Monday.
Google Sheets node: read from the sheet
Email node: format and send the data
3. AI Feedback Summary
You collect feedback via a form and want a GPT-style summary every day.
Form node: collect feedback
OpenAI node: summarize input
Email or Slack node: send results to yourself or your team
AI Workflows with n8n
n8n supports AI workflows natively. You can build:
Prompt chains
Content generators
Data extractors
Agent-style logic
And the best part: you can combine them with your internal tools, databases, or APIs. For example, process a customer message, summarize it with an LLM, tag it based on content, then store it or trigger a follow-up email.
AI is not just a feature in n8n—it’s a first-class block you can use just like any other node.
A Few Tips
Start small. One trigger, one action. Grow from there.
Always test your flows before activating.
Use version control if you run complex workflows.
Check the community—there are lots of shared workflows you can reuse or get ideas from.
Not silver bullet
While n8n is powerful, it’s not perfect. The biggest limitation for me is that it’s heavily tied to the UI. There are import/export APIs and CLI tools, but designing, testing, or scaling workflows programmatically isn’t straightforward. That makes it tricky to version control or build CI/CD pipelines around it. Personally, I wouldn’t build an entire business on top of n8n—but for prototyping, internal tools, or automating isolated workflows, it’s the best thing out there.
But…
It just works (well)
n8n is not trying to be flashy. It’s not trying to upsell you. It’s just a solid, open, flexible tool to automate things.
If you’re already automating, it’ll give you more control.
If you’re new to automation, it’s one of the easiest ways to start.
I’ll be writing more about specific n8n patterns and workflows soon—including how to use it with AI tools and agent-style automations.
In the meantime, check out n8n.io, run it with Docker, and start automating boring stuff.
Automating Web Page Screenshots with GitHub Actions and Playwright
You just wrapped up your web project, and now it’s time to make sure it looks great across devices and browsers. You could manually check every page, but let’s be real—who has time for that? Instead, let’s automate the process using GitHub Actions and Playwright to generate web page screenshots automatically. This setup will give you instant feedback on your website’s appearance and help you catch issues before they go live.
In this guide, I’ll walk you through the entire setup, from installing Playwright to configuring GitHub Actions. By the end, you’ll have a fully automated system that runs on every code push. Grab your coffee, and let’s dive in!
What Are GitHub Actions?
GitHub Actions is a built-in CI/CD (Continuous Integration and Continuous Deployment) tool that automates your development workflows. It allows you to run scripts in response to events like code pushes, pull requests, or scheduled triggers.
Why Use GitHub Actions?
Seamless Integration: It’s built into GitHub, so you don’t need any external setup.
Flexible Workflows: You can create custom automation with YAML.
Pre-Built Actions: A marketplace full of ready-to-use workflows.
Playwright, developed by Microsoft, is an automation framework for browser testing. It allows you to write scripts that simulate real-user interactions, and best of all, it works across multiple browsers.
Why Playwright?
Multi-Browser Support: Works with Chromium, Firefox, and WebKit.
Headless Mode: Run tests in the background without opening a browser.
Powerful API: Automate clicks, form fills, and even screenshots effortlessly.
git add .
git commit -m "Set up Playwright screenshot automation"
git push origin main
Step 3: Check GitHub Actions
Go to the Actions tab in your GitHub repo. You should see the workflow running. Once completed, the screenshot will be available as an artifact.
⚠️ Playwright browser installation step can take long
Installing Playwright in GitHub Actions can take a significant amount of time because it downloads all supported browsers by default. If you only need a specific browser (e.g., Chromium), you can install it with:
npx playwright install chromium
Then, modify your script to use only the installed browser.
🏎️ Speeding Up Workflow with Caching
Since downloading and installing Playwright browsers happens on every workflow run, caching them can significantly speed up execution. Modify your workflow to cache the Playwright binaries:
This ensures that Playwright’s browser binaries are reused across runs, reducing setup time.
Wrapping Up
That’s it! You’ve successfully set up an automated workflow that generates web page screenshots every time you push your code. This can save you time and help catch layout issues before they reach production.
Next Steps
Modify the script to capture multiple pages.
Add email or Slack notifications.
Extend it to handle different screen sizes.
If you found this guide useful, share it with your fellow developers! Got questions? Drop them in the comments. 🚀
When bootstrapping a new product, regardless of platform and solution is used in back-end and front-end, the time comes very quickly that you will need to integrate with 3rd party platforms to create continuity of the product’s user experience between different solutions.
As a good example of this, let’s say you bootstrapped a small SaaS product that helps users calculate their taxes. Your product is not going to be only the software solution you created but the whole experience from customer support to documentation or educational materials, perhaps some marketing experience when acquiring and onboarding your new users. So right off the bat, we will need a customer support solution, marketing tool. Perhaps a CRM-ish tool to use as our “customer master” database. And will want to channel everything there as much as we can.
But when someone signs up, your back-end only creates their user account, and their customer support record, CRM record, or marketing track is not connected. Most likely, these will be separate services like Intercom, Zendesk, Mailchimp, etc. And obviously, your own backend/database where your user’s initial records are created and their engagement with your core product happen.
I have planned and done these integrations many times over in different products and worked with many 3rd party services to integrate. Some niche solutions that I had to integrate don’t have proper APIs or capabilities. Setting some of these exceptions aside, most tools have integrations with well-known platforms like Salesforce, Facebook Ads, IFTTT, Slack. And as a common and growing theme, most tools also have integration with Zapier which is the main event I want to come to.
Eventually, I find myself evaluating Zapier Integrations between these platforms to cover most of the use cases we often spend days doing single integration. If the triggers and actions cover what we are trying to do, I started to suggest my clients and the rest of my team create Zapier focused integrations.
There is an easier way. A big majority of people working in the process/product/team management space use spreadsheets daily. Either Excel or Google Sheet covers that big majority of the use cases. I evangelize Google Sheets just because of its real-time collaboration and ease-of-access capabilities. It’s a free and large majority of people having google accounts making it very universal.
I have done direct google sheet integrations in the past many times. But recently I like the concept of using google sheet as a source that can be commonly used by other services for integration purposes. Since it’s a living document, it’s very easy to make changes on a document or listen to changes happening on documents (by human or APIs). This makes it an amazing candidate for using it with Zapier to use it as a “source” of data. It makes Zapier the magic glue here to serve as a universal adapter to anything else we want to connect to. Having thousands of services available in Zapier makes it a meeting ground for moving the data we provide through google sheet to anywhere else.
I need to say this will be limited based on each service’s capability and the available actions/triggers in the Zapier platform. But most SaaS solutions invest enough effort and time to make their Zapier integrations rich enough to serve the most common use cases. It won’t cover 100% of needs but it will certainly eliminate a lot of basic integrations like slack, email notifications, marketing tools triggers (i.e: follow-up campaigns).
This is not a code-less solution
When going down this route, the biggest work and challenge will be integrating Google Sheet APIs to connect your account (through the oAuth process), and store your credentials in your server and create the server → gsheet integration to send your back-end changes to a google sheet document. It’s not the easiest API to integrate with, but it’s well documented, mature, and has endless examples in the community (Github). And best of all, this one integration opens up so many without needing to do further integration. Even in the most basic products, we find ourselves doing slack, email deliveries in MVP versions. Investing the same effort in google sheet will easily justify itself later.
Trade offs
One big trade-off is to have your user’s PII data to be transported, stored in a google sheet (which will be private), and then sent to Zapier. If you are super paranoid or have to comply with certain privacy regulations, managing this traffic may need to be done more sensitively or completely unfeasible for your product. But the majority of products I built do not need that rigorous audit and compliance. So this solution has worked for me many times.
Example
I want to show a sample integration to set up a google sheet as a trigger and put a Slack notification as an action. Hopefully, this showcases some imagination and helps you understand where this can go.
Set up Google Sheet changes as “trigger”
Create a new zap or edit the existing one to change the “trigger” service. Select Google Sheets. In the first step, you will be asked to select the google account linked to your zapier account. If you haven’t done it yet, or want to connect to another account than you currently have, you can do it in this step.
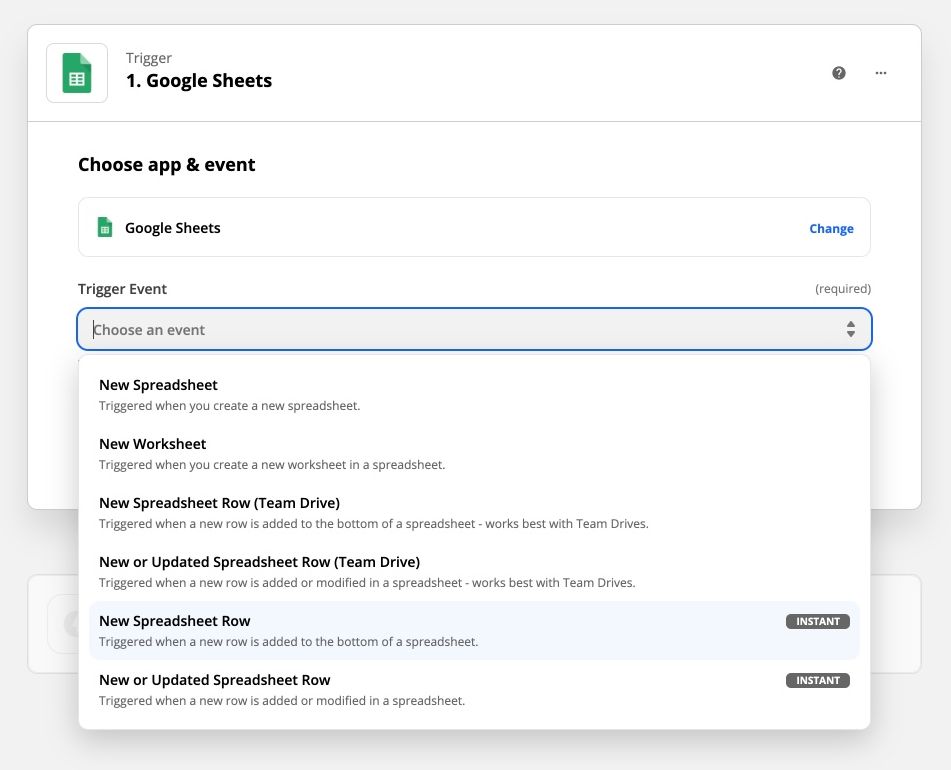
After selecting the account, Zapier will ask you to select what event you want to set this zap to listen to. Generally, we will inject a new row into a sheet in one of the documents. So we select “New Spreadsheet Row” as the event to listen to, but as you can see, you can select other events like updating a spreadsheet row or new worksheet creation in a document.
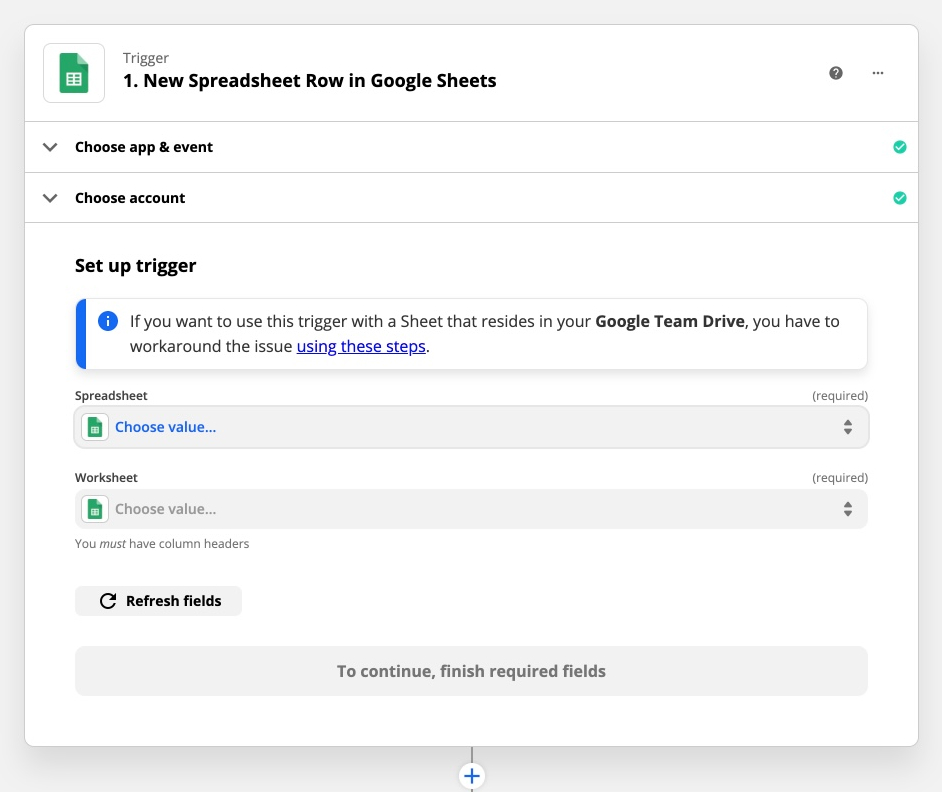
Now you will need to select which document and which worksheet to listen to. Zapier will show document and sheet selection dropdowns here.
As the final step, you will be able (and kinda have to) to test your trigger that will pull a sample row from your sheet. Make sure you enter values into your columns to use this sample data to set up your further actions in zapier. Zapier will show these sample values when you create actions using these values.
Set up Slack as “action” to send a message to a channel
Now, we’ll use this trigger in any service we want. We can also create multiple actions where you can send an email and slack notification and create a new Intercom customer record at the same time in one zap.
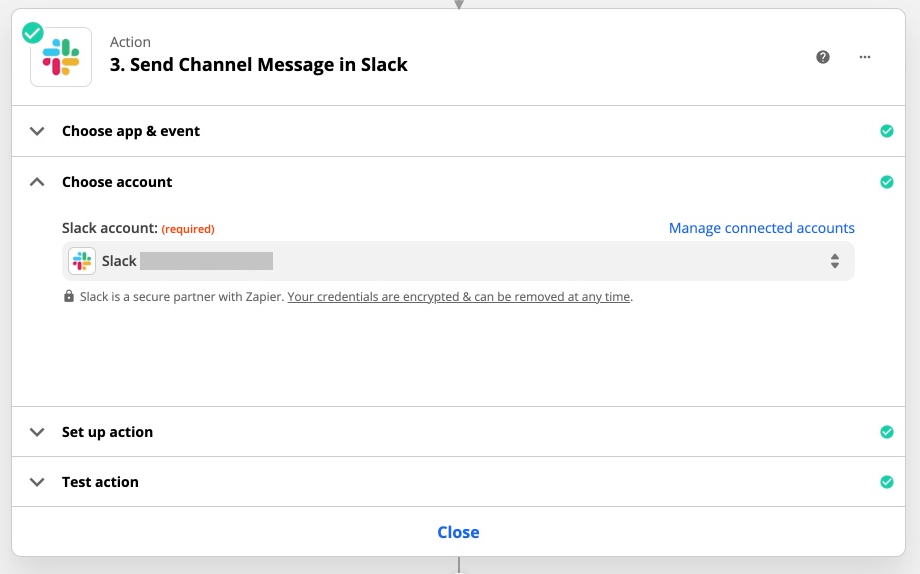
For this example, in the “action” section we will select Slack service when asked.
First, we will select the type of “action” we want to perform. We will select “Send Channel Message”. You can select other actions like send a direct message or others.
Then, similar to Google sheet initial steps, we will first select the slack account we want to use.
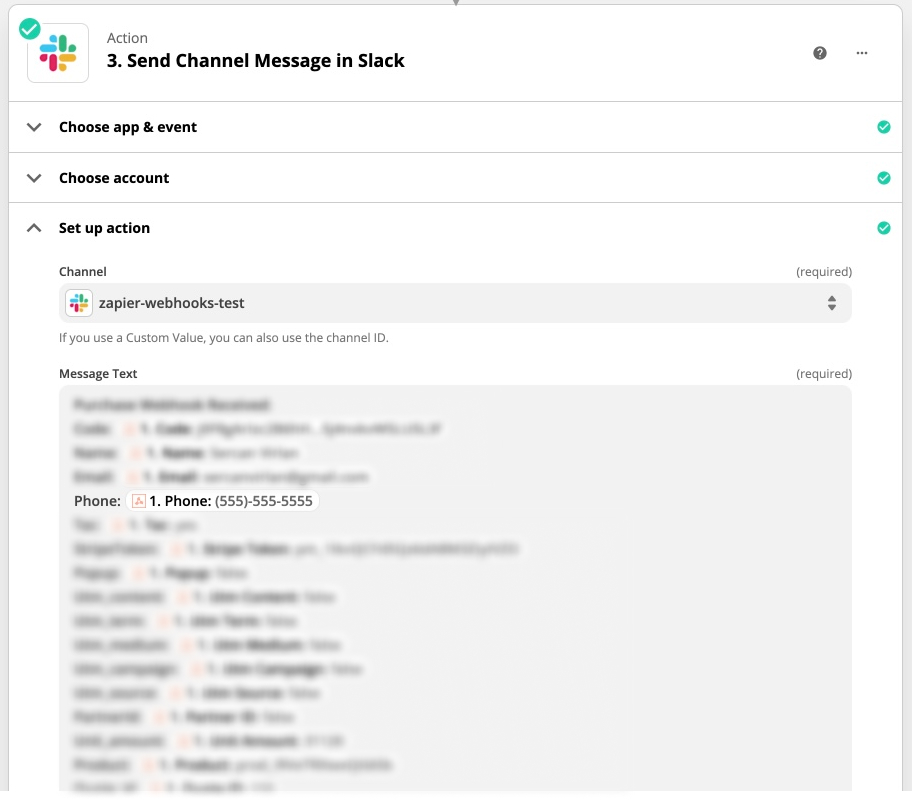
And finally, with seeing a lot of options, we will set up the sender name, avatar and other details, but most importantly, the channel we want the message to be sent to and the message content itself:
Zapier is pretty intuitive and simple to construct the smart content areas like this one. You will be able to both type a static message as well as insert the actual data (variables) from your source. In this example, our source is the google sheet document. So you will see a dropdown with search capabilities to search and find the actual column value you want to insert when you want to construct a message with dynamic parts.
Once everything is done, you will be able to finish this step and be forced to test the action you just set up. And all done! Don’t forget to turn the zap “on”.
This is just the most simple example I can use. There are many use cases you can allow this integration to push changes/data into thousands of services available in Zapier.
Wanted to give you a short information about browser automation. You visualize a desktop app when a “browser” comes to minds right? All browsers use an engine to render web pages on our screen. And these engines can actually work without rendering pages in the UI. All they need is to render the elements in memory. From there, it can allow us to interact with rendered pages programmatically without displaying the rendered page on our screens. There are browsers only works in this mode and they are called “headless” browsers. Means they have no UI. This browsers are meaningless for general consumers but it comes very handy to developer and testing community. Many companies build their testing and QA process utilizing these headless browser, do execute their UI flows with browser automation scripts. For instance, headless browser can be programmed to run and simulate the following user experience flow:
Load http://example.com web page,
Wait until page is completely rendered including javascript and css,
Fill “Fatih” to the field called “Name”,
Click to the button called “Send”,
Wait 5 seconds,
Take screenshot and save as JPEG
This can be very useful when doing regression tests.
Event utilizing screenshots with headless browsers will be very useful. There are many companies doing screenshot comparison for high level understanding changes done visually based on any given iteration on the code. This process simply takes and keeps versions of each page and in every release, it takes a new one with latest version and compares the pixels (and colors) to the previous version to determine a percentage for the change it detects. Then you can set some report and process to make sure you track of big changes to detect if a tiny css change blew a page you usually don’t test manually. It becomes very meaningful when you think about a web page with 100 different pages.
Are there any headless browsers I can use?
The well known headless browsers; the one named “Phantom” (and phantomjs) that is big on nodejs community. There is also headless chrome which is based on chromium.