Hosting my hobby projects from cheap HP mini desktop from my closet (Verizon Fios)

Why?

For me, self-hosting is like having my own personal playground where I can experiment, tinker, and learn. It’s a great way to explore new technologies, try out different setups, and have fun with my projects.

As part of my job, I need to have a deep understanding of developer experience. The best way to build this understanding is to be the developer, both initial experience with any development tool, as well as day-to-day work with these systems. Self-hosting is in a way, building empathy with the developer community. Understanding differences, and good/bad versions. My main reason is “learning”.

There are a bunch of other reasons one may choose to do this:

  • Privacy: your data
  • Full control: You own it (well, both good and bad)
  • Cost-effective: (may not be always true, but mostly true)

You shouldn’t do this… But if you really want to…

I don’t suggest this route for the majority of the people. It’s hard, you’ll hit walls way more frequently than you want. You have to be a warrior. If your reason is similar to mine, go for it. There is a strong determining factor though, your connectivity.

Let’s get started. I’ll start the connectivity, then the hardware and software.

Sounds common but not so common: It’s a privilege to be on Fios

While high-speed internet has become more commonplace, it’s still a privilege, especially in the United States. We’re (I’m) definitely taking it for granted. I use Verizon Fios is a fiber internet service. If it wasn’t for this, I wouldn’t self-host my stuff.

The big practical separation for Fios is how stable it is, regardless of the “mpbs/gbps” package you have. I used Fios in residential and office setups in New York City for years. I got off as I moved to different neighborhoods and I really really missed it when I didn’t have it, even though I got 1gbps service packages from other providers.

Back in the day when we used dial-ups and tried to play Half-Life (or Counter-Strike) online, your connection speed mattered but “lag” mattered even more. I lived in Turkey back then and we had a cable internet provider vs ADSL services the difference was, that you were getting super low lag/ping in cable network even though you were 1/4, 1/3th of the connection speed you had compared to other services that bragged how fast they were. Didn’t matter when playing online.

I have 300/300mbps, what’s called a “symmetrical” connection. 300mbps is already way higher than average internet connectivity worldwide (although certain countries/cities regions have way faster networks, overall world citizen gets access to the internet at lower speeds). But it would be ok even if it was slower because it’s a Fiber network and it’s symmetrical which means download and upload speeds are the same. Often you see traditional ISPs advertise something ridiculous with high speeds like 500mbps, but it’s often only referred to as download speeds. And in the majority of consumer scenarios, this is fine. But you need the upload speed to be high and consistent/stable when you want to serve upstream.

Hardware

Since it’s hobby purposes, I initially searched some “old” servers (like servers sitting on racks) on eBay. Then I realized it had a million combinations of hardware components, like CPU architectures, and network interfaces. I quickly went down the rabbit hole of Reddit threads both fun and scary stories. These “serious” server hardware were electric eating, heating sources that are also giant, require space kinda machines turned me off and I backed out quickly.

Then I explored mini PCs, which are more common computers that could handle my applications really easily. Think like you’re looking for a computer that you could use, but instead, you just host stuff and it sits somewhere in your home in a closet, without being a fire risk or a thing that you need to worry about how to keep it cool.

I bought an “HP Elite Desk Mini” which is a decent computer if I were to use it as my desktop. It has 16GB memory, an i7 quad-core CPU, and 510 GB SSD. I think I bought it under $150 on Amazon. You can go fancier with a much beefier machine with a few hundred dollars if you’re being much more serious about this. I’m thinking of buying another (same machine) and stacking them.

The footprint of this machine is super small. It snuck under my Verizon router in a closet, has almost zero noise, and barely heats. I’m sure if I find an ARM version of this thing (or a Raspberry Pi) I can go smaller and have almost no heat but I’ve never seen overheating on these.

Whether this machine is a good or bad hardware decision, it’s debatable, but I’m really happy a few years in.

Software: Ubuntu & Docker

The first thing I did was to clean it up and install Ubuntu (LTS). Almost bare bones Ubuntu then right away docker installed.

I have Nginx and PHP on it for some early play of a WordPress blog (not this one) but then abandoned it.

I run almost everything exclusively in Docker (more on this below).

I try to update & upgrade Ubuntu once a year. Nothing else.

Access: Cloudflare Zero Trust

The machine itself is completely closed to direct internet access. Its IP Tables don’t allow connections even from the local network (except SSH port accepts local network IP range).

Traditionally, the machine needs to open ports outside, then have a router port forwarding and set up all public IP sort things. More than 2 decades ago I did that with static IP from my ISP. Man, all the hustle…

None of that is necessary anymore. I use Cloudflare Access, Tunnels which has an agent always running in the server, and from remote configuration, I can listen to any internal port (without opening it up) and forward the port directly to a subdomain of my domains. This shortcut the DNS works for me too. On top of that, most of my private apps run on subdomains that are protected by Cloudflare Zero Trust access (only me). I love Cloudflare’s feature that solves 2 to 3 problems at once.

One might wonder, what happens if Cloudflare has an outage, and their Zero Trust tools stop working, does it open my apps to the public all of a sudden? No, because my apps are not open to the public in the first place. Zero Trust tunnel has to work in order to open it up to the public, and if Zero Trust authentication is down, the subdomain will also not be accessible (because it’s proxied through Zero Trust “application” record.

Worst case scenario, I lose access to my private apps from outside. Even with that, I can SSH to my server and create a tunnel, port forwarding to the specific port the app is running.

On a normal day, I simply join to Zero Trust network using Cloudflare’s desktop app WARP, which replaces VPN for me.

All things considered, I’m sure there are still holes and paranoia in this plan. You can go through a more traditional route that is not any different than hosting this instance in Digital Ocean or AWS and replicate what you think is “more secure”, but I’m pretty happy with the baseline Cloudflare brings, and solves a few unnecessary things I have to take care (like no need to do reverse proxy for all apps I’m running).

Deploy apps: Portainer + Gitops

I use Portainer to both setup deployments and manage my containers. Portainer is essentially a nice UI version of your docker command line tools. But where it shines is the gitops integration that integrates with github via webhooks, so when I push any change to any of my app repos (which all have docker-compose.yml that includes their infra and application configurations), my apps get re-deployed by portainer. This makes spinning up a new app, or an open-source tool in my server, a breeze.

I covered portainer and its gitops integration in this article: Portainer + gitops ❤️: A simple way to deploy and manage your self-hosted applications
A quick way to tweak CDN/Edge TTL to radically improve site performance (and SEO)

I want to talk about a quick tweak you can do in your CDN TTL settings to radically improve your site’s performance. Direct impact on Time-To-First-Byte (TTFB) metric, but as a halo effect, pretty much every other Web Vital.

You can do this in any CDN since TTL customization is a pretty standard need and most CDN providers have easy ways to create rules for various rule configurations.

I use Cloudflare for my blog’s CDN layer. Cloudflare already comes with nice defaults for optimizing the delivery of static assets like images, javascript, css files. But for HTML documents, CDNs use cache-control headers to determine how to cache, and how long to cache. Applications return this header and it’s a way for the application (origin) to tell CDNs how to behave on certain pages. But in this optimization method, we’ll simply override all (or most) of our pages to be highly cached and served from the cache while revalidating in the background.

The way this works is CDN always serves the “last” cached HTML to the reader (or crawler) from the edge network, really really really fast (in some cases double-digit milliseconds), and triggers a request to the origin server to get the “latest” version. Most applications also return proper response codes if the content hasn’t changed from the timestamp that CDN will ask if there is a new update to the content.

How to configure custom TTL in Cloudflare

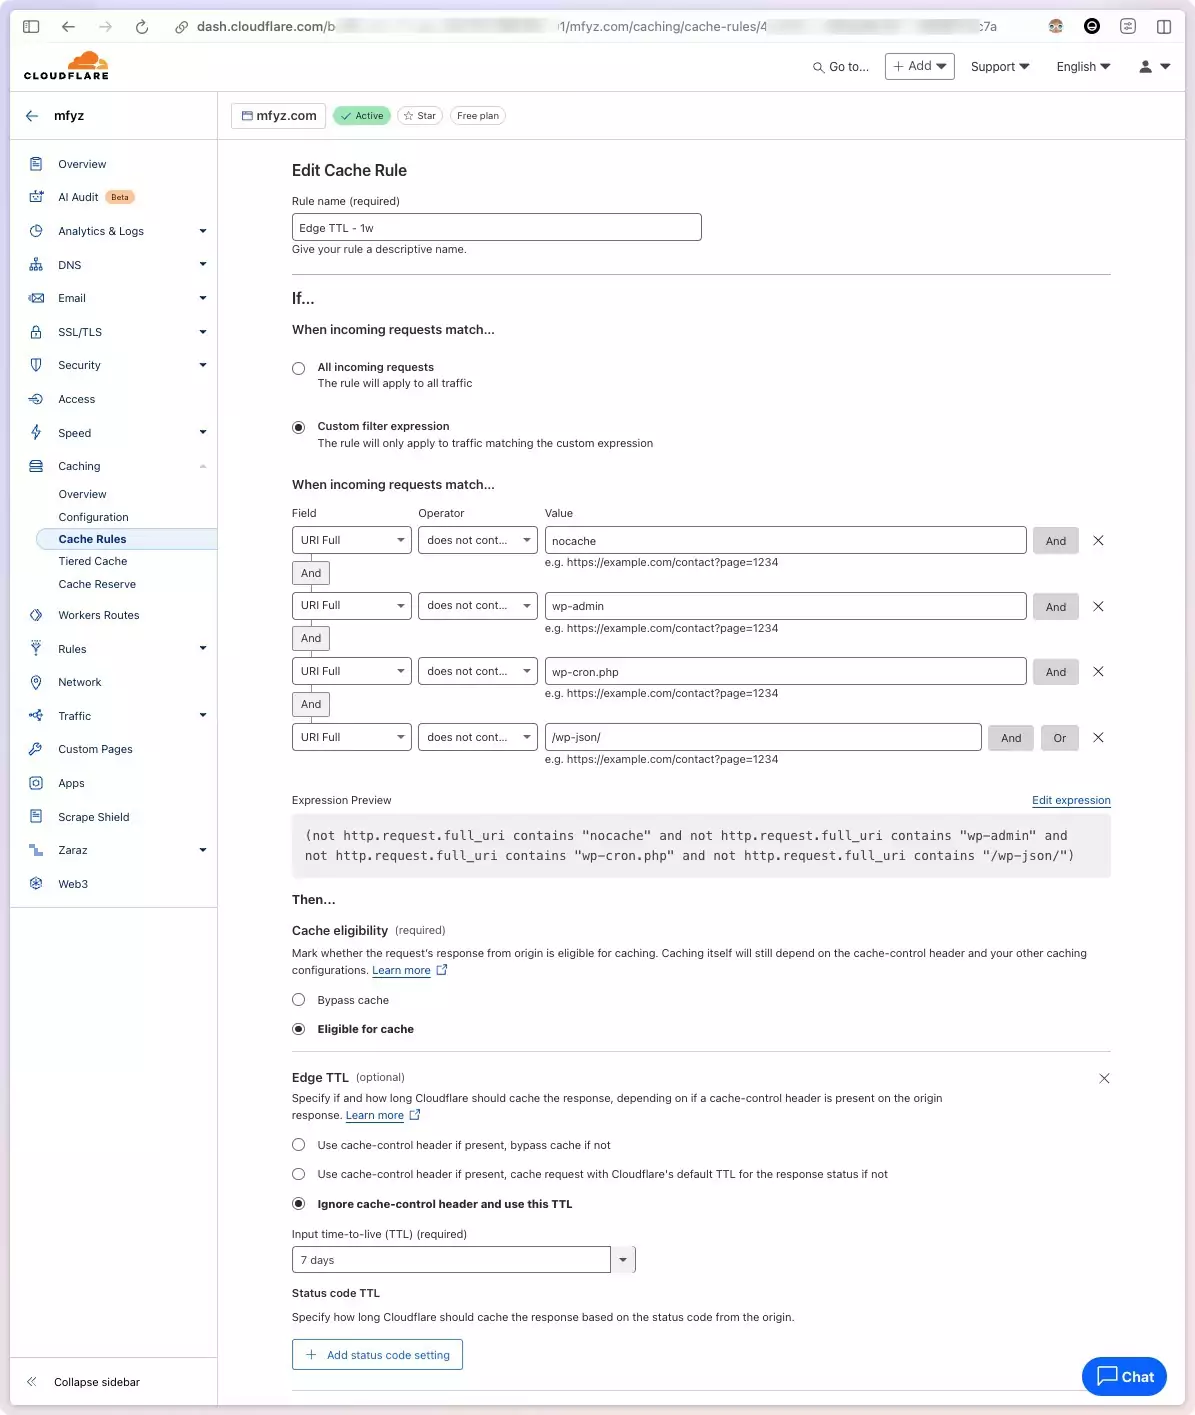
To set up custom edge TTL in Cloudflare, navigate to your site page, Caching > Cache Rules page.

Create a new rule, give it a name, and then set up the request path configuration.

You can set multiple expressions, and exclude patterns that you know are Admin, or Rest API, or other URLs that should NOT be cached long. I use WordPress for my blog and I exclude paths containing things like wp-admin, wp-json, cron…

Then Select “Ignore cache-control header and use this TTL in the Edge TTL section. And finally, select how long you want to cache. Longer is better, because longer means, most of your site content, including long-tail content that doesn’t get consistent traffic will also be cached at the edge. I started with 1 day, then 1 week, then I tried 1 month, but then had some pages stuck in the cache too long, and dialed it back to 1 week as my sweet spot.

Even if you’re not using Cloudflare, I’m sure there is an equivalent of this in your CDN provider.

What is the impact on page speed?

After the change, I saw a big drop (like 90% reduced load) in my server’s load. It meant CDN was doing what it was supposed to do. It’s one of the positive side effects of doing higher cache offload to CDN, to be able to scale higher traffic without needing powerful hosting resources.

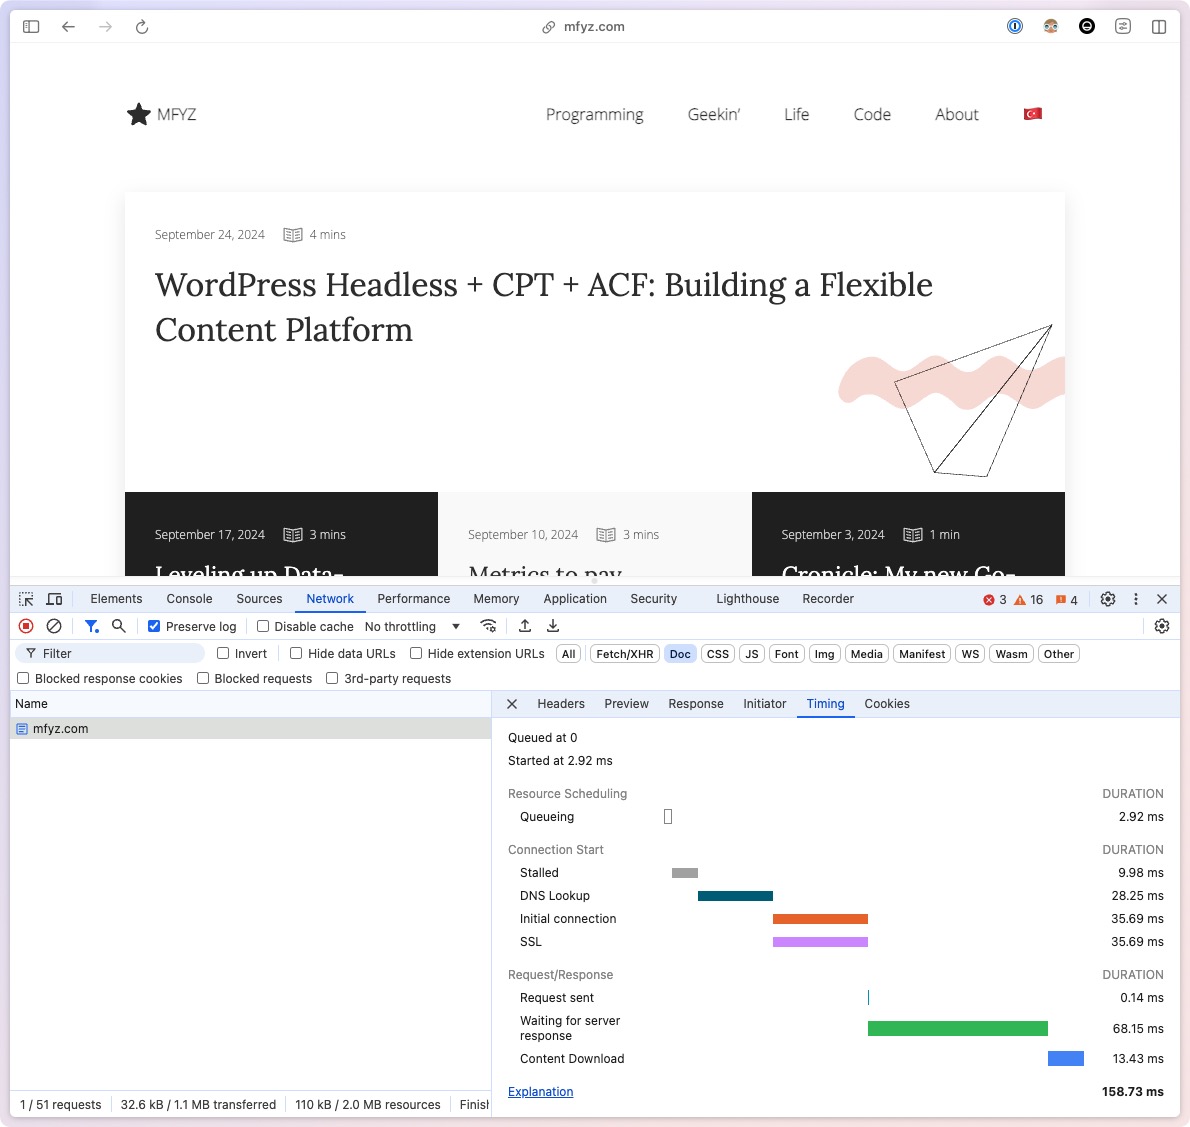
My Time-To-First-Byte decreased (improved) 70%, coming from shy of 500ms down to 100-160ms range 🤯

More importantly, the real user experience on the page became even more mind-blowing because things became super snappy. Click click click, bam bam bam, nothing was in a visible loading state anymore. Even if metrics didn’t move, I am super happy with this aspect of the change.

🤯🤯🤩

I got my Cloudflare Web Analytics email and noticed almost all Web Vitals moved positively at least 30% improvement.

I wasn’t expecting other Web vitals like CLS, and LCP to be directly impacted (or impacted as much as they did). But it makes sense. When the assets load much faster like this, the “wait time” (or blocking time) goes down, therefore layout shift or the largest paint goes down.

SEO Impact

It’s well known fact that Google takes your “core web vitals” in account when determining your ranking in the search results. This change has more impact on crawlers than you think. Because most of the time, crawlers’ requests are the ones that hit “cache cold” pages. It means Google (or other search engine) is reading your site holistically way more than your real users. Imagine every single article you wrote. There is no user who reads every single one of them – Google does 🙂 (and does it regularly). When a crawler tries to visit a page that nobody read in a long time, its’ request will have cache-miss more likely than cache-hit, so it will “wait” longer for your web server to render the page.

When you put yourself in the crawler’s shoes, imagine you try to read 10,000 articles/pages on a site over a day or two period (maybe it takes longer, who knows…). Now consider the percentage of those pages that will have to be rendered, or served from the CDN cache. The more pages Google sees “slow”, it will think your whole site is slow.

This is where the real value of super-long TTLs comes in. Especially if you combine that with serve-stale-while-revalidate (SSWR) which most CDNs automatically do (if not, I’m sure there is a setting you can enable these together). SSWR with super-long TTL (like 7 days, or more) basically creates an infinite loop of “always cached” scenarios. And with that, your crawler traffic gets served from the cache (at cost/risk of “stale content” which is OK in the vast majority of use cases), and directly increases your site’s overall speed score and, therefore your SEO scores.

Content Freshness

There is one caveat though, which is content freshness. When you bump the Edge TTL up to multi-day TTLs like I did, you need to make sure your CMS/site is nicely integrated with your CDN’s cache clear systems, in the case you make updates. Two scenarios:

  • You update existing content (like fixing a typo, or changing the cover image of a post), the change should be reflected on the content’s detail page right away.
  • You publish new content, so the new content is supposed to show up in common places like your homepage.

You can use your CDN’s cache clear UI or APIs to trigger “purge” on URLs you think it’s impacted (homepage, section pages, etc), or highly visible pages like the homepage can be configured with a lower TTL in a separate cache rule set.

I use WordPress for my content management system and Cloudflare has WordPress plugin to listen to publish/update hooks to trigger these cache clear nicely.

Another way to think about this is to find the balance. What is the “stale”ness you can tolerate on a page? Let’s say another article detail page showing “recent articles”, or “related articles” sections to NOT show your most recent article there. As long as that time length is not something you can’t afford, cache longer, to achieve better site/page performance.

Static Site hosting with Cloudflare Pages

Cloudflare Pages

I wrote about my fascination and falling in love more with other Cloudflare services recently. Cloudflare started as a DNS proxy service with caching and security features but then expanded into more capabilities like workers, domains and static website hosting with the Cloudflare Pages service.

There are thousands of hosting solutions out there, some free as well. But I really liked playing with Cloudflare Pages because of a few key features. Non of these features are unique or exclusive to Cloudflare but combination of them makes perfect candidate if you are already using other cloudflare services or if you currently don’t have a go-to solution when you want to bootstrap something and put it out there quickly.

It makes perfect candidate for developers to use it as experimenting tool. Don’t get me wrong, this service is production-ready and probably one of the best ones out there. But ease of making deployments makes it great for using it as playground.

Probably fastest (network) load times you can get

Cloudflare Network

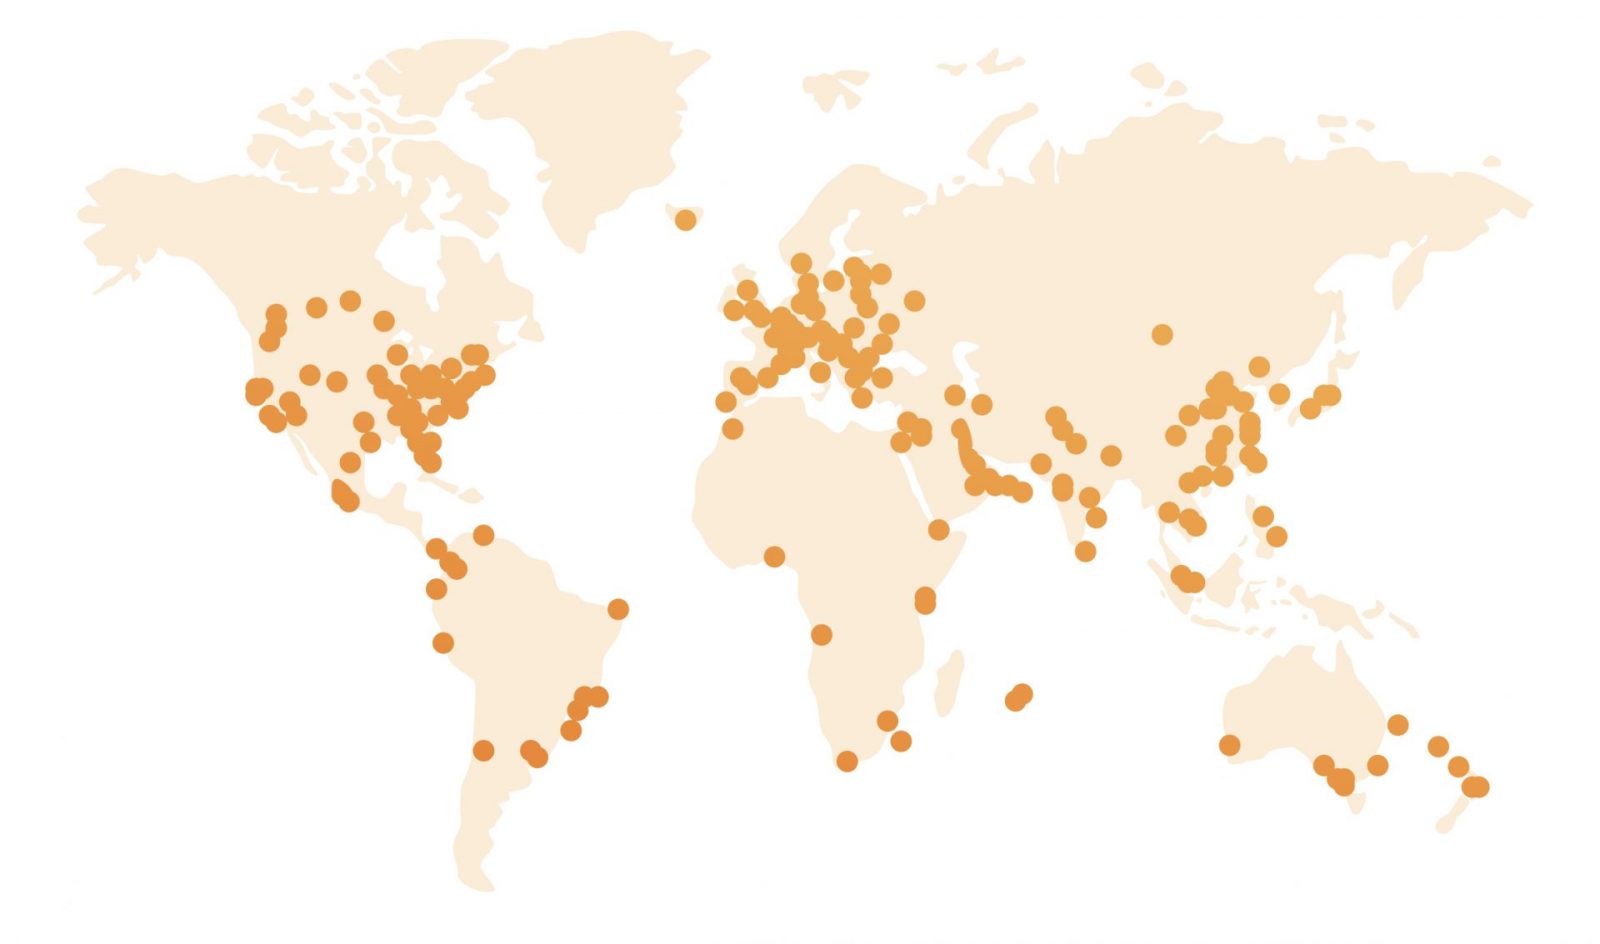
Cloudflare edge network and CDN may be the widest distributed network of servers get your content and app closest possible to your users throughout the globe. When it comes down to the speed, they are great at doing what they do. And we’re speaking static hosting which goes well with the high quality CDN that your users will get the lowest latency and highest download speeds to your website’s resources. And you get snappy website.

Git integrated deployments

Cloudflare Pages are exclusively deployed by git/github integration. You have to put your assets (or pre-build app) in a repo and connect to cloudflare pages when you create a new project.

Cloudflare listens pushes to certain branches where you can directly push changes or restrict your git workflow to work with merge/pull-requests. Eventually commits trigger the deployment builds.

These builds are not required. If you have index.html in your repo, it gets deployed served right away. But if you are using a build process, cloudflare pages will work with that easily.

Perfect for JAMStack apps

The build process makes cloudflare pages perfect for JAMStack apps. My go to stack is next.js to create plain/simple react.js based apps. Cloudflare pages plays well with next.js among with many other popular frameworks. 

Keep in mind that your JAMStack app, build process has to export static html/js/css assets that can’t be served by running a web server process. So your static output runs on CDN network and loads instantaneously.

Custom Domains

Cloudflare provides free subdomains with SSL by default when you set up a project and deploy a site. But you can configure your custom domains without much work for free with Cloudflare Pages. It also comes with managed flexible SSL out of the box.

Pricing

Cloudflare Pages is free to start. And their free tier ie pretty generous until you need to scale a lot. And even with the paid version is dirt cheap compared to the effort you have to put to scale and/or alternative services.

Conclusion

All-in-all, I loved playing with Cloudflare Pages. Again, it never cease to amaze me how much you can do for free with Cloudflare services including Pages. I highly recommend every developer to at least play with it and do a static site deployment to see how easy is to do it.

https://pages.cloudflare.com