Sometimes you don’t need a full-blown app. You just need one endpoint. Maybe it’s for a tool you’re building. Maybe it’s a prototype. Or maybe, it’s just for the vibes. Fastify + Vercel is a great combo for that.
Let’s walk through how you can build and deploy a /books API endpoint using Fastify and Drizzle ORM — and how surprisingly easy it is.
Why Vercel for an API?
You probably know Vercel as the go-to place for frontend apps, especially Next.js. But it also works beautifully for backend use cases, like single endpoint APIs.
Here’s why:
Zero-config deploys
Built-in scalability
Serverless by default
Free tier good enough for small APIs
Instant previews for each commit
That means your idea can go from local to live in minutes.
Let’s Build /books CRUD
In this example, we’ll build a RESTful CRUD endpoint for managing books. We’ll use Fastify as the HTTP framework, and Drizzle as the ORM to talk to a database. You can swap Drizzle with anything else (Prisma, Kysely, raw SQL), but for this demo, we’ll show Drizzle in the code.
File: api/books.ts
import { drizzle } from 'drizzle-orm/vercel-postgres';
import { sql } from '@vercel/postgres';
import { FastifyRequest, FastifyReply } from 'fastify';
import Fastify from 'fastify';

const db = drizzle(sql);

const fastify = Fastify();

fastify.get('/books', async (req: FastifyRequest, reply: FastifyReply) => {
  const books = await db.query.books.findMany();
  return reply.send(books);
});

fastify.post('/books', async (req: FastifyRequest, reply: FastifyReply) => {
  const body = req.body as { title: string; author: string };
  const inserted = await db.insertInto('books').values(body).returning();
  return reply.code(201).send(inserted);
});

fastify.put('/books/:id', async (req: FastifyRequest, reply: FastifyReply) => {
  const { id } = req.params as { id: string };
  const body = req.body as { title?: string; author?: string };
  const updated = await db.update('books').set(body).where({ id }).returning();
  return reply.send(updated);
});

fastify.delete('/books/:id', async (req: FastifyRequest, reply: FastifyReply) => {
  const { id } = req.params as { id: string };
  await db.deleteFrom('books').where({ id });
  return reply.code(204).send();
});

export default fastify;
This file is all you need. Put it under the api/ folder in a Vercel project. Vercel will automatically treat it as a serverless function.
Deploy it
npm install -g vercel
vercel login
vercel
That’s it. You’ll get a working API endpoint at something like:
https://your-app-name.vercel.app/api/books
Test It with curl
Here’s how to add a book:
curl -X POST <https://your-app-name.vercel.app/api/books> \
  -H "Content-Type: application/json" \
  -d '{"title": "The Pragmatic Programmer", "author": "Andy Hunt"}'
You’ll get a 201 Created with the new book entry.
Popular Fastify Plugins
Fastify has a rich plugin ecosystem. Some handy ones to know:
Adding them is just a few lines of code. That’s part of the joy of Fastify.
Best Vibes
Fastify on Vercel is perfect for AI-generated APIs. When tools or agents generate code for your backend, you want:
Fast iteration
Clear docs
Built-in tests
Easy deploys
This combo checks all those boxes. It’s low friction, flexible, and fun to build with. You can write code manually or have AI generate it—and either way, it just works.
When you want to build fast and iterate even faster, this is a stack worth reaching for.
That’s it. One file, fully working CRUD API, deployable in under 2 minutes. Enjoy the vibes 🧃
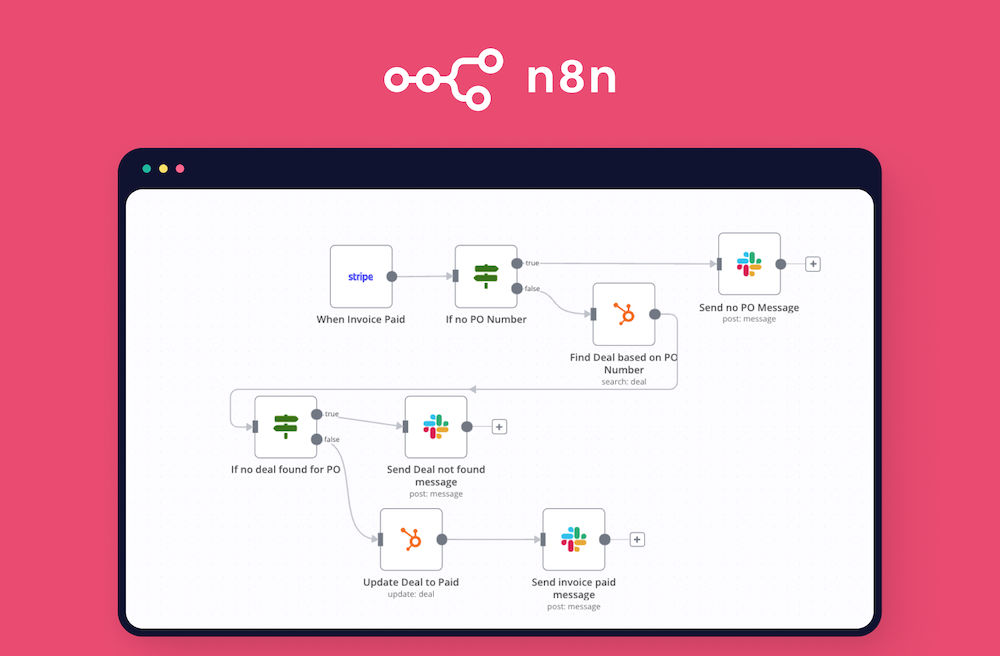
Zapier is great—until you hit its limits. Most automation tools work fine for simple things, but the moment you need more control, flexibility, or self-hosting, they fall short.
And building automations manually? It’s time-consuming, labor-intensive, and honestly, boring.
That’s where n8n comes in.
What is n8n?
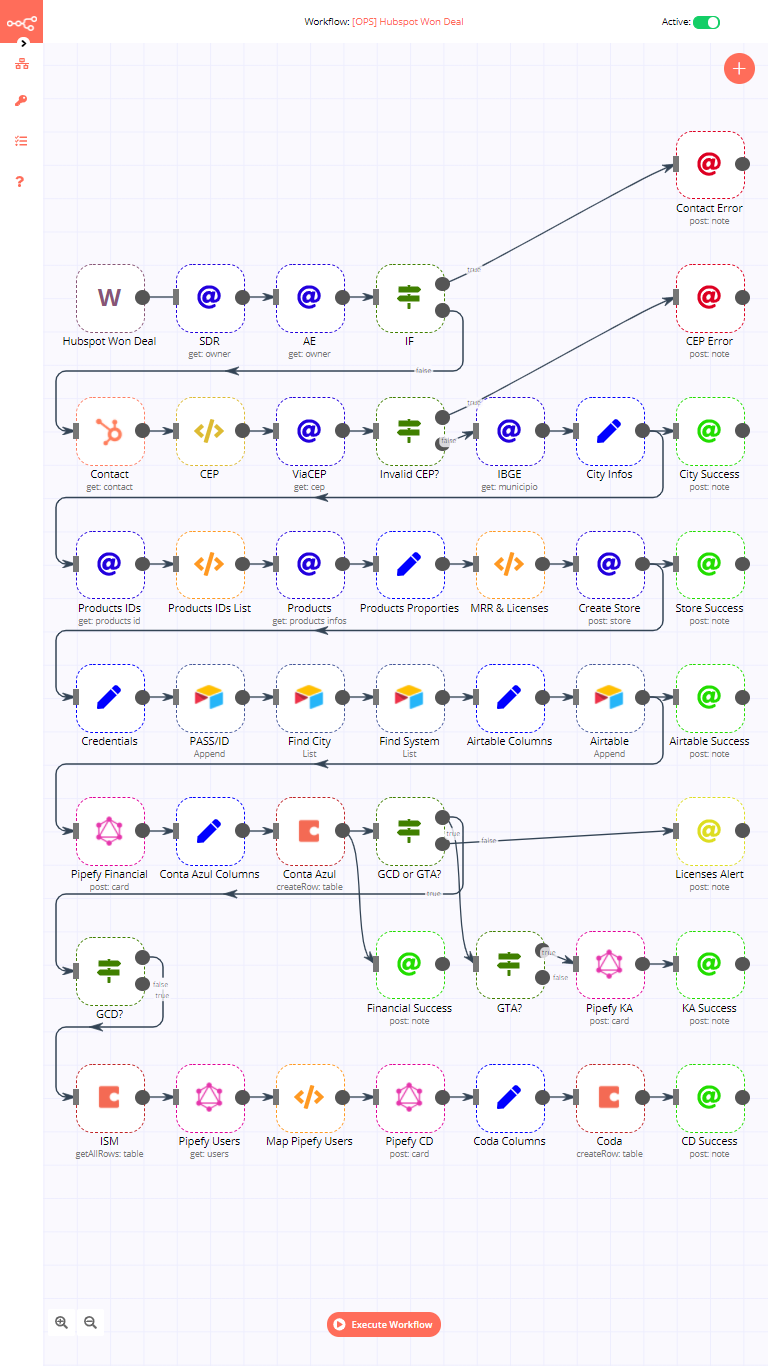
It’s an open-source workflow automation tool that makes building automations not just easier—but actually fun. You can connect APIs, tools, databases, even AI blocks, and control everything visually. No complex setup. No vendor lock-in.
You build workflows by visually connecting nodes on a canvas. Each node is an action—like calling an API, sending an email, writing to a database, or running a script. You can start small, then build more complex automations as you go.
You can go as crazy as you want:
Why Use n8n?
There are lots of automation tools out there, but n8n stands out if you care about flexibility, ownership, or just want something that works without lock-in.
A few things that make it different:
Docker or Cloud: You can self-host it easily (I use Docker), or use n8n Cloud if you want something managed.
Open Source: You own your workflows. You can customize it. You don’t depend on someone else’s pricing tiers.
Visual Interface: Drag, drop, connect. No complex setup.
No Code (or Full Control): You can build powerful workflows without writing code. But if you need it, you can drop in JavaScript or run custom functions.
Templates: They have tons and tons of community contributed templates that you can just copy to your instance with 1 click. I often use templates to learn how new blocks that I don’t know configured with real examples.
AI-Ready: n8n has built-in AI blocks. You can call LLMs, run prompts, build agents, and connect them to other tools. AI workflows are one of the strongest use cases right now.
How I Run n8n (Docker Setup)
If you’re like me and prefer to self-host, here’s the simplest way to run n8n locally with Docker:
You can also check out n8n Cloud if you prefer a managed version.
Create Your First Workflow
Once n8n is running:
Open the editor UI in your browser
Click “New Workflow”
Add some nodes—click the + button and search for integrations (Slack, GitHub, Google Sheets, etc.)
Connect the nodes
Click “Execute Workflow” to test
You can trigger workflows manually, on schedule, or with triggers like webhooks, emails, or form submissions.
Example Workflows
1. Slack Alerts for GitHub Issues
You want to get notified in Slack when someone opens an issue on a repo.
GitHub node: trigger on new issues
Slack node: send message to a channel
2. Weekly Google Sheets Report
You update a sheet regularly, and want to email yourself a report every Monday.
Google Sheets node: read from the sheet
Email node: format and send the data
3. AI Feedback Summary
You collect feedback via a form and want a GPT-style summary every day.
Form node: collect feedback
OpenAI node: summarize input
Email or Slack node: send results to yourself or your team
AI Workflows with n8n
n8n supports AI workflows natively. You can build:
Prompt chains
Content generators
Data extractors
Agent-style logic
And the best part: you can combine them with your internal tools, databases, or APIs. For example, process a customer message, summarize it with an LLM, tag it based on content, then store it or trigger a follow-up email.
AI is not just a feature in n8n—it’s a first-class block you can use just like any other node.
A Few Tips
Start small. One trigger, one action. Grow from there.
Always test your flows before activating.
Use version control if you run complex workflows.
Check the community—there are lots of shared workflows you can reuse or get ideas from.
Not silver bullet
While n8n is powerful, it’s not perfect. The biggest limitation for me is that it’s heavily tied to the UI. There are import/export APIs and CLI tools, but designing, testing, or scaling workflows programmatically isn’t straightforward. That makes it tricky to version control or build CI/CD pipelines around it. Personally, I wouldn’t build an entire business on top of n8n—but for prototyping, internal tools, or automating isolated workflows, it’s the best thing out there.
But…
It just works (well)
n8n is not trying to be flashy. It’s not trying to upsell you. It’s just a solid, open, flexible tool to automate things.
If you’re already automating, it’ll give you more control.
If you’re new to automation, it’s one of the easiest ways to start.
I’ll be writing more about specific n8n patterns and workflows soon—including how to use it with AI tools and agent-style automations.
In the meantime, check out n8n.io, run it with Docker, and start automating boring stuff.
I have recently published a blog post on my company blog about how I and my team helps our customers at Arc XP to scale their reader traffic to billions on our platform.
It’s really cool to see how our CDN, and caching layers creates resiliency, security and scale.
Arc XP is an enterprise scale CMS that acts as operating system for large media companies. We’re part of The Washington Post and we help World’s larges media organizations to operate smoothly in their content workflows, digital experience to reach their readers at scale. Learn more: https://www.arcxp.com/
Even though there are some skepticism around using sqlite in production, but I find it really mature and perfectly acceptable in a lot of projects.
Drizzle is a great typescript ORM.
Managing schema and migrations with drizzle is great.
Turso is a hosted SQLite service. Their free tier is extremely generous.
Running local sqlite in local development and tests makes it super easy and portable.
Turso + Drizzle: Perfect SQLite in Production
Even though there’s some skepticism around using SQLite in production, I find it really mature and perfectly acceptable in a lot of projects. SQLite has proven its worth, becoming a solid choice for applications requiring a lightweight database without the overhead of more complex setups.
The Benefits of Using SQLite in Production
Using SQLite can be a game-changer for various reasons:
Simplicity: Its ease of setup and minimal configuration is perfect for rapid development.
Lightweight: Taking up a fraction of the resources compared to other databases.
Portability: SQLite databases can be easily moved around, making it a breeze to manage local development and testing environments.
Introducing Drizzle
Now, let’s talk about Drizzle. Drizzle is a fantastic TypeScript ORM (Object-Relational Mapping) tool. Here’s why I think Drizzle is great:
Type Safety: Built with TypeScript, it provides type safety, reducing runtime errors.
Simple Relationships: Managing schema and migrations with Drizzle is a walk in the park. You can ease your work by using a clear and concise API, simplifying data manipulation and access.
A Great Match: Turso and Drizzle
Turso is a hosted SQLite service that has come to embrace modern development workflows. Their free tier is extremely generous, making it an excellent option for both startups and solo developers looking to keep costs down while still enjoying the benefits of a sophisticated database.
The synergy between Turso and Drizzle makes for an efficient development experience. You can run local SQLite for development and testing, and when you’re ready to go live, transition to Turso seamlessly. Here’s why this combo works so well:
Connection Simplicity: Switching from a local SQLite file to a Turso-hosted database is smooth, making the transition to production seamless.
Consistent Development Environment: You can maintain consistency between your local and production environments, reducing deployment headaches.
Setting Up Turso and Local DB with Drizzle
To get started with this powerful duo, you’ll first need to set up Drizzle to work with SQLite. Here’s how you can do that:
Step 1: Install Drizzle ORM
You can easily add Drizzle to your project using npm or yarn:
npm install drizzle-orm
or
yarn add drizzle-orm
Step 2: Configure Drizzle with SQLite
You’ll want to create a configuration file to set up your connection:
import { drizzle } from 'drizzle-orm/sqlite';
import { SqliteDialect } from 'drizzle-orm/sqlite';
import sqlite3 from 'sqlite3';

const db = drizzle(new sqlite3.Database('path-to-your-database.db'), {
  dialect: new SqliteDialect(),
});
Step 3: Use Turso for Production
When you’re ready to use Turso, you need to adjust your connection. Turso provides a unique connection string that you can find in your dashboard. Just replace the database connection in the code above:
const db = drizzle(new sqlite3.Database('your-turso-db-url'), {
  dialect: new SqliteDialect(),
});
Combined Snippet
Two code snippets above are independent from each other, either local sqlite db, or remote turso db. Here is what I use in combined database wrapper that handles both local sqlite when I run my app in my development machine, and uses turso in production when I deploy my app on my servers.
import { drizzle } from 'drizzle-orm/libsql';
import { createClient } from '@libsql/client';
import sqlite3 from 'sqlite3';

let db: ReturnType<typeof drizzle>;

if (process.env.NODE_ENV === 'production') {
  // Use Turso/libSQL
  const client = createClient({
    url: process.env.TURSO_DB_URL!,
    authToken: process.env.TURSO_DB_AUTH_TOKEN, // optional if public
  });

  db = drizzle(client);
} else {
  // Use local SQLite
  const sqlite = new sqlite3.Database('local.db');
  // @ts-ignore: drizzle types are overloaded here
  db = drizzle(sqlite); // This works because drizzle handles both clients
}

export { db };
Set up your schema and use awesome drizzle methods
The combination of Turso and Drizzle proves to be a perfect match for SQLite in production.
You get the maturity and reliability of SQLite, combined with the power of TypeScript through Drizzle, all while benefiting from the convenience that Turso offers as a managed service.
If you’re still skeptical about using SQLite in production, I encourage you to dive in and give it a shot. With the right tools at hand, you’ll find it can be a robust and efficient solution for your applications. Give it a try, and happy coding!
For more information about Turso and Drizzle, check out their official websites: Turso and Drizzle ORM.
We’re creating more bloated digital experiences every day. Worst part, it became the default.
How did we end up here?
In simpler times, we used to simply wrote vanilla javascript, css in another place, assets in another… That’s what browsers (and humans understood really easy).
With the hype of modern frameworks, we came up layers of new dev experience improvements and goodies (don’t get me wrong, I love them), and now we need to transpile our code to something that browser can understand. Transpilation is in essence a simple process (now became too serious… really), but it’s done by what we call “javascript bundlers”. Webpack, esbuild, swc… Their output is (generally), single (or a few) assets that packages and bundles “all” (or most) of your stuff into a few files.
Bundlers can do cool stuff like minification, code splitting, chunking etc. But developers has to train (configure) the bundlers on how to do these. Most of the time developers don’t take time and do this. That results the default output of giant single js, css files.
Bundle everything into single chunk makes sense in some cases. But most of the modern javascript development moved into larger single-page-application behavior even though the user only interacts with a smaller portion of that experience at the end of the day.
This article is essentially an counter point to this default behavior. But I don’t want to focus on the generic code splitting which you should be familiar if you are not, and I’ll touch on a specific aspect of code splitting. I want to call out the other obvious stuff, that can be easily missed by developers which can result even more giant single js and css bundles.
How Often Contents Change Matters
When planning your unbundling, consider how often certain parts of your code will need updates and how frequently you update those parts. Client-side code that undergoes frequent updates, like the main app logic, will invalidate the cache often, leading to more frequent downloads. By separating “set-and-forget” parts, into their own chunks, you minimize unnecessary cache busting. Imagine you make updates to the main parts monthly, but your site/app user visits your app throughout the year and let’s say you’re not making big dependency upgrades. There is no reason anything unchanged to be re-downloaded by your user.
We were just trying to from point A to point B, we kinda ended up overloading:
Let me touch a few obvious things that should be separated from your main bundle. Imagine we’ll start stripping these obvious, less/never-updating parts into its own chunks and at the end you’ll have “the rest” of your bundle that you don’t need to consider every single thing, but these key stuff will help optimizing your site.
1. Binary Assets (Images, Fonts, and Icons)
Including binary assets like images or fonts directly in a JavaScript bundle results in a significant increase in file size, which means longer load times for users. This happens because bundlers like webpack will base64-encode the images or fonts when they’re imported, creating a larger, slower-loading bundle.
To avoid this, use CSS or HTML <link> tags to load these assets. If you’re working with SVGs, consider inlining them in the HTML or creating a sprite file instead of embedding them in JavaScript. Similarly, fonts can be linked through a Content Delivery Network (CDN), letting the browser cache them independently. This way, your assets are handled more efficiently, and your bundle size remains light.
Frameworks and libraries that creating convenience and tokenization like styled components, or other styles-in-js makes this harder because it couples styling into your javascript. Sometimes the references to the assets from these solutions unintentionally includes the binary assets into your js. My rule of thumb is to never enable asset loader plugins in the javascript bundlers which is generally how you enable these libraries to work seamless in your components.
2. Heavy Utility Libraries
a) Use tree-shaken exports
It’s easy to add libraries for utility functions (think lodash or moment.js), but including the entire library when you only need a few functions can be wasteful. These libraries, while useful, often add a lot of code that your application doesn’t actually use.
Instead, try importing only the functions you need. Libraries like lodash support modular imports (e.g., import get from 'lodash/get') so that you only include what you’ll use. Alternatively, look for lighter options or replace certain utility functions with native JavaScript. A lighter bundle with just the essentials will improve loading times without sacrificing functionality.
b) Consider Code Splitting and Bundling Libraries to vendor.js (or lib.js)
This is probably the most important “obvious” thing that gets bundled in your final javascript bundle and takes up the most space. Your dependencies, libraries you use in your code will most likely stay unchanged (unless you do very frequent updates and upgrades to your libraries – but we often don’t). If you’re not, when you touch single line change on your own custom code, your whole bundle will be re-packaged and create a new single large js file. Even though vast majority of the content of that bundled file is same, the file itself will be completely re-downloaded by your users browser. Consider react.js. It can be around 300kb dependency and it makes total sense to split react itself to its own chunk. Or combine a few (in some cases all) into a lib.js, or vendor.js. This file essentially only need to get updated when you perform updates and upgrades to the included in them.
Most bundler tools have ways to configure and say chunks certain modules into a named chunk you can control.
3. Dev Tools and Testing Utilities
Debugging tools, console logs, and testing libraries are crucial during development but become dead weight in production. They take up space and, in some cases, can expose internal details of your code.
Be sure to configure your bundler to strip out development-only code for production builds. Tools like webpack or environment variables (e.g., process.env.NODE_ENV) make it easy to exclude debugging or testing code from the final bundle. This approach keeps production files lighter and more secure, without sacrificing your development process.
4. Static Data (Large JSON Files or Configurations)
If your project includes large JSON files or configuration data, it might seem convenient to embed these directly in the bundle. But large data structures in JavaScript can significantly bloat file sizes, even though they don’t change frequently.
For a better approach, consider serving static data through a CDN or loading it asynchronously only when needed. If the data is frequently used, you could cache it locally on the client. By removing static JSON or config data from the bundle, you’re allowing for faster initial loads and enabling browsers to handle data separately, making your application feel more responsive.
Keeping your bundle lean is about making thoughtful choices on what to load and when. By excluding binary assets, static data, unused utility functions, and development-only code, you make your application faster, more efficient, and more enjoyable for users. Focus on loading only what’s essential, and you’ll see a big difference in both performance and user experience.
This is definitely not extensive list, but covers a few obvious things to keep in mind. If you use webpack, I previously covered a topic about how to analyze and optimize webpack bundles:
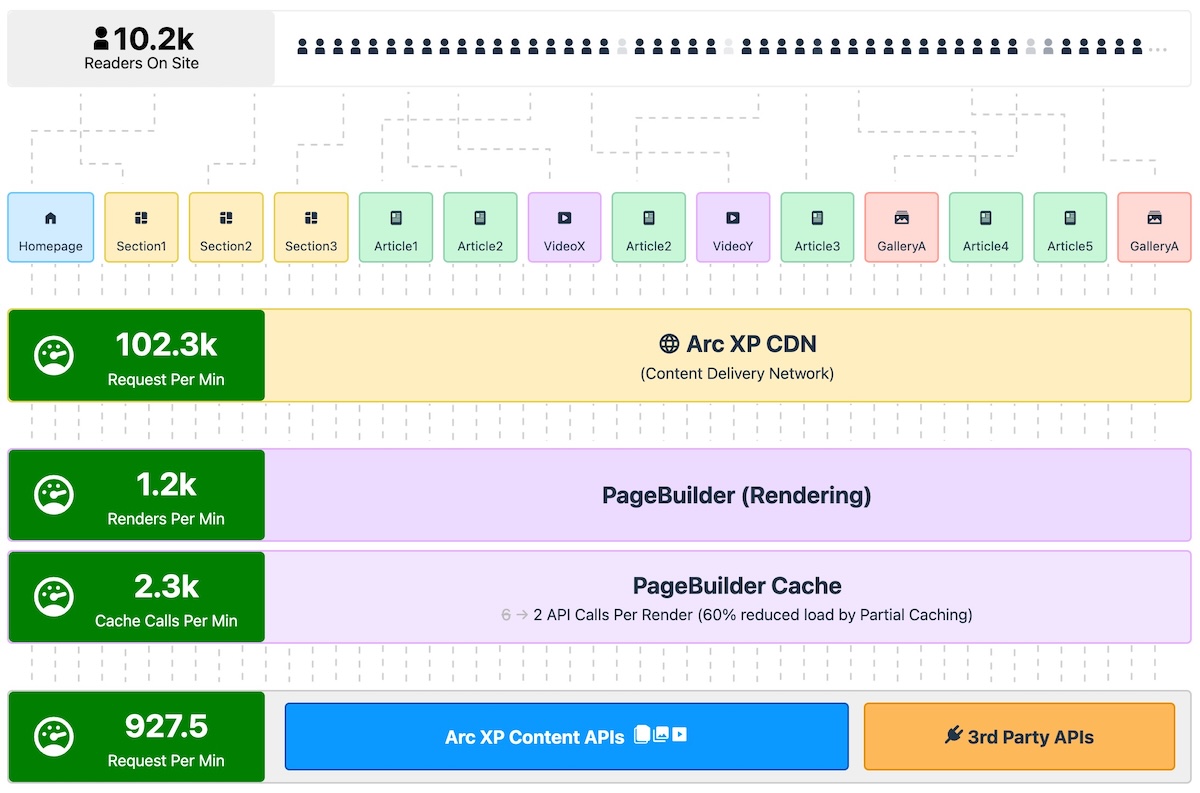
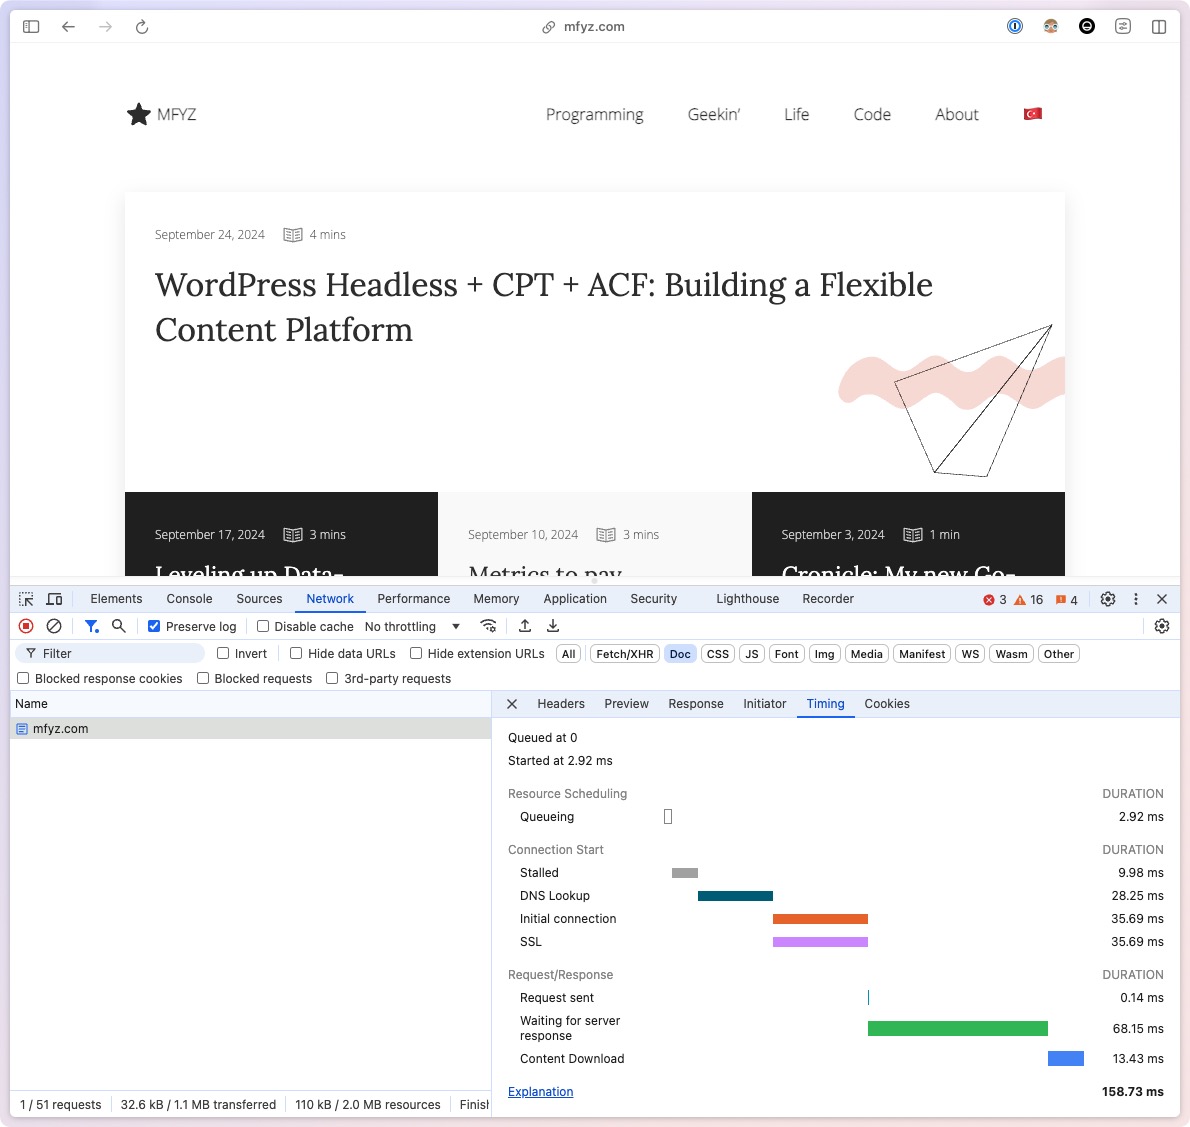
I want to talk about a quick tweak you can do in your CDN TTL settings to radically improve your site’s performance. Direct impact on Time-To-First-Byte (TTFB) metric, but as a halo effect, pretty much every other Web Vital.
You can do this in any CDN since TTL customization is a pretty standard need and most CDN providers have easy ways to create rules for various rule configurations.
I use Cloudflare for my blog’s CDN layer. Cloudflare already comes with nice defaults for optimizing the delivery of static assets like images, javascript, css files. But for HTML documents, CDNs use cache-control headers to determine how to cache, and how long to cache. Applications return this header and it’s a way for the application (origin) to tell CDNs how to behave on certain pages. But in this optimization method, we’ll simply override all (or most) of our pages to be highly cached and served from the cache while revalidating in the background.
The way this works is CDN always serves the “last” cached HTML to the reader (or crawler) from the edge network, really really really fast (in some cases double-digit milliseconds), and triggers a request to the origin server to get the “latest” version. Most applications also return proper response codes if the content hasn’t changed from the timestamp that CDN will ask if there is a new update to the content.
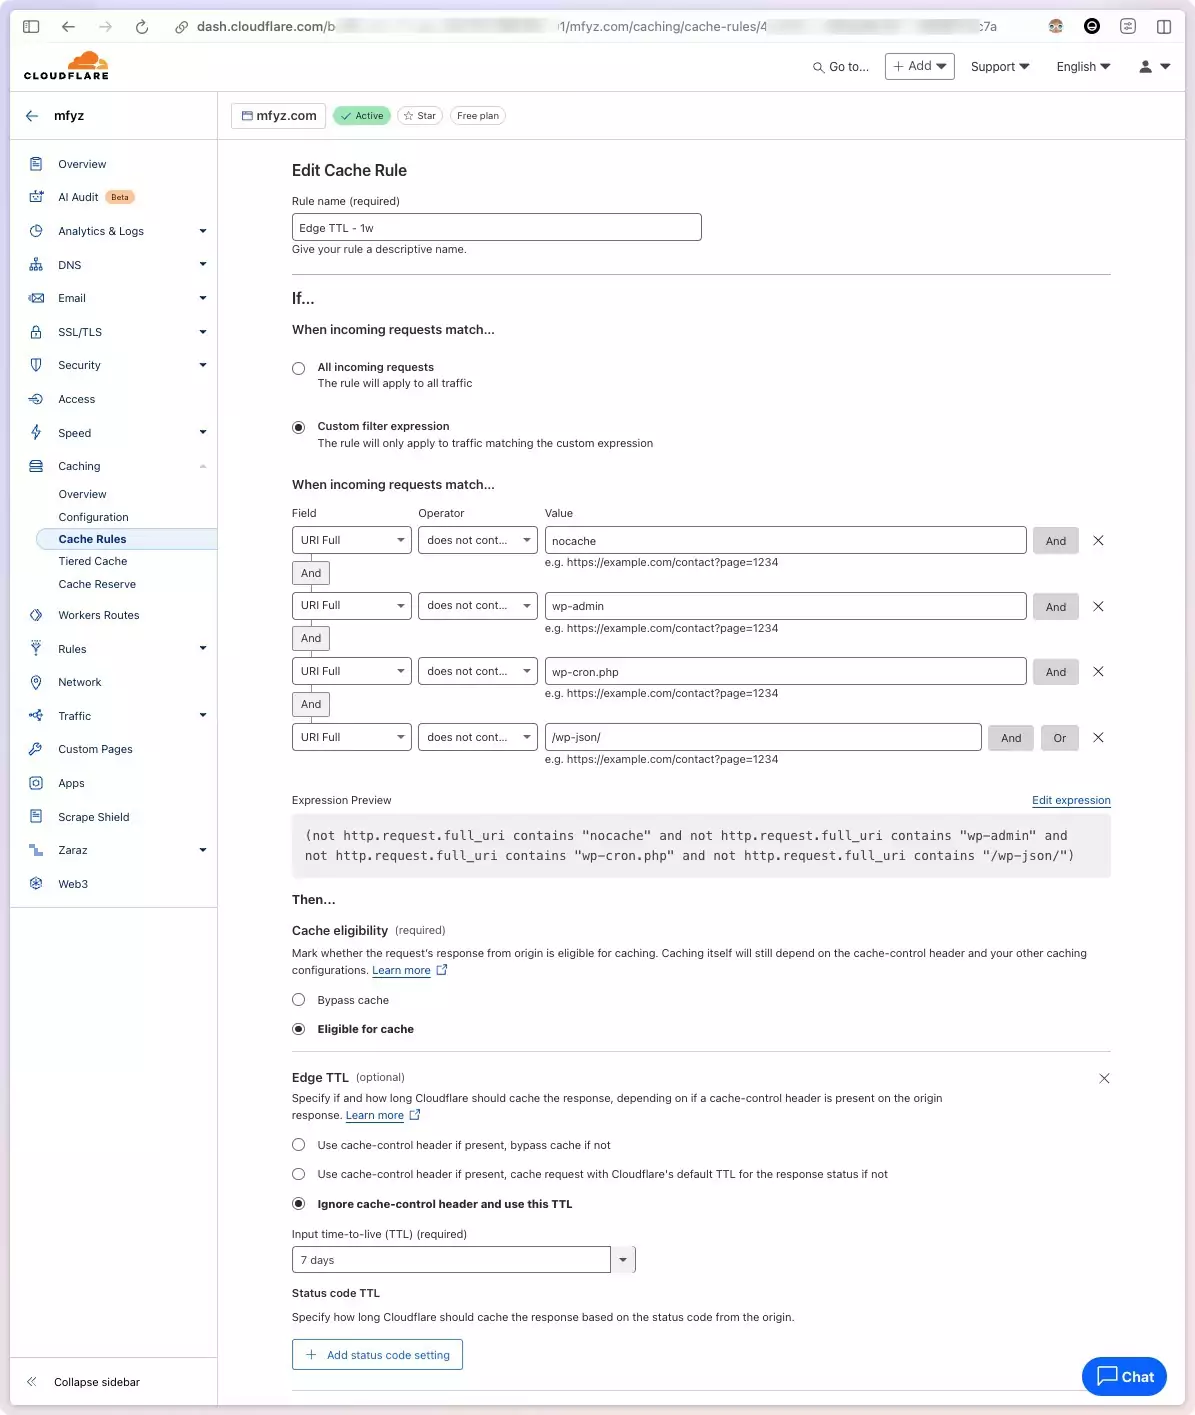
How to configure custom TTL in Cloudflare
To set up custom edge TTL in Cloudflare, navigate to your site page, Caching > Cache Rules page.
Create a new rule, give it a name, and then set up the request path configuration.
You can set multiple expressions, and exclude patterns that you know are Admin, or Rest API, or other URLs that should NOT be cached long. I use WordPress for my blog and I exclude paths containing things like wp-admin, wp-json, cron…
Then Select “Ignore cache-control header and use this TTL in the Edge TTL section. And finally, select how long you want to cache. Longer is better, because longer means, most of your site content, including long-tail content that doesn’t get consistent traffic will also be cached at the edge. I started with 1 day, then 1 week, then I tried 1 month, but then had some pages stuck in the cache too long, and dialed it back to 1 week as my sweet spot.
Even if you’re not using Cloudflare, I’m sure there is an equivalent of this in your CDN provider.
What is the impact on page speed?
After the change, I saw a big drop (like 90% reduced load) in my server’s load. It meant CDN was doing what it was supposed to do. It’s one of the positive side effects of doing higher cache offload to CDN, to be able to scale higher traffic without needing powerful hosting resources.
My Time-To-First-Byte decreased (improved) 70%, coming from shy of 500ms down to 100-160ms range 🤯
More importantly, the real user experience on the page became even more mind-blowing because things became super snappy. Click click click, bam bam bam, nothing was in a visible loading state anymore. Even if metrics didn’t move, I am super happy with this aspect of the change.
🤯🤯🤩
I got my Cloudflare Web Analytics email and noticed almost all Web Vitals moved positively at least 30% improvement.
I wasn’t expecting other Web vitals like CLS, and LCP to be directly impacted (or impacted as much as they did). But it makes sense. When the assets load much faster like this, the “wait time” (or blocking time) goes down, therefore layout shift or the largest paint goes down.
SEO Impact
It’s well known fact that Google takes your “core web vitals” in account when determining your ranking in the search results. This change has more impact on crawlers than you think. Because most of the time, crawlers’ requests are the ones that hit “cache cold” pages. It means Google (or other search engine) is reading your site holistically way more than your real users. Imagine every single article you wrote. There is no user who reads every single one of them – Google does 🙂 (and does it regularly). When a crawler tries to visit a page that nobody read in a long time, its’ request will have cache-miss more likely than cache-hit, so it will “wait” longer for your web server to render the page.
When you put yourself in the crawler’s shoes, imagine you try to read 10,000 articles/pages on a site over a day or two period (maybe it takes longer, who knows…). Now consider the percentage of those pages that will have to be rendered, or served from the CDN cache. The more pages Google sees “slow”, it will think your whole site is slow.
This is where the real value of super-long TTLs comes in. Especially if you combine that with serve-stale-while-revalidate (SSWR) which most CDNs automatically do (if not, I’m sure there is a setting you can enable these together). SSWR with super-long TTL (like 7 days, or more) basically creates an infinite loop of “always cached” scenarios. And with that, your crawler traffic gets served from the cache (at cost/risk of “stale content” which is OK in the vast majority of use cases), and directly increases your site’s overall speed score and, therefore your SEO scores.
Content Freshness
There is one caveat though, which is content freshness. When you bump the Edge TTL up to multi-day TTLs like I did, you need to make sure your CMS/site is nicely integrated with your CDN’s cache clear systems, in the case you make updates. Two scenarios:
You update existing content (like fixing a typo, or changing the cover image of a post), the change should be reflected on the content’s detail page right away.
You publish new content, so the new content is supposed to show up in common places like your homepage.
You can use your CDN’s cache clear UI or APIs to trigger “purge” on URLs you think it’s impacted (homepage, section pages, etc), or highly visible pages like the homepage can be configured with a lower TTL in a separate cache rule set.
I use WordPress for my content management system and Cloudflare has WordPress plugin to listen to publish/update hooks to trigger these cache clear nicely.
Another way to think about this is to find the balance. What is the “stale”ness you can tolerate on a page? Let’s say another article detail page showing “recent articles”, or “related articles” sections to NOT show your most recent article there. As long as that time length is not something you can’t afford, cache longer, to achieve better site/page performance.
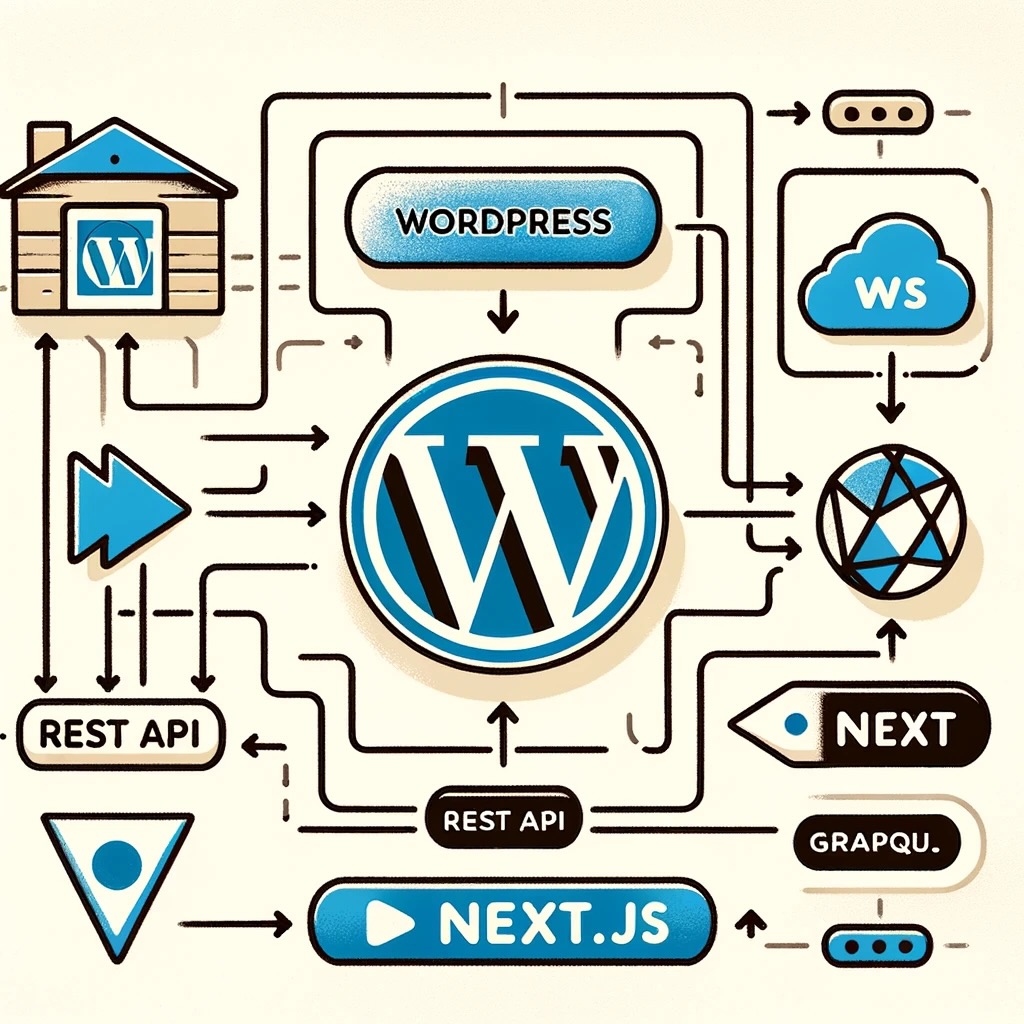
This article will guide you through creating a flexible and dynamic content platform using WordPress as a headless CMS, Custom Post Types (CPTs), and Advanced Custom Fields (ACF). Whether you’re a seasoned developer or just starting out, this combination offers a powerful foundation for your projects.
Why Go Headless with WordPress?
Think of WordPress as the brains behind your content, and a headless setup as giving it the freedom to power any front-end you want. This means you can use your favorite framework (React, Vue.js, etc.) to create a beautiful and performant user interface.
One of the big benefits of using wordpress headless is to remove concerns of any front-end from the actual WordPress. This is one of the things I struggled a lot in the past working with wordpress that there is a plugin for everything. And you can easily end up in a place with 20+ plugins bloating your wordpress installation. Most of them are about front-end website experience. This way, you can also separate your editorial needs from your developer teams’ needs, making your developer team more independently optimize and deploy your website, without worrying about risking editorial mishaps.
Setting Up Your Local Test Environment
Before we dive into the fun stuff, let’s set up a playground. Here’s what you’ll need:
WordPress Installation / Local Server: Use Docker for a streamlined setup. Check out this docker compose I wrote a few years back, it should still be a good place to start: https://github.com/mfyz/wordpress-docker-compose or I’m sure you can find a valid/recent example quickly.
Headless Framework: Consider Next.js for a React-based frontend. You can find a sample project I played with it here: https://github.com/mfyz/next-wp
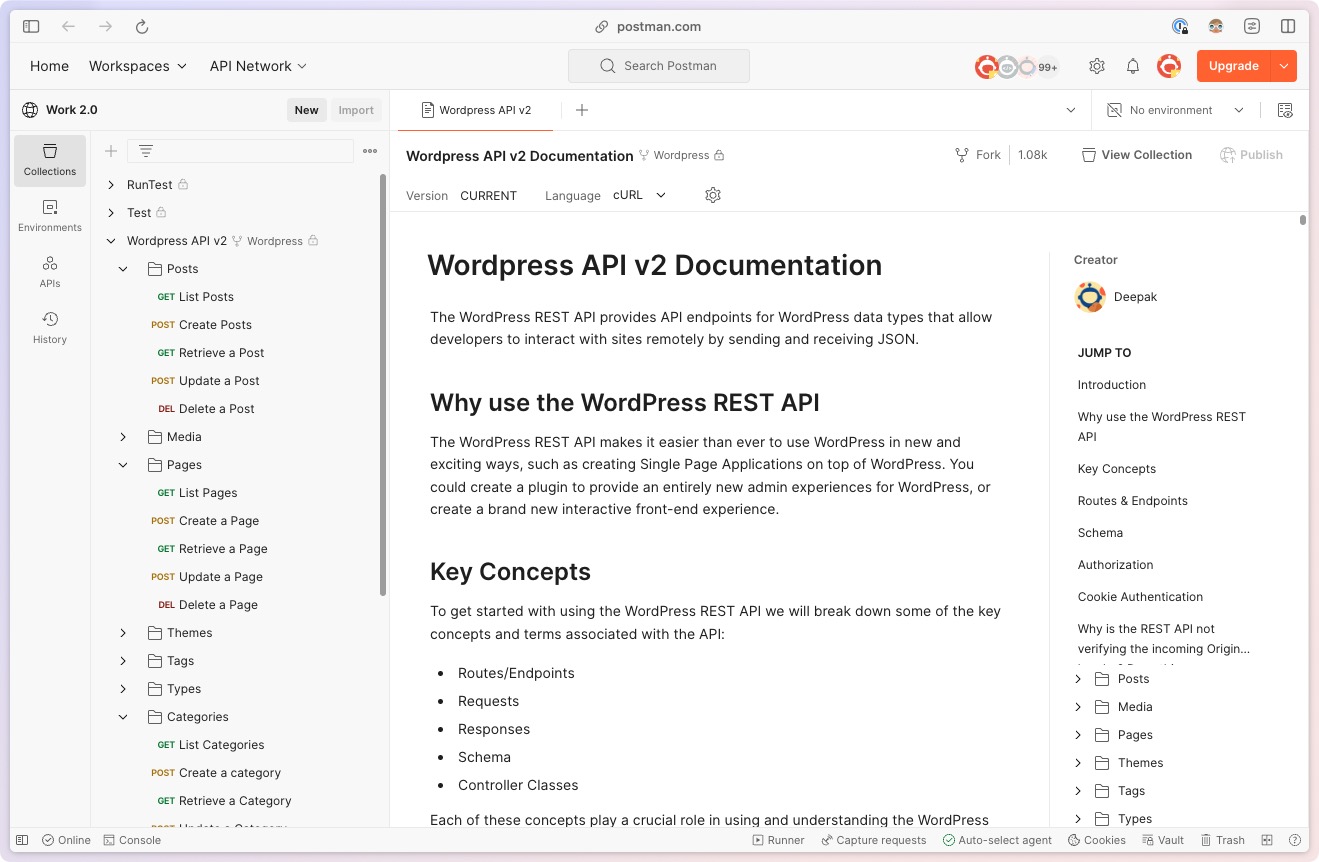
Unleashing the Power of WP-JSON
WordPress’s REST API, accessible through wp-json, is your gateway to interacting with your content programmatically. Let’s explore it using Postman.
Exploring the WP-JSON Endpoint with Postman
Postman is a fantastic tool for testing APIs. Here’s how to utilize it for exploring the WordPress REST API:
Import a Postman Collection: Import the pre-built WordPress Postman Collection to get started quickly. This collection provides pre-configured requests for interacting with various WordPress resources.
Test Requests: Send GET requests to retrieve various post types, pages, and custom fields. Explore the available endpoints and data structures.
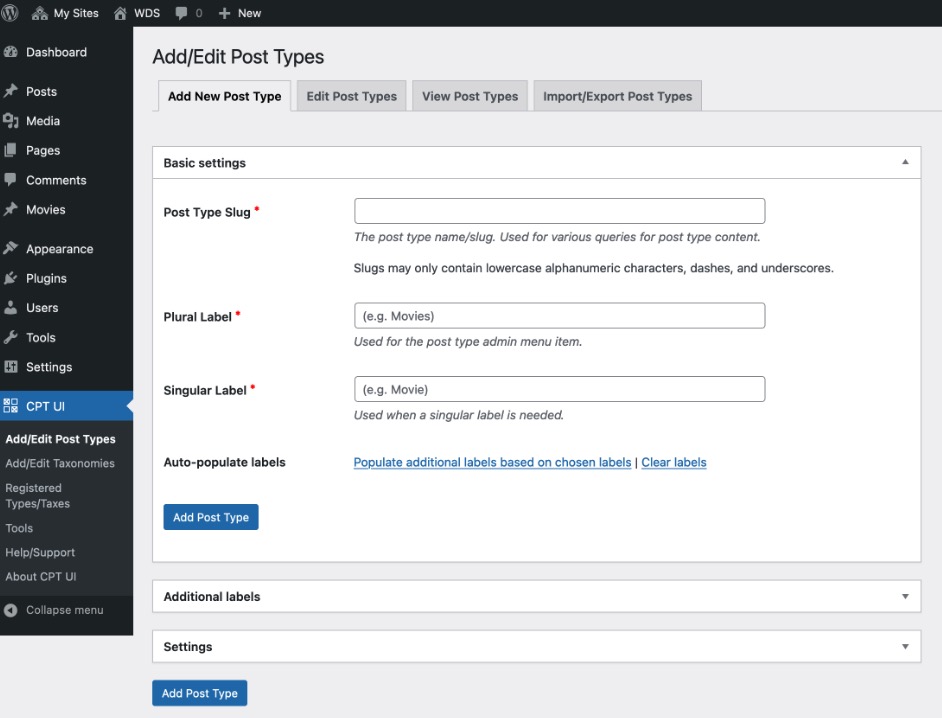
Customizing Your Content types with Custom Post Types (CPT)
WordPress offers you the flexibility to create custom post types beyond the standard posts and pages. Think of these as building blocks for your unique content structure (Imagine unique content types, like: recipes, books, hardware, people, places…).
Custom Post Type UI is a user-friendly plugin allows you to easily create, manage, and customize custom post types directly within your WordPress admin panel. It eliminates the need for manual coding, making CPT creation accessible to users of all skill levels.
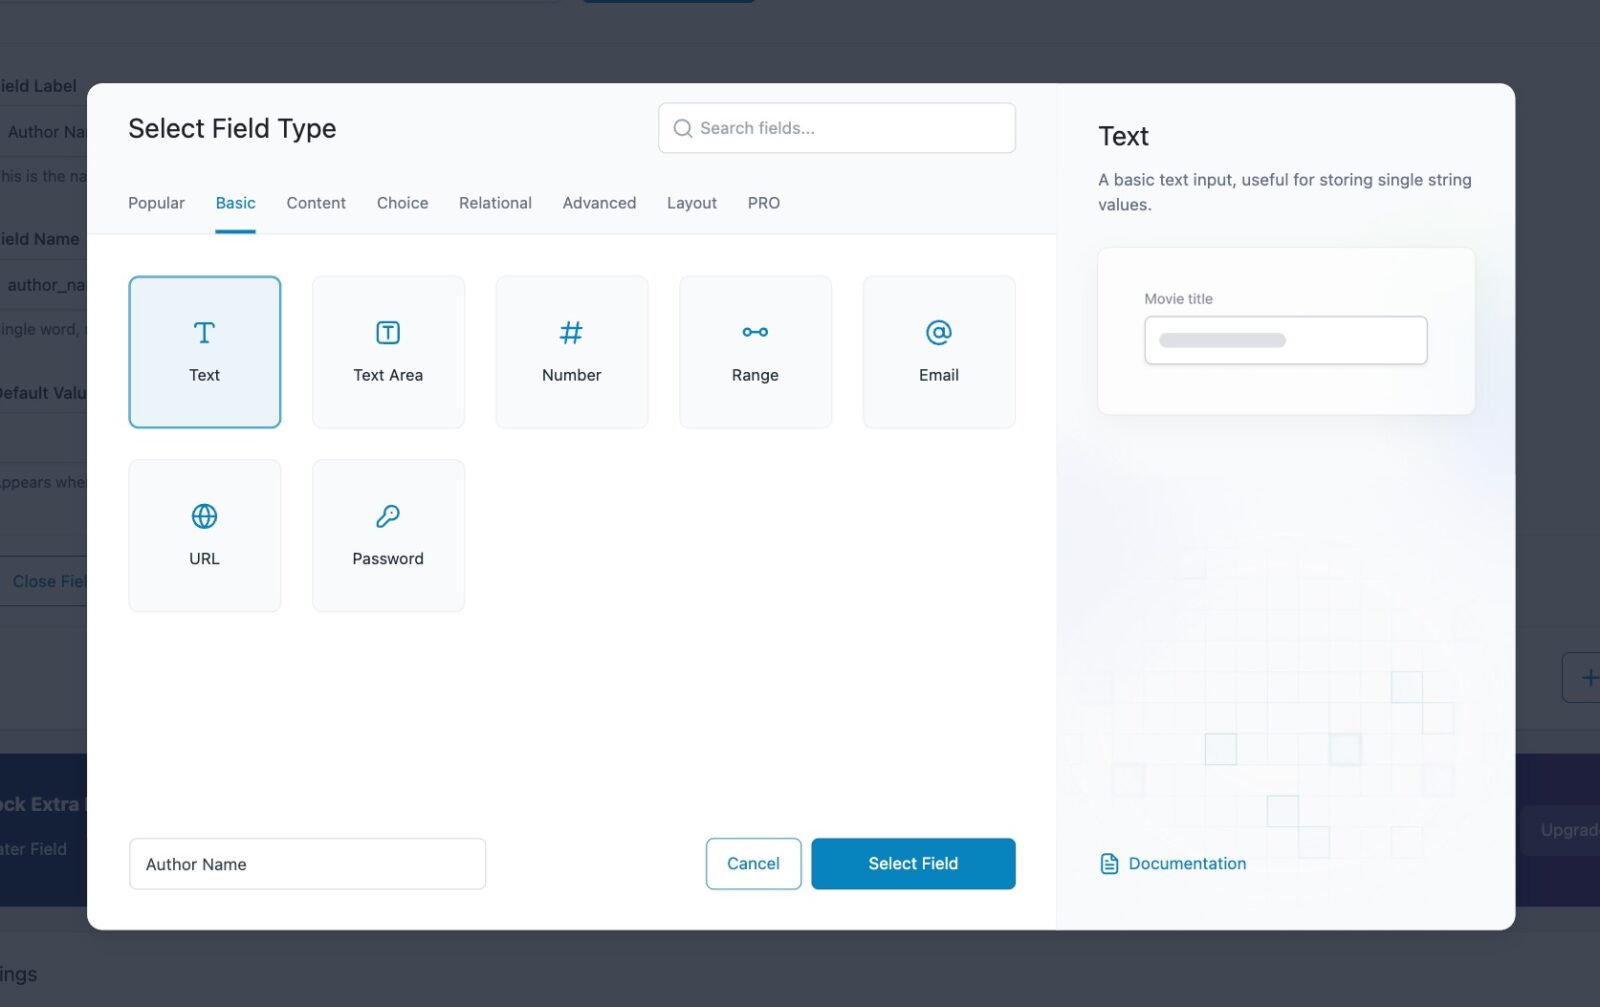
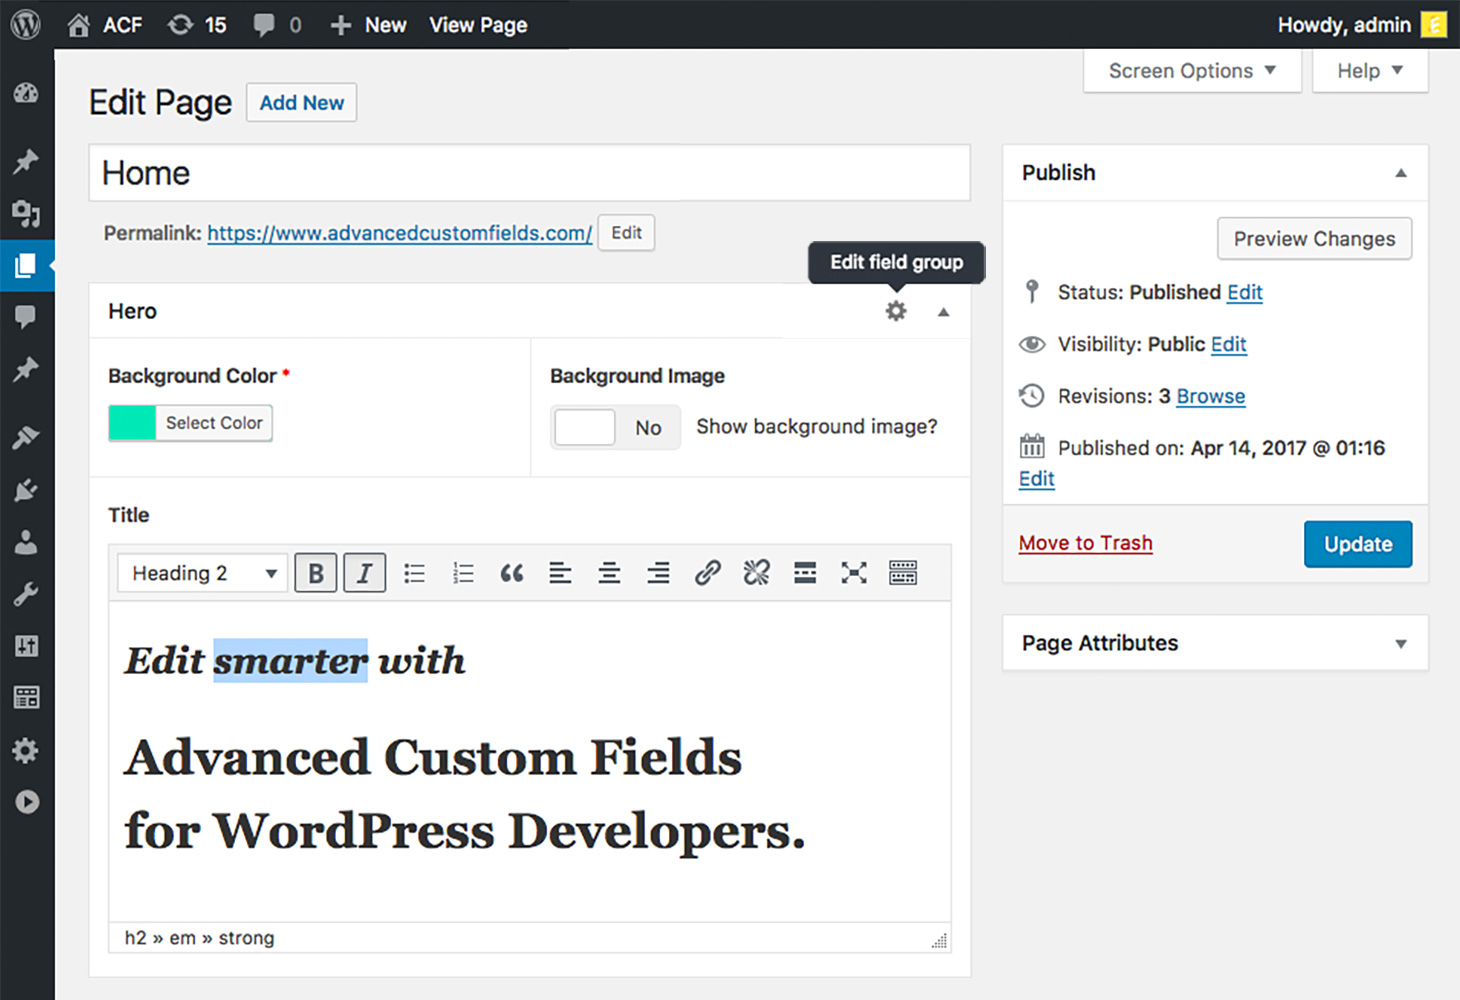
Advanced Custom Fields with ACF
Advanced Custom Fields (ACF) is a game-changer for content management. It lets you create custom fields for your custom post types, making them more flexible and dynamic. Think of it like building blocks for your content.
Here’s what you can achieve with ACF:
Create Flexible Layouts: Design complex page layouts with varied content formats using ACF fields.
Simplify Content Creation: Provide editors with user-friendly interfaces for adding and managing content, even for complex data structures.
Enhanced Data Management: Store complex data structures efficiently with custom field groups.
Here is how your custom fields will look like in your pages, or posts:
I find this very intuitive.
When combining it with the CPT UI plugin, it becomes really customization. CPT UI has additional controls to make the “editing” experience simpler for custom types (like disable Guttenberg, disable the body of the post altogether, and other customizations).
ACF will promote its PRO plan a lot, but you don’t need its pro version in most cases.
Front-end freedom
Using WordPress empowers your front-end team to choose their favorite front-end framework, push the boundaries of customization and performance for your front-end of your experiences.
It can also centralize your content platform for multi-channel digital experiences like website, mobile apps, OTT apps (TV apps).
In the summary at the top, I mentioned the next.js sample I played with a few years back to use simple wordpress + CPT UI + ACF combination. You can browse the source code here: https://github.com/mfyz/next-wp
I hope this article provides a solid foundation for your headless WordPress journey.
In today’s lightning-fast digital landscape, website speed is no longer a luxury – it’s a fundamental requirement. Every developer should possess the knowledge to analyze and optimize web page performance for a seamless user experience. After all, a speedy website translates into higher engagement, lower bounce rates, and ultimately, increased conversions.
The High Cost of Slow Websites
The detrimental effects of sluggish websites are well-documented by numerous studies:
Upward of 25% of users abandon a site if it takes longer than 4 seconds to load Akami Study.
A 3-second delay can lead to a significant drop in engagement, with 22% fewer page views and a 50% higher bounce rate Strangeloop Networks Study.
Conversions take a major hit for websites taking 5 seconds to load, experiencing a decrease of 38% Strangeloop Networks Study.
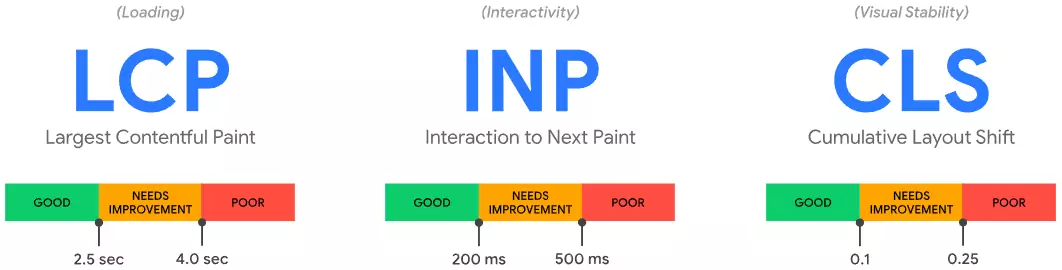
Forget outdated metrics – Google prioritizes Core Web Vitals for website performance evaluation. These metrics measure real-world user experience and directly impact search engine rankings. Here’s a breakdown of the three key Core Web Vitals:
Largest Contentful Paint (LCP): This tracks the time it takes for the largest content element to load. Optimize images and preload content to improve LCP (ideally under 2.5 seconds). Learn more about LCP
Interaction to Next Paint (INP): This metric measures the user’s perceived responsiveness. Aim for an INP of under 50 milliseconds. Learn more about INP
Cumulative Layout Shift (CLS): This metric assesses how much your page layout shifts as elements load. Use pre-defined dimensions for images and avoid lazy loading critical content to minimize CLS (ideally below a score of 0.1). Learn more about CLS
Optimizing for Interactivity
Beyond loading speed, interactivity matters. Here’s how to ensure your page feels responsive:
Time to Interactive (TTI): This measures the time it takes for your page to become fully interactive. Reduce unnecessary JavaScript and optimize critical rendering paths to achieve a TTI under 3.1 seconds. Learn more about TTI
Total Blocking Time (TBT): This metric focuses on how long your main thread is blocked by JavaScript execution. Minimize render-blocking JavaScript and leverage code splitting to keep TBT below 3.1 seconds. Learn more about TBT
Actionable Steps for Improvement
Leverage a CDN: Consider a content delivery network (CDN) to improve content delivery speed for geographically dispersed users. Monitor CDN performance, including cache hit rate and first-byte time. Remember to carefully consider the Time-to-Live (TTL) of your content. A longer TTL can improve performance by reducing the number of requests to your origin server, but it can also lead to stale content if not managed properly.
Minify and Optimize Resources: Reduce file sizes and optimize images for web delivery.
Implement Lazy Loading: Load non-critical content below the fold only when the user scrolls down to improve initial page load.
Utilize Browser Caching: Enable browser caching for static assets to reduce server requests on subsequent visits.
Other Considerations
While Core Web Vitals and interactivity metrics provide a solid foundation, there are other factors to consider for comprehensive website performance optimization:
Network Performance: Although not directly measured by Lighthouse, network response times significantly impact user experience. Tools like Google PageSpeed Insights can help identify network bottlenecks.
Server-Side Optimization: Optimizing server response times and resource processing can significantly improve perceived website performance.
Continuous Monitoring and Improvement
Remember, website performance is an ongoing process. Regularly monitor your website’s performance metrics using tools like Google PageSpeed Insights and Lighthouse. Continuously analyze and optimize your code, content, and infrastructure to ensure a top-notch user experience.
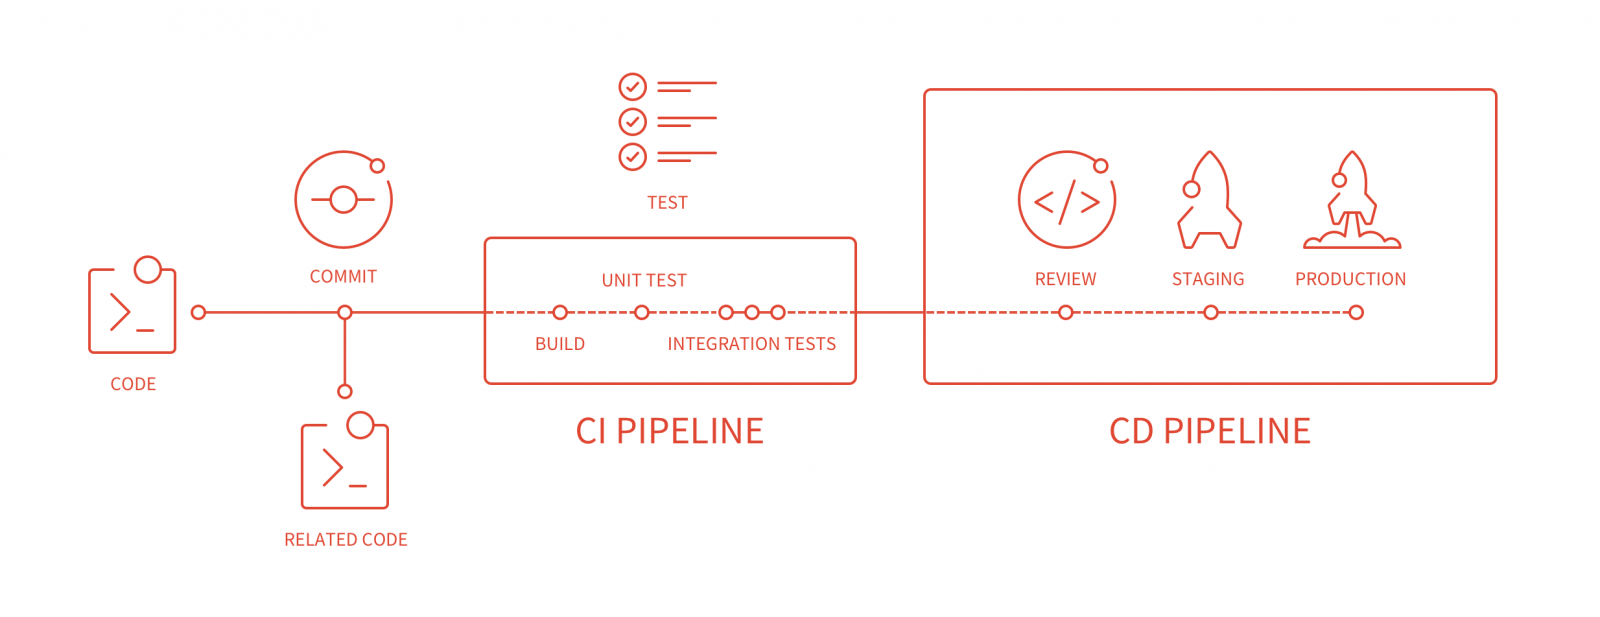
Setting up a project that runs in a web server (consider a traditional server like an AWS EC2 instance) requires you to deploy your code and configure the application. Doing this once may not be a big task but doing it continuously is not. Not to mention it will get impractical. Especially if it’s a project that you work on and maintain actively.
Setting up a good way to deploy your application is one of the key characteristics of a successful development setup. Ideally, your project should have an automated way to deploy, and roll back changes.
It makes a lot of sense of to use version control systems as the base of deployments. VCS systems are about how code changes are tracked by individual developers, comes together and merges back to the main branches. It perfectly fits well to have the capabilities to track deployments to these changes too.
The VCS services like Github and Gitlab now come with powerful CI/CD pipelines supports these use cases almost out of the box.
There are also many ways to achieve what I’m going to describe in this post. But I take this as my bare minimum, plain and simple way to deploy code and perform simple tasks to restart my application automatically as part of my code workflow.
We will be using SSH and RSYNC to update your code remotely, then update the changed/added/deleted files in your target folder then restart your application if needed.
In a PHP-based project, updating files would be enough because apache will be running the scripts in every single request unless you are using a caching module – which even comes with an automatic cache refresh if the file is changed.
If you are deploying a NodeJS (or similar) app that needs to be re-started, then we’ll use remote SSH command to perform a restart operation from your CI/CD pipeline.
Let’s jump right in the .gitlab-ci.yml example and I will point out the key areas in this template.
Running with gitlab-runner 15.4.0~beta.5.gdefc7017 (defc7017)
on green-4.shared.runners-manager.gitlab.com/default ntHFEtyX
section_start:1664673660:prepare_executor
Preparing the "docker+machine" executor
Using Docker executor with image alpine ...
Pulling docker image alpine ...
Using docker image sha256:9c6f0724472873bb50a2ae67a9e7adcb57673a183cea8b06eb778dca859181b5 for alpine with digest alpine@sha256:bc41182d7ef5ffc53a40b044e725193bc10142a1243f395ee852a8d9730fc2ad ...
section_end:1664673666:prepare_executor
section_start:1664673666:prepare_script
Preparing environment
Running on runner-nthfetyx-project-17714851-concurrent-0 via runner-nthfetyx-shared-1664673617-f4952085...
section_end:1664673667:prepare_script
section_start:1664673667:get_sources
Getting source from Git repository$ eval "$CI_PRE_CLONE_SCRIPT"Fetching changes with git depth set to 50...
Initialized empty Git repository in /builds/amazingproject/website/.git/
Created fresh repository.Checking out 7ab562d5 as staging...Skipping Git submodules setup
section_end:1664673681:get_sources
section_start:1664673681:step_script
Executing "step_script" stage of the job script
Using docker image sha256:9c6f0724472873bb50a2ae67a9e7adcb57673a183cea8b06eb778dca859181b5 for alpine with digest alpine@sha256:bc41182d7ef5ffc53a40b044e725193bc10142a1243f395ee852a8d9730fc2ad ...
$ apk update && apk add git curl rsync openssh openssh-client python3
fetch https://dl-cdn.alpinelinux.org/alpine/v3.16/main/x86_64/APKINDEX.tar.gz
fetch https://dl-cdn.alpinelinux.org/alpine/v3.16/community/x86_64/APKINDEX.tar.gz
v3.16.2-221-ge7097e0782 [https://dl-cdn.alpinelinux.org/alpine/v3.16/main]
v3.16.2-229-g1f881aca9b [https://dl-cdn.alpinelinux.org/alpine/v3.16/community]
OK: 17033 distinct packages available
(1/33) Installing ca-certificates (20220614-r0)
.
.
.
(33/33) Installing rsync (3.2.5-r0)
Executing busybox-1.35.0-r17.trigger
Executing ca-certificates-20220614-r0.trigger
OK: 78 MiB in 47 packages
$ git clone https://github.com/MestreLion/git-tools.git && git-tools/git-restore-mtime
Cloning into 'git-tools'...
12,931 files to be processed in work dir
Statistics:
0.57 seconds
13,151 log lines processed
59 commits evaluated
2,204 directories updated
12,931 files updated
$ which ssh-agent || ( apk add --update openssh )
/usr/bin/ssh-agent
$ eval "$(ssh-agent -s)"
Agent pid 54
$ echo "${PRIVATE_KEY}" | tr -d ' ' | base64 -d | ssh-add -
Identity added: (stdin) ((stdin))
$ mkdir -p ~/.ssh$ [[ -f /.dockerenv ]] && echo -e "Host *\n\tStrictHostKeyChecking no\n\n" > ~/.ssh/config$ ssh "$CONNECTION_STR" "mkdir -p $DEPLOY_PATH;";
Warning: Permanently added '199.192.23.254' (ED25519) to the list of known hosts.
$ echo "--------> Copy latest codebase to remote"
--------> Copy latest codebase to remote
$ eval "rsync -avzqR --rsync-path='$RSYNC_BEFORE_HOOK' $RSYNC_EXCLUDES --delete -e 'ssh' ./ '$CONNECTION_STR:$DEPLOY_PATH'"$ ssh "$CONNECTION_STR" "find $DEPLOY_PATH -type d \( -path $DEPLOY_PATH/assets/uploads -o -path $DEPLOY_PATH/application/logs \) -prune -o -exec chmod og-w {} \;"$ cd $CI_PROJECT_DIR && sh ./scripts/notify_slack.sh "${SLACK_CI_CHANNEL}" ":rocket: Build on \`$ENVIRONMENT\` \`$CI_BUILD_REF_NAME\` deployed to $SERVER_NAME! :white_check_mark: Commit \`$(git log -1 --oneline)\` See <https://gitlab.com/amazingproject/website/commit/$CI_BUILD_REF>"
% Total % Received % Xferd Average Speed Time Time Time Current
Dload Upload Total Spent Left Speed
0 0 0 0 0 0 0 0 --:--:-- --:--:-- --:--:-- 0
100 427 0 2 100 425 15 3218 --:--:-- --:--:-- --:--:-- 3259
oksection_end:1664673757:step_script
section_start:1664673757:cleanup_file_variables
Cleaning up project directory and file based variables
section_end:1664673758:cleanup_file_variables
Job succeeded
It runs fast, is almost universal and applicable to any type of codebase, and is extendable. If you need to restart your application by either using process managers or full daemon restart, you can add a new command and use the ssh lines that we remote-execute a command on the server.
Create and use a limited-permission deployer user for better security
A good rule of thumb is to set up a “deployer” user on the server, have the smallest possible permissions to the user, and have the target folder write access so these commands run properly. There is even a way to give sudo rights for specific commands if you really need to execute something with root permissions, without having a full sudo-enabled user account.
Even simpler deployment
Maybe RSYNC is even more complex for your needs. Maybe all you need is to pull the repo on your server initially, and in each deployment run “git pull”. You can simplify this script to get rid of all rsync parts and only have a remote SSH command runs that.
When working with WordPress, there are many occasions you may need a quick spin WordPress environment without dealing with database setup and a web server.
Making WordPress use a SQLite database and run on a native PHP server is surprisingly easy and simple.
I’ve been using this setup for testing plugins, and themes and trash the setup without worrying about it much.
The magic here is mostly automating the installation and configuration of the WordPress instance using wp-cli. It’s very easy to install and run wp-cli from a phar package.
When building a web app, we often use our go-to CSS framework (bootstrap, tailwindcss…) that comes with a lot of useful stuff that normalizes and speeds up our UI building process. Frameworks also come with a lot of baggage, a lot of it. Most of our UIs are not super complex and we don’t use the majority of the CSS frameworks we use. Even when we build and implement your own Design System from scratch, you always will have unused CSS in any given project or application.
PurgeCSS is a great way to optimize your final output to only contain the CSS you need and used. In my simple apps, I’ve implemented PurgeCSS, and I’ve seen between 70-90% final CSS size decrease and a significant render time decrease.
PurgeCSS works with most javascript bundlers and web build tools. It also comes with its own CLI tool. My go-to use case is their seamless integration with TailwindCSS in NextJS builds. Here is a nice guide and the example github repo I put when I was playing with this.
When building modern javascript apps (regardless of browser or server-side use), it’s important to know what your dependencies are and what you utilize from those dependencies. If no care is given to this, your bundle size may end up being very large and result in a non-performant user experience. Especially if this is a browser-based application that every byte matters.
Today, I want to talk about a very effective method to optimize your bundle size called Tree Shaking.
Traditionally, we install a module and import the methods we use from a module. In many modules, the methods in them are not separately exported and are part of a single default export that we object deconstruct from the default import. The most common example of this is:
import { Box } from "@material-ui/core"
This results webpack to bundle all module methods. Even if we don’t use any of them.
There are a couple of ways to avoid this. Some libraries like lodash allow you to install only what you need. Instead of installing the entire lodash library, you can install only the module you need like lodash.get or lodash.trottle.
Another method is the tree shaking where we still install the full library but when we package our bundle, we tell webpack that we are only importing a portion of the larger library.
Another key point to pay attention to about tree shaking is the consistency throughout your code. Make sure every instance of a module’s imports should be done consistently to point module paths. A single instance of a traditional way of importing the module and then deconstructing the parts needed will result in bundling the whole module in your bundle again.
Another reason to look into using the babel plugin is to achieve this automatically.
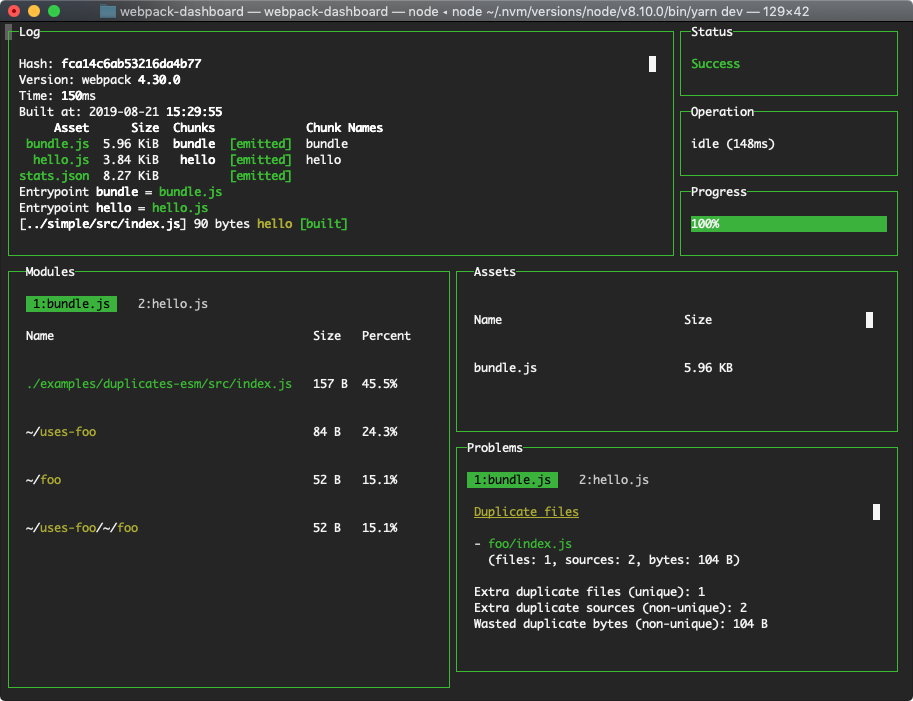
When working on a javascript application (i.e: a react app), you probably work with webpack. Your local development setup will most likely be watching changes on your files and doing repeat builds throughout the development process.
It’s important to get used to webpack output. Being able to pick up important details from it. Webpack output is not particularly difficult but there is a cleaner, more organized way, using webpack-dashboard.
Webpack-dashboard is an interactive command line output that gives you the summary and important stuff you need to see about your build quickly.
jQuery is one of the most useful javascript frameworks makes things a lot easier for a lot of developers.
jQuery also standardizes ways of doing things between different browsers, otherwise, certain implementations would require per-browser treatment.
But as much as jQuery makes things easier for developers, the end result may not be the best. Especially in this day and age, every byte counts towards many different aspects of your website/app’s performance. Page load times, SEO, crawling performance…
A big mistake most web developers do when they start learning web technologies is to learn jQuery very quickly (because the content is abundant about jQuery tutorials and libraries) without knowing underlying technologies and what/how jQuery is helping them to do things quicker.
Why NOT jQuery?
Essentially jQuery is a layer on top of standard Javascript and Web APIs that each browser may or may not support certain aspects or requires separate implementations. So what you are doing at the end of the day is to use Web APIs to interact with DOM on your HTML document and create magic. As much as most of the magic can be created with libraries. Their dependencies and bundled asset size can add up. In some cases – like a WordPress blog and plugins, these assets can add up to a megabyte or more total download size for your web page.
It’s better to be extra paranoid and conservative about what you need and what you can do with vanilla javascript and existing web APIs. Unless you are working with brand new web technology, the majority of what you will need is already very mature and standardized between browsers.
With enough knowledge of the underlying technologies, you can actually see how much you can do without needing jQuery when writing a javascript for a web page you are building.
Here are two great resources compiles the non-jQuery ways of doing things:
Recently, the no jQuery approach became a bigger trend within the web developers communities because everybody is doing an amazing job to optimize their rich web pages and applications to score better on performance, speed.
Looking from a generalist’s eyes, jQuery probably comes very quickly in various types of web frameworks, CMSes, themes to these CMSes. So when it comes to optimizing the speed, one of the biggest questions comes down to cleaning up unused code that is loaded on the web page. In most cases, when using jQuery, you are not utilizing a good chunk of what you create on your web page. It’s not very easy to unbundle and make sure your final page only contains what you make use of on your jQuery-based javascript code.
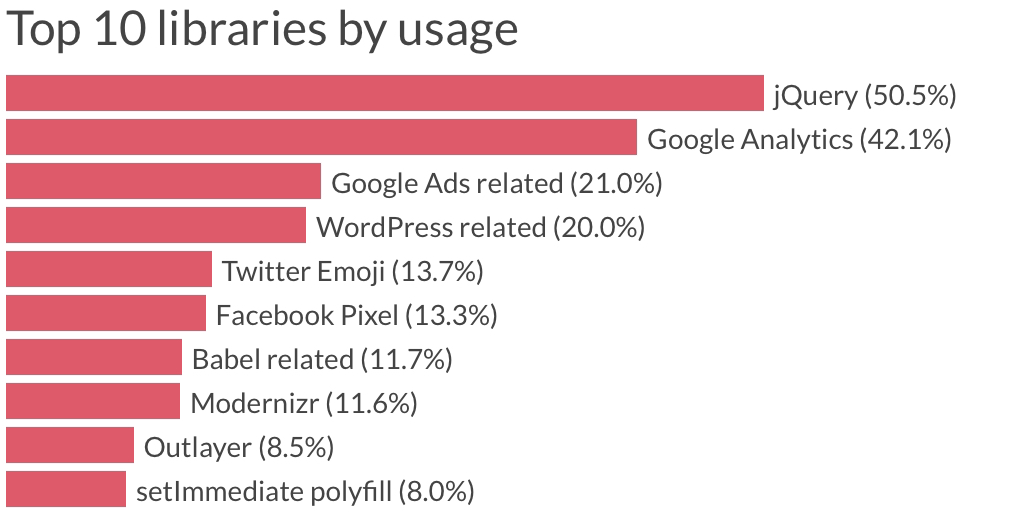
There is a great article: https://catchjs.com/Blog/PerformanceInTheWild that analyzes a large sample set of web pages and finds jQuery being the most common dependency at half of all websites they analyzed.
With enough engineering effort and care, almost all of these pages can do what they do without jQuery and supporting libraries.
That’s why we are seeing more and more libraries that are written in vanilla JS and have no dependencies on other libraries. Most javascript framework/library developers are also proud to advertise their library is X kb in production. And it’s definitely one of the most important factors of a developer making the smart choice of these solutions when creating a web page.
Here is an adjusted version of our internal documentation at Nomad Interactive about our git workflow explained. We almost exclusively write javascript on all platforms (node.js back-end, react.js web front-end, and desktop, react native for mobile with minimal swift and android java for mobile apps). There are a lot of biased opinions and structures in this article that may be too javascript focused but it can be applied to other languages with equivalent solutions.
We want to have a code base and development process with best practices that reflect ideal workflow and produce clean, understandable, testable. This article outlines few key goals we want to achieve with this ideal workflow.
Continuous Integration Requirements (Pipelines)
Clean Code, Unified Developer Language
Development shouldn’t be built around a lot of rules or “musts”. Allowing developers to define their own style is important, but understandable code is one of the most important elements of an effective development team. It’s famously known that big teams (Google, Facebook, Airbnb…) utilizes a large set of rules under a good practice definition that allows every developer to speak the same language and be able to adapt to each other’s code and process very easily.
In order to do that, we will follow similar practices to have our javascript code to be unified in a single style. Few tools we will start utilizing to achieve this.
REQUIREMENT #1: WRITE JS in ES6
We will have a good practice of writing modern ES6 and in this case, we have to, use transpilers (babel, webpack) to compile our code to VanillaJS for plain javascript rendering.
REQUIREMENT #2: Clean code enforced using ESLINT
We inherit Airbnb’s javascript guidelines and write javascript/JSX in the same style. We have built our own eslintrc and maintain that in a separate repository. Our eslint configuration is packaged in an npm package and our project eslint configurations are generally just a few lines and inherit all rules from this package: https://www.npmjs.com/package/@nomadinteractive/eslint-config
We will set up our continuous integration server to only accept error/warning-less code commits.
REQUIREMENT #3: 100% Test passing
We don’t want to worry about breaking stuff, spend time on unnecessary human energy to make sure we cover all regression tests within our development iterations. For this, we need to embrace some form of test-driven development. For each environment and often per-project specific test approach. But we generally do unit testing via jest on our express back-end apps (mostly APIs), some unit testing on web apps but mostly e2e test with puppeteer, and some unit + e2e using detox on iOS and Android apps.
We don’t have any code coverage requirements yet.
Branching and Tagging Practices
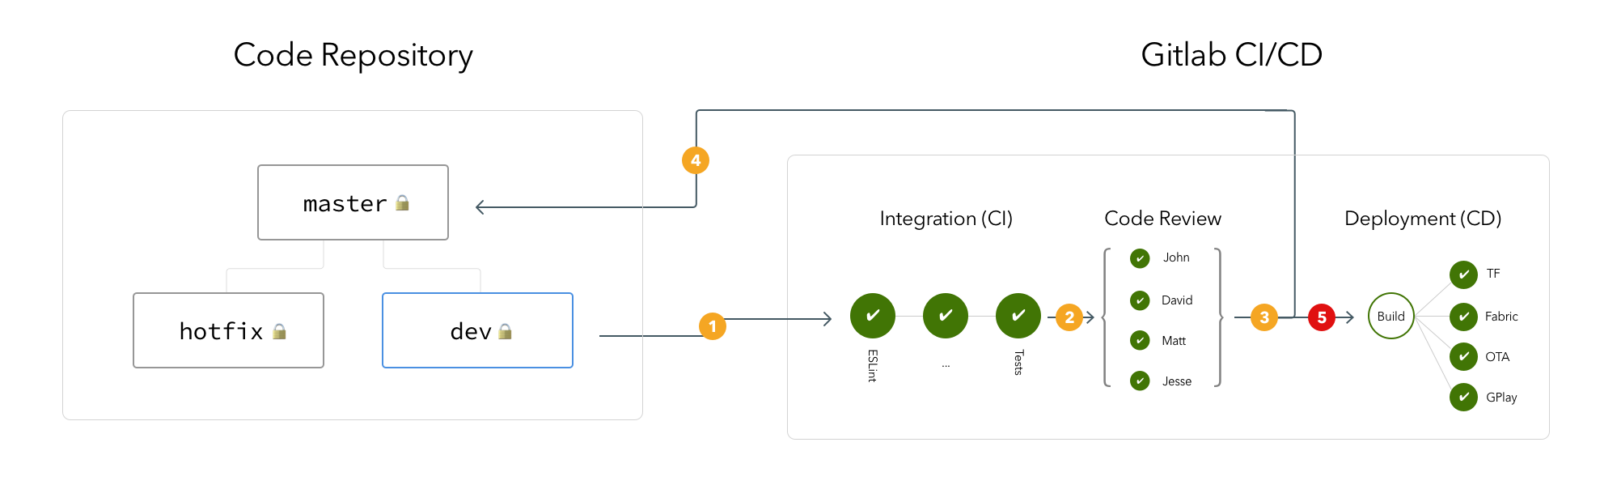
We always lock the master branch for all users except the CI server, locked for pushes and merge requests as well.
Dev branch is also locked for direct commit/pushes. Only pull request and merge requests are going to be allowed.
Development code is pulled or merged to the “dev” branch when the CI pipeline succeeds.
Every developer works on their own local development branches per feature, fix, or other categorized with uniform branch naming strategy.
We should avoid having long-living remote branches other than the protected branches that are specific to a developer – at all costs.
When it’s time to push your changes to a build or the latest development branch where all developers push their branch remote, then merge their code. You can create merge requests to the dev branch from your branch easily on GitLab or GitHub UI or from the command line. Then, the CI server picks up your commit, makes sure your code is clean and acceptable, then it approves and finishes merge to the dev branch. You continue working on your local branch and repeat this process.
Diagram below demonstrates the branching and development workflow.
Automated deliveries
Shipment of the code has to be automated in all cases from development to production submissions. We need to utilize all code distribution methods to automate this workflow.
We currently use Test Flight for iOS apps, Firebase Beta for Android apps. Obviously, web-based apps (both front-end and back-ends) deploy to their respective environments via CD automatically.
For mobile apps (react native), we also utilize Microsoft Code Push for over the air updates for react native apps aside from the bundled native builds to be distributed in the traditional ways mentioned above. This allows us to ship smaller builds faster.
Merge Request Approvals – Code Reviews
We conduct code reviews, every merge request to be assigned to another developer for them to review and approve the changes, then CI will proceed with deployment.
Example
Ethan makes some changes,
Ethan sends merge request to the dev branch,
CI server runs tests and prerequisites for the project, if succeeds,
CI server assigns a random developer (from the approvers’ list) for code review (Let’s say Fatih)
Fatih reviews code on GitLab UI and approve the merge request
CI server finishes CI and CD pipeline (finish merge to dev and if its release, merge it to master and deploy as well).
Based on the team size, we will only enable code review for releases. Making code review part of our regular builds will be an extra step for a remote development team and may cause delays.
CI /CD Pipeline Types
A) Development Merges
Regular code check-ins when finishing sprints, screens, bugfixes, etc. The primary reason to do this as often as possible to sync clean and stable codebase between developers when working on larger/longer builds.
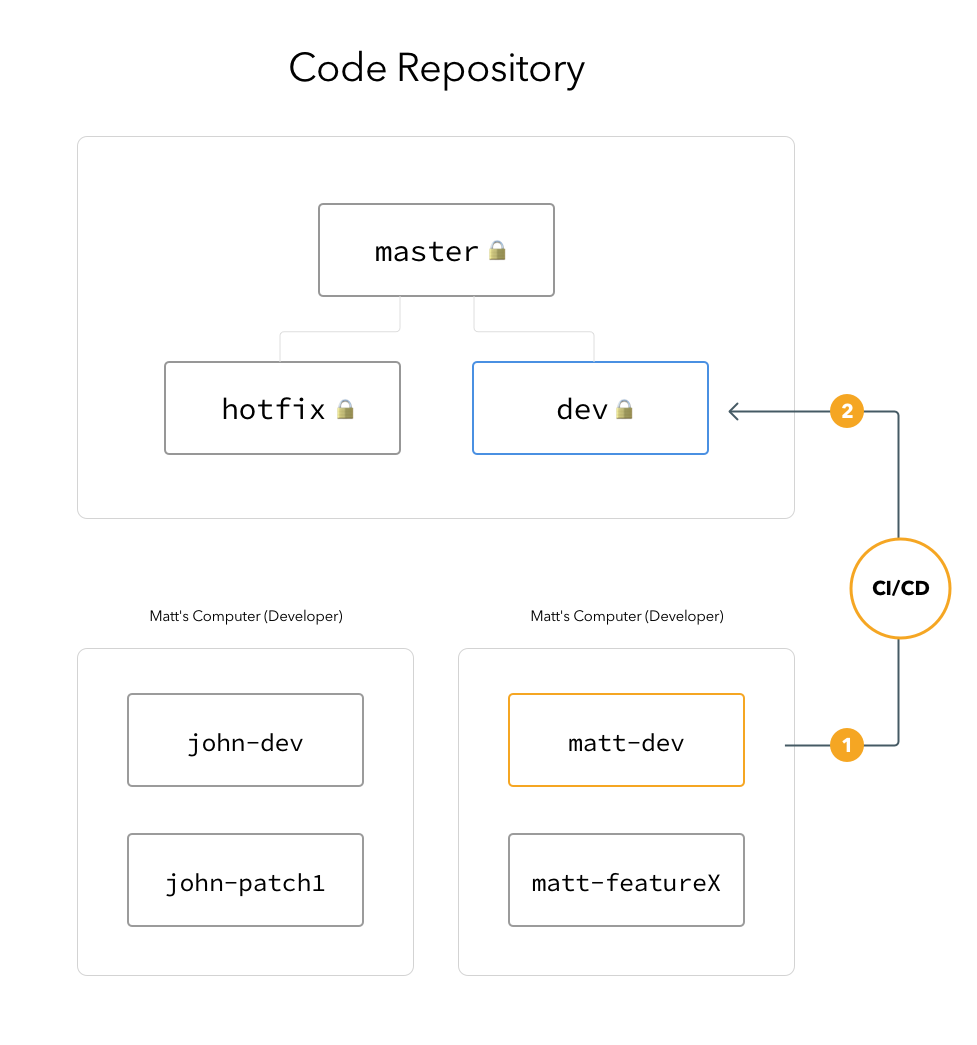
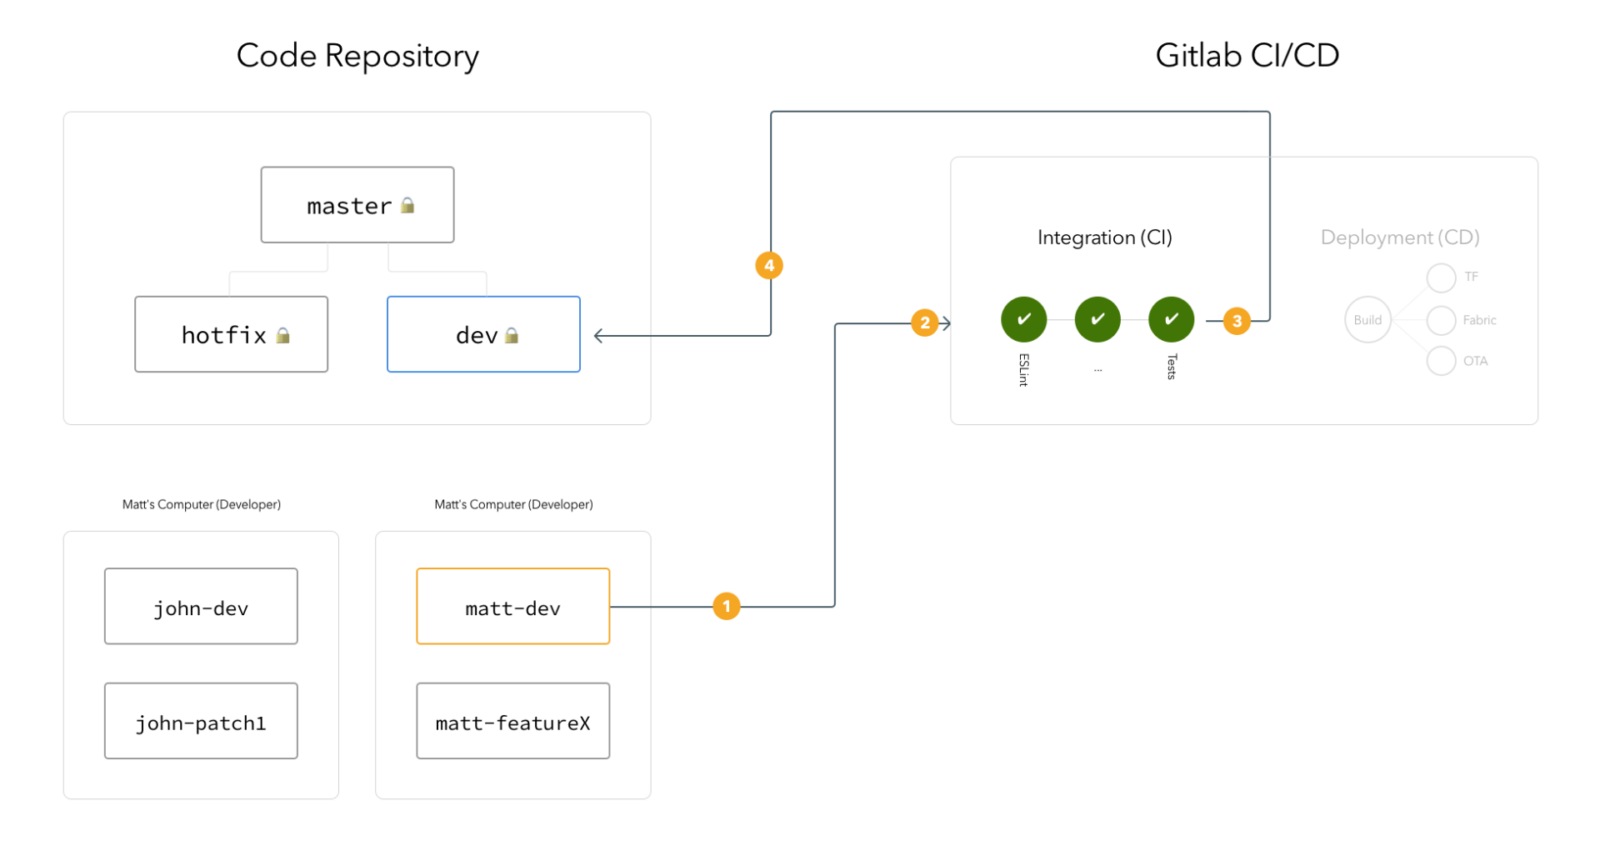
Matt commits and pushes all his changes to his local branch “matt-dev” and created a “merge request” from the matt-dev → dev branch.
Gitlab CI picks up the requests and starts the CI pipeline to check the code.
With successful CI pipeline result, merge request will be approved by the CI server and code will be merged to the dev branch.
With successful build and code change notifications on slack channels, all developers will be able to see any change on the dev branch. Everybody will pull the latest code to their local development branch.
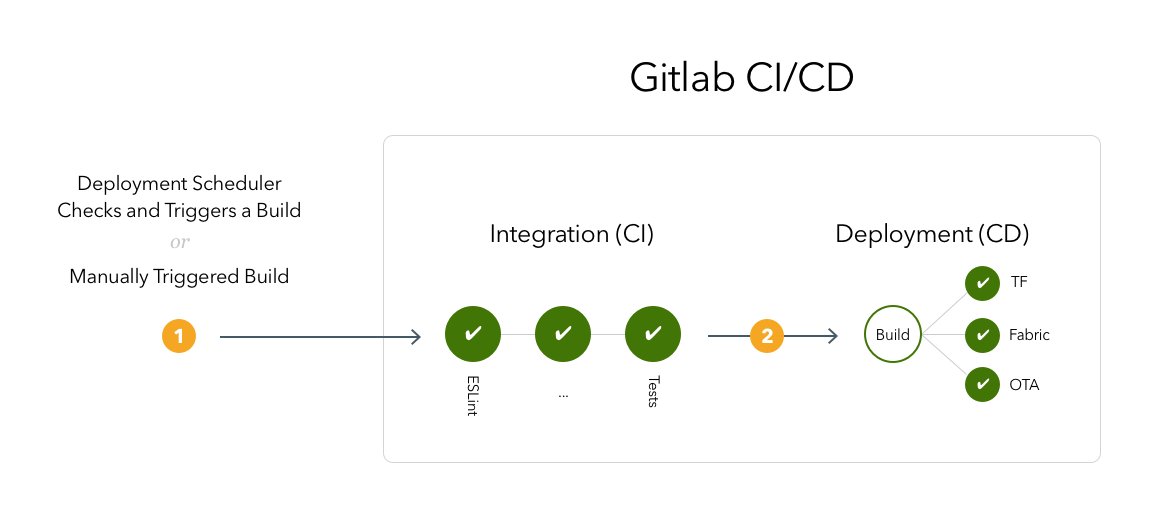
B) Development Builds
Same as Dev CI but triggered with a final build to be pushed for distribution for testing
Deployments (builds) will be triggered either:
Manually over GitLab UI, slack commands, or a potential mobile app, we will build for deployments.
Every morning with a scheduler, if there are merges that are not built yet. This will allow our development pipeline to be always shipping the changes to testable code. This process effectively eliminates the “deployment queue” concept.
Deployments will start with CI pipeline re-run including code quality checks.
CD steps are actually steps in the CI pipeline that are only enabled for deployments. These steps will package and deliver the app bundles to various distribution platforms TF, Fabric/Firebase, OTA based on the platform.
C) Releases (production)
When the development builds are stable and it’s time to package the code for production.
One of the developers of the project takes the lead and manually triggers a release build by creating a merge request from the dev branch to the master branch. CI server picks up this merge request and fires up a CI pipeline.
When the CI pipeline successfully passes, it notifies all “reviewers” defined in the project to review the code. We will have multiple developers and team leads review the code and approve the release.
Once all reviewers approve the merge request and pushed the code to the master branch, the CI pipeline also tags the master branch with the version number of the release,
Gitlab merges the code to master and continues on CI pipeline for the release.
After packaging the app, CD pipelines distribute the app to existing internal distribution services TF + Fabric/Firebase + OTA. On top of this, CD prepares the build on App Store and Google Play for final release operation. Since the App Store uses TF builds as the way to push builds to the app store, we don’t need anything extra on that but we need to implement a way to upload the release build to Google Play as a “Timed Publishing” model.
D) Hotfix releases
This is a special branch that mimics the “dev” branch and has the same release workflow. Hotfix releases have an extra step on the “merge to master” step, it also runs pull operation to the “dev” branch after hotfix changes are merged to master. This makes hotfix changes to become available in the “dev” branch.
I want to talk about a UI framework we have been using at Nomad Interactive for quite some time now on our react.js applications. We have been separating front-end and back-end parts of our apps for many years and for front-end solutions, we have experimented with angular, vue, and some simpler alternatives but eventually we ended up in react.js world and have been exclusively working with react.js on both web, mobile and desktop products we are creating.
And obviously, we are in need of a powerful, rich UI framework to not bog down on basic stuff like form handling, UI elements for user input, or data representations like data tables, charts… And until the frameworks like angular, react, we have used Twitter bootstrap for years and probably used many different versions of the same thing over and over again…
With React, it’s been more stable for us to pick a solution on, let’s say date, time entries on the forms that we use and support the libraries we love. And in the last year and a half, we have started using Ant Design as our primary UI framework which is built on top of bootstrap. Ant Design framework is built by Alibaba team obviously to empower Alibaba products which may not be at the ant design level when you use alibaba.com or its other network sites, but I’m sure at some point they will be at that level. Regardless, the framework has huge designer, developer talent behind it. Occasionally you see just Chinese parts in the documentation but don’t make that scare you, there is also a huge English-speaking developer community behind it as well.
Ant Design is super react.js friendly and everything is very well simplified and streamlined for developers to only worry about the data flow on the app from the back-end APIs through the presenter/controller controllers/classes. We use redux extensively for that.
Eventually, in most cases, we want the same clean and simple representations of UI widgets/elements in a consistent manner. So we find Ant Design’s default state as well as its customization features through simple SCSS or even inherited from package.json through webpack build, which makes things much more atomic designed and configured on our applications.
Ant Design has a huge library of components and well-designed and flexible scaffolding for your layouts.
We benefited so much as far as the consistency of the application layouts we build and common language between our designer and our developer to stick with ant component’s general interactions and obviously layout and other details. Not that we are not customizing ant components, it’s just much easier for our designer to work with since it’s well designed and documented and it’s also easier for our developers to customize it for the same reasons.
Here is the official documentation starting with basics: https://ant.design/docs/react/introduce. You can also dive into the components library and start playing with some of its more complex examples in the demonstration embedded in the documentation.
Working without a code versioning system is unthinkable. And we progressed from the days of svn to git. Despite having a big competitor like the most popular git service is github.com, gitlab.com is for me a more appealing git hosting (and much more) service compared to github.com.
Gitlab is a fantastic platform that is ahead of github.com in certain aspects. We use GitLab as our primary code management, quality control, continuous integration, and deployment platform in our team. Although Microsoft is pushing hard to catch up on the parts (i.e GitHub actions to catch up GitLab CI/CD pipelines) that they follow, and obviously, much more ahead of gitlab.com on other features.
One of the biggest separating factors for gitlab.com is its self-hosted nature of it. IT’s open source license and software that you can install and host on your own infrasture. In some projects or clients, you may want to host your own isolated code revisioning and build platform.
With this nature of it’s licensing model, we first choose to use GitLab self-hosted to run and maintain GitLab versions over years until last year that we migrated to gitlab.com cloud service.
The biggest underlying reason was to not want to maintain gitlab.com hosted versions and be responsible for the server management, updates/upgrades, and stuff. To be honest, in one of the instances, we spent too much time figuring out upgrade details and making sure we didn’t cause any downtime while we performed upgrades. We also rigorously wanted everything running on the docker swarm pool of servers we manage. And Gitlab itself is not the easiest service to get it running with our current toolset of docker/traefik…
Gitlab.com has the exact same licensing structure between the cloud and the self-hosted versions. This is why it doesn’t make any sense to self-host and maintain infrastructure if you don’t have other reasons not using the cloud version of the service. That’s exactly what we were doing and we quickly experimented on few repos to be migrated and see we could have almost no change needed on our CI/CD pipelines settings that were 100% compatible to continue running on the cloud version. It really was seamless to migrate to the cloud version from the hosted version.
Another beauty of using gitlab.com is how easy to set up hosted “runners” and set them up to be used in the cloud repos for CI/CD pipelines. We often have extra build steps that are generally just optional but just because we could run them on our own runners without worrying about build minutes.
I suggest gitlab.com and its cloud version for both basic git hosting use cases as well as more advanced use cases like ci/cd pipelines or even adding 3rd party services on your code quality process.
Many years ago, we used IronWorker as our worker running, management service. We were also delegating all infrastructure resources for the workers that required more and more resources as we scaled our app back then. It was great to have the workers separated from our main applications (API, website…).
Just to give you context, the workers – or background scripts – are generally independent and isolated scripts that run in their own schedules to do one and only one type of task – like sending birthday emails, or calculating an index that will be used for a function on the website that is used frequently. Each worker/script has separate schedules. Some run once a day (generally runs nightly), or some run every hour or some run even more frequently like every 5 minutes or so. There are also workers that are designed to always-run, but these tasks also can be designed and coded as scripts that can run in batches and scheduled accordingly. Workers are mostly packaged, all dependencies included scripts that only require a runtime and its external dependencies like database connection, etc…
We used different solutions in different projects over the years along with cloud services like Iron Worker. But I was never satisfied because I wanted something both convenient as well as had nice web UI to be able to have some control – like start/stop/check status of workers as well as see output and error logs. I also didn’t want to run another daemon for this along with my main application and the workers.
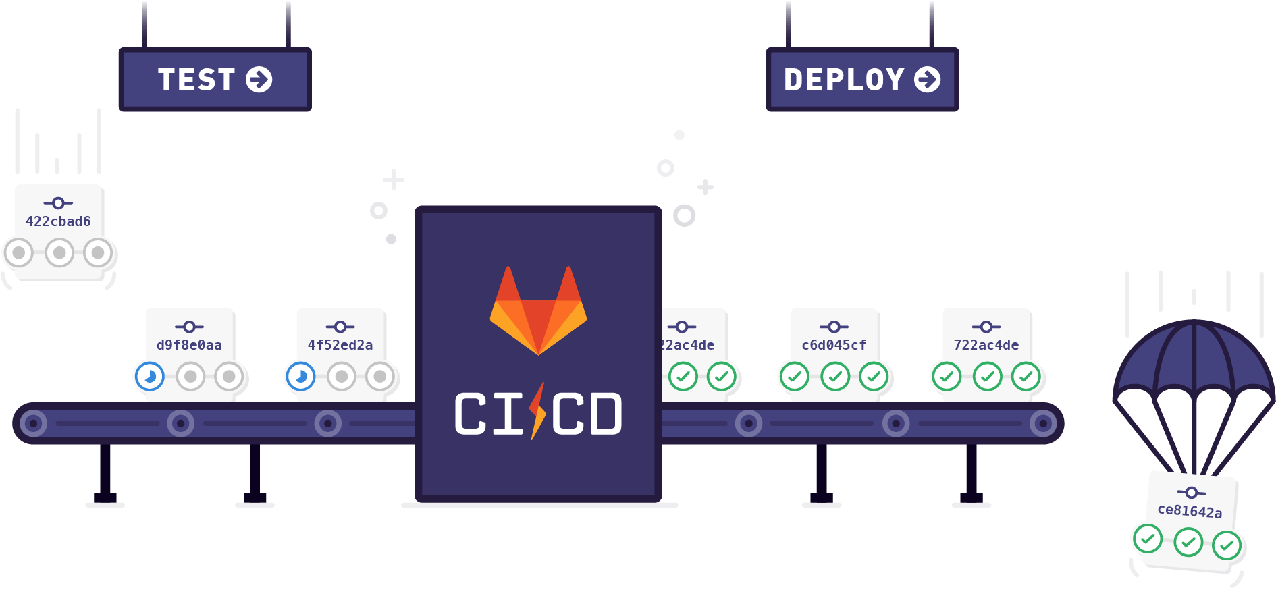
I passively searched for a nice solution for years until I realized when we were using gitlab.com runners to run a lot of our CI/CD pipelines and coded up many CI pipelines included multiple steps, often using 3rd party services and bots to control the flow of the pipelines. At the end of the day, a pipeline was a script (or series of scripts or steps) that runs on a runner, in a temporary container in docker/Kubernetes infrastructure. This allows us to use any tool/script language we want, add many environment preparation steps we want, and see the output of the scripts we run.
Gitlab.com CI/CD pipelines support ways to run a pipeline on a schedule without any other trigger (like code push, merge…). This allows us to design our workers as custom pipeline steps and be able to schedule these steps as we want. We can also pass any payload we want from the schedule configuration as a command-line argument to the pipeline scripts.
When I realized this, I experimented with few personal scripts that crawl, extract and aggregates stuff for myself – like a script that processes new craigslist posts through RSS feeds, cache them, and sends notifications on slack. Also, I was able to run these scripts on my own self-hosted runner that didn’t incur any CI/CD minutes. It was perfect.
You can design, code, and schedule your background scripts/workers as gitlab.com pipeline steps. Running them on either shared cloud runners (gitlab.com gives 400 minutes per project group per month), or use your own self-hosted runner on a docker swarm (or Kubernetes).
We use “react-router” which is a general underlying routing package. And with it, we use react-router-dom which manages routing on web applications together with react-router package.
react-router-dom essentially is a layer on top of the browser’s history API. It tracks URL changes in the browser and maps to a router where it’s defined in a single place on our web apps. Generally named as router or routes.js.
The rest of the app, both programmatically (javascript) or the HTML links uses to root path addresses to request navigation in the router. The rest is handled by react-router.
3 Types of Navigation Requests in React JS Web Applications
1) Links – Replacements of <a> tags in reactjs web apps
We use a special “Link” component from the react-router-dom library that wraps simple links with javascript event handlers and maps directly to react-router where it’s handled as URL change without page refresh.
To use Link component, first import it from react-router-dom package:
import { Link } from 'react-router-dom'
and to use the component:
<Link to="/">...text, button or other elements....</Link>
Keep in mind that <a> tags are still functional but may have complications on the react-router-dom package to capture if the link is internal. Or external so it’s captured properly by react-router-dom.
2) Redirections as Component in “render” methods
This method is not a good practice in my opinion but it’s a quick solution and in some cases where of your page component is directly resulting a redirection all together which will need to be unmounted/destructed and the application has to navigate to another page component. Like unauthorized access, login page, error page redirection…
Simply import and use the “Redirect” component from the react-router-dom package. Here is a scenario in your component render method that your page is resulting in unauthorized access:
if (!authorized) {
    return <Redirect to="/login" />
}
3) Programmatical redirect from javascript
This is probably the most common scenario where a redirect needed when certain user interaction synchronously or asynchronously results in the redirect. Like clicking a button that calls the API and results in the redirect when it successfully resolves.
This case is unfortunately not very straightforward. In order to access history API, you need to configure it as a prop to all components from the router. For this, there has to be a shared history instance of the browser. So at the highest level when we define our router using react-router and react-router-dom package wrappers. We need to create and pass the history instance that will enable the “history” prop in the components so we can push new changes or request navigation to previous steps (going back). We will use the “history” package to create a browser history instance.
For the first time set up, after installing the history package from npm, in your app container. Import “createBrowserHistory” method from the history package. Then call it to create an instance of browser history.
import { createBrowserHistory } from 'history'
const history = createBrowserHistory()
After that, where you define redux Provider, before your root “router” definition, wrap your root router component with BrowserRouter (which you may already have for the react-router-dom package), pass the history instance to your BrowserRouter component as a prop:
You’re ready to start manipulating browser history from your components.
In your components, whenever you need to programmatically redirect, deconstruct (or directly use) “history” object from props of the component. Then, to redirect to a new address:
const { history } = this.props
history.push('/dashboard')
This will initiate react-router-dom to listen to the history instance and resolve the route and re-render the whole app container with the component assigned to the route requested.
Some of these methods feel unnatural but sometimes all we need. Good to know different approaches to initiate dom, native or redux routers in different platforms. The approach above is focused on a web-based application but the same/most approaches can be applied to react-native applications as well.